|
Tutorial dedicado ao aniversário do SimPsp. Dois anos de muito trabalho recheado de alegria. Agradeço a todos que de uma forma ou de outra estão ligados ao SimPSP. Mas, quero fazer um agradecimento, em especial, para a minha querida amiga Marcinha por ter juntado o sonho que ela tinha com o meu para formar e dar vida ao SimPsp.
TRADUÇÕES:
Obrigada aos nossos tradutores!
MATERIAL 1 Tube Flor à sua escolha DecorSimbySoxiki amigasBySoxiki tituloBySoxiki textBySoxikibem DecorSim2bySoxiki
PLUGINS Flaming Pear Italian Editors Effect Filter Factory Gallery M
TUTORIAL 01- Abra o material no psp, duplique e feche os originais. Escolha 3 cores. Foreground: #c9ccd3 Background: #ad95a4 Terceira Cor: #eddb9d
Cor extra: #ffffff (branca)
02 - Abrir uma nova transparência de 900x500px. Prepare um gradiente com as cores do Foreground e Background e pinte a transparência.
03 - Effects > Artistic Effects > Topography.
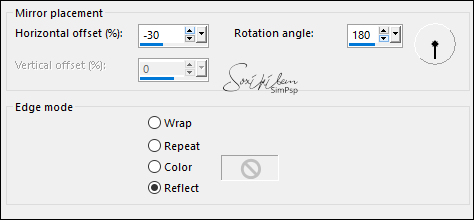
04 - Effects > Reflection Effects > Rotating Mirror.
Effects > Edge Effects > Enhance.
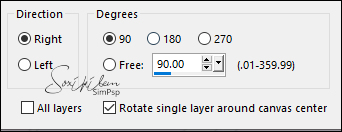
05 - Layers > Duplicate. Image > Free Rotate.
06 - Effects > Plugin It@lian Editors Effect > Vetro
07 - Effects > Plugin Italian Editors Effect > Effetto Fantasma: 41, 41.
08 - Effects > Plugin FM Tile Tools > Blend Emboss: Default.
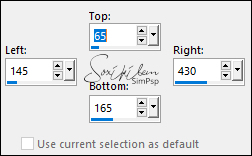
09 - Layers > New Raster Layer. Selection Tool > Custom Selection.
Pintar esta seleção com a cor 3. Selections > Select None.
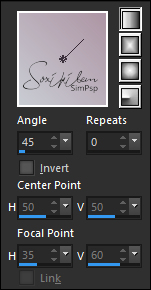
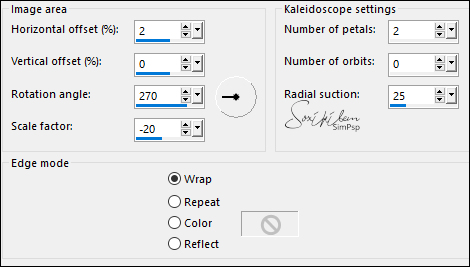
10 - Effects > Reflection Effects > Kaleidoscope.
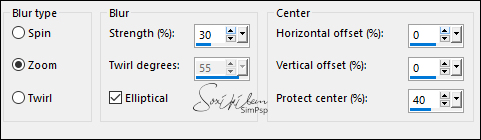
11 - Adjust > Blur > Radial Blur.
Effects > Edge Effects > Enhance. Effects > Plugin Flaming Pear > Transline.
12 - Layers > New Raster Layer. Selection Tool > Custom Selection.
Pintar esta seleção com a cor 3. Selections > Modify > Contract: 5. Pressione a tecla Delete do teclado. Layers > New Raster Layer. Pintar esta seleção com a cor 3. Selection > Modify > Contract: 15. Pressione a tecla Delete do teclado. Mantenher a seleção. Layers > Properties > General > Opacity: 50%. Layers > New Raster Layer. Pintar esta seleção com a cor 3. Selections > Modify > Contract: 5. Pressione a tecla Delete do teclado.
13 - Layers > New Raster Layer. Pintar esta seleção com a cor branca. Edit > Copy no tube das flores. Edit > Paste Into Selection.
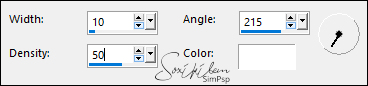
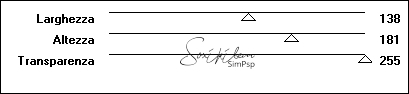
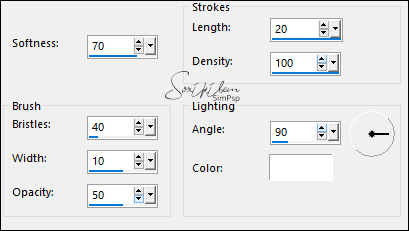
14 - Adjust > Blur > Gaussian Blur: 5. Effects > Art Media Effects > Brush Strokes.
Selections > Select None.
15 - Fechar a visibilidade das layers Raster 1, Copy of Raster 1 e Raster 2. Layers > Merge > Merge Visible.
16 - Com a layer Merged ativada: Layers > Duplicate Com a Ferramenta Pick Tool, posicionar: Position: X 210, Position: Y 180. Layers > Merge > Merge Visible. Layers > Duplicate. Ativar a Layer Merged. Adjust > Blur > Gaussian: 40. Layers > Properties > General > Blend Mode: Screen. Abrir a visibilidade de todas as layers.
17 - Ativar a Layer Copy of Merged. Edit > Copy no DecorSimbySoxiki. Edit > Paste as New Layer. Layers > Duplicate. Ative a Layer Raster 3. Adjust > Blur > Gaussian Blur: 10. Layers > Properties > General > Blend Mode: Screen.
18 - Ativar a Layer do topo. (Copy of Raster 3) Edit > Copy no Tube Floral. Edit > Paste as New Layer. Posicione à direita. Layers > Duplicate. Ativar a Layer Raster 4. Adjust > Blur > Gaussian Blur: 30. Layers > Properties > General > Blend Mode: Multiply. Effects > Plugin Flaming Pear > Transline.
19 - Ativar a Layer Copy of Raster 4 do Tube. Effects > 3D Effects > Drop Shadow: -20, 15, 100, 50, color: #FFFFFF (branca).
20 - Edit > Copy no amigasBySoxiki. Edit > Paste as New Layer. Com a Ferramenta Pick Tool, posicionar: Position X 240, Position Y 300. Layers > Properties > General > Opacity: 25.
21 - Edit > Copy no tituloBySoxiki. Edit > Paste as New Layer. Com a Ferramenta Pick Tool, posicionar: Position X 93, Position Y 357.
22 - Edit > Copy no textBySoxikibem. Edit > Paste as New Layer.
23 - Layers > New Raster Layer. Pintar com a cor 3. Effects > Plugin Filter Factory Gallery M > Ambrosia: Default.
24 - Adjust > Blur > Gaussian Blur: 30. Layers > Properties > General > Blend Mode: Overlay, Opacity: 50%. Image > Mirror > Mirror Horizontal.
25 - Image > Add Borders > Symmetric: 2px - Color 2: background 10px - Color: #FFFFFF (branca) 2px - Color 2: background 50px - Color: #FFFFFF (branca) 2px - Color 2: background
26 - Edit > Copy no DecorSim2bySoxiki. Edit > Paste as New Layer.
27 - Se preferir redimensione seu trabalho.
Aplicar sua marca d'água ou assinatura.
CRÉDITOS Tube Flor by Gabry
Sinta-se à vontade para enviar suas versões. Terei todo o prazer em publicá-las em nosso site.
|