  Tutorial by CidaBen English Translation by Moderation SIM-PSP Original Tutorial 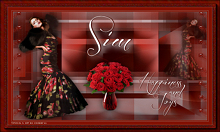
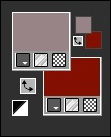
MATERIAL
1 Main Tube of your choice 1 Decorative tube of your choice. Decor: decor_festiv_simpsp_cben título_festiv_simpsp_cben21 título_happiness_and_joys_cben Mask: Narah Mask_1158 * Selections: Save inside PSP Selection folder.  PLUGINS
Mehdi - Vawy Lab 1.1 Mehdi - Shorting Tiles Carolaine and Sensibility Toadies - What are you? I.C.NET Software - Filter Unlimited 2.0 AAA Frames Tutorial created in PSP
2020 Ultimate.
TUTORIAL
1 -
Open the material on the PSP, duplicate and close the
original.
Choose two colors
for: Foreground #988486 and Background #831100
And two extra colors:
Extra color 1 > #1e0500 Extra color 2 > #FFFFFF 2 -
Open a new transparent image of
800 X 500 px.
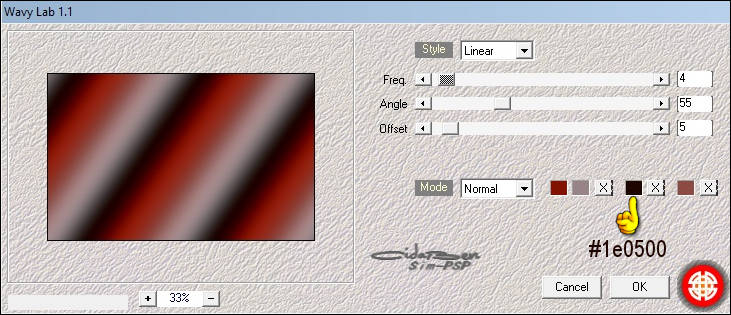
Effects > Plugins > Mehdi > Wavy
Lab 1.1:
Change only the
third color to the extra color 1 you chose:
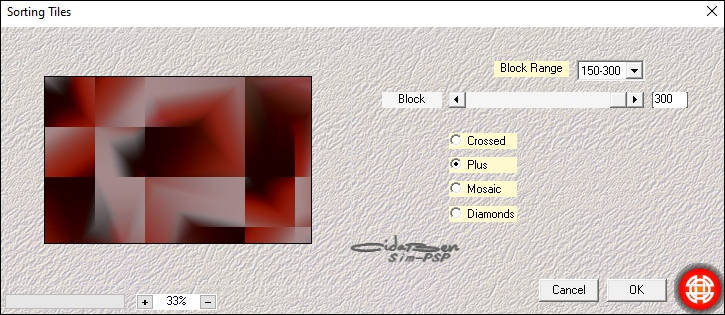
 3 - Effects > Plugins > Mehdi > Sorting
Tiles:
 4 - Layers > Duplicate.
Image > Mirror > Mirror
Horizontal.
Layer
> Properties > General > Opacity:
50%
Layer > Merge > Merge
Down.
Adjust
> Sharpness > Sharpen.
5
- Selections > Load /Save
Selection > Load Selection From Disk >
festiv_simpsp_cben1
Selections > Promote
Selection to Layer.
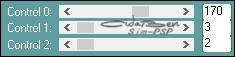
6 - Effects > Plugins > Carolaine and Sensibility >
CS-LDots:
7
-
Selections > Select
None.
Adjust >
Sharpness > Sharpen.
Layers > Duplicate.
İmage
> Mirror > Mirror Horizontal.
Layers >
Merge > Merge Down.
Layers >
Duplicate.
8 - Effects > Plugins
> Toadies > What Are
You?
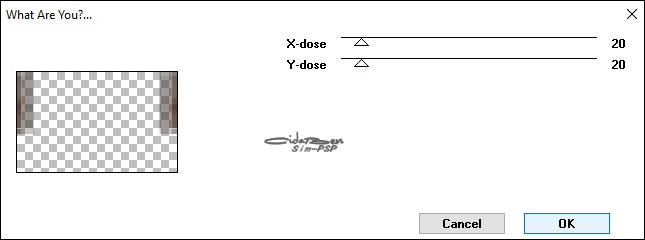
9 - Layers >
Merge > Merge Down.
Adjust > Sharpness > Sharpen.
Activate
Layer Raster1.
10 - Selections > Load
/Save Selection > Load Selection From Disk >
festiv_simpsp_cben2
Selections > Promote Selection to
Layer.
Effects > Plugins > Carolaine and Sensibility > CS-DLines:
Selections
> Select None
Adjust >
Sharpness > Sharpen
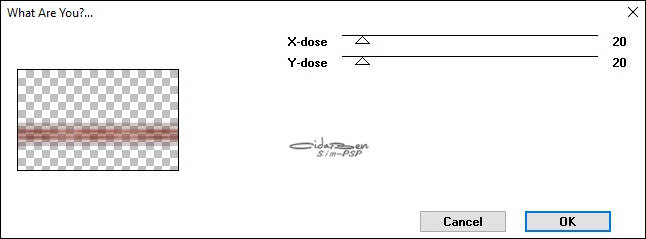
11 - Effects > Plugins > Toadies > What Are
You?
 12 - Adjust > Sharpness > Sharpen
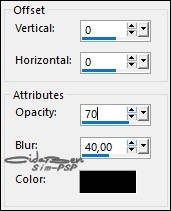
Effects > 3D Effect > Drop
Shadow:
13 - With the
Pick Tool tool, position:
Position X 0,00
> Position Y 248.
Layers >
Duplicate
14 - With the Pick Tool tool, position: Position X 0,00
> Position Y -30. 15 - Layers > Merge > Merge
Down.
Activate Layer Raster1. 16 - Selections > Load /Save Selection > Load Selection From
Disk > festiv_simpsp_cben3
Selections >
Promote Selection to Layer.
Effects > Plugins > Carolaine Sensibility > cs-Texture 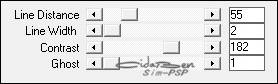
Selection > Select None.
17 - Layers > Duplicate.
Image >
Mirror > Mirror Horizontal.
Layers >
Merge > Merge Down.
Layers >
Properties > General > Blend Mode: Overlay
Activate
Layer Raster1.
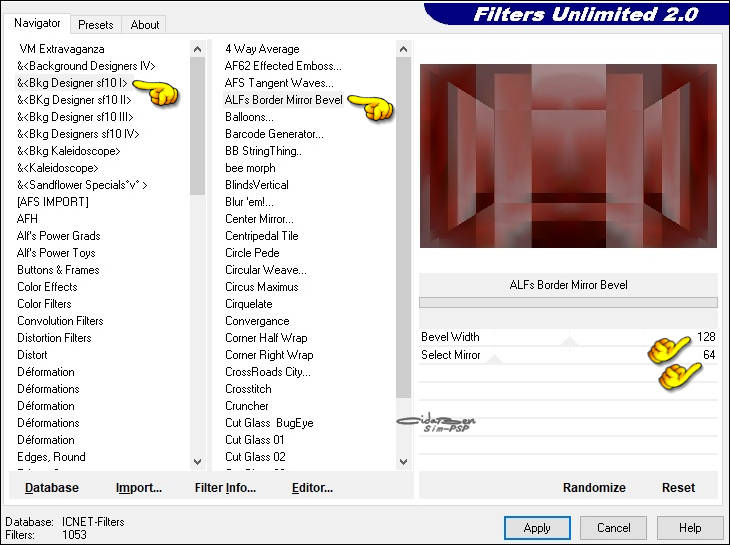
18 -
Effects >
Plugins > I.C.NET Software > Filter Unlimited
2.0 > Bkg Designer Sf 10I >
ALFs Border Mirror Bevel:
19 - Adjust > Sharpness > Sharpen.
Layer > New Raster Layer.
Fill with white color: #FFFFFF.
20 - Layers >
New Mask Layer > From image >
Narah_Mask_1158
Effects > Edge
Effects > Enhance.
Layers > Merge
> Merge Group
21 - Layers >
Properties > General > Blend More: Soft Light - Opacity 80%
Layers >
Duplicate.
Image > Mirror
> Mirror Horizontal.
Layers > Merge
> Merge Down.
Image > Mirror
> Mirror
Vertical.
Activate the Top
Layer.
22 - Edit
> Copy > decor_festiv_simpsp_cben.
Edit > Paste as new layer.
Adjust > Sharpness > Sharpen.
23 - Edit > Copy
> Main Tube tubenarapamplona.742 Edit > Paste as new layer. Image > Resize > 65% > all layers unchecked (if using material tube). Image > Mirror > Mirror horizontal. Posicione à esquerda. (como no exemplo da minha versão)
Adjust > Sharpness > Sharpen.
Effects > 3D
Effects > Drop Shadow: 0 > 0 > 70 > 40 > color:
#000000
24 -
Layers > Duplicate. Image > Mirror > Mirror Horizontal. Image > Resize > 60% > all layers unchecked (if using material tube.) Effects > Image Effects > Offset: * If you are using another tube, place it on top to the right) 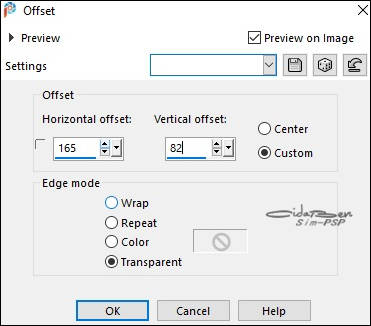
Layers > Properties
General > Opacity: 45%
25 - Edit > Copy
the Tube Decorative Grisi_Tube_Decoration_318.
Edit > Paste as
new layer.
Image > Resize
> 60% > all layers unchecked.
Position in the
center as in the example of my version.
Adjust > Sharpness
> Sharpen
Effects > 3D
Effects > Drop Shadow: 0 > 0 > 70 > 40 > color >
#000000
26 - Edit > Copy
> título_SIM_cben.
Edit > Paste As
New Layer.
Position in the
center at the top.
Colorize if desired.
Adjust > Sharpness
> Sharpen.
27 - Edit > Copy
> título_happiness_and_joys_cben.
Edit > Paste As
New Layer.
Position in the
lower right corner.
Colorize if desired.
Adjust > Sharpness
> Sharpen.
28 - Image > Add borders >
Symmetric: 1px > color: Foreground #988486
Image > Add
borders > Symmetric: 5px > color: Background #831100
Image > Add borders > Symmetric: 1px > color: Foreground #988486 Image > Add
borders > Symmetric: 15px > color: Background #831100
Image > Add
borders > Symmetric: 1px > color: Foreground #988486
29 - Selections > Select All. Image > Add
borders > Symmetric: 30px > color: Background #831100
Selections >
Invert.
30 - Adjust >
Add/Remove Noise > Add Noise...
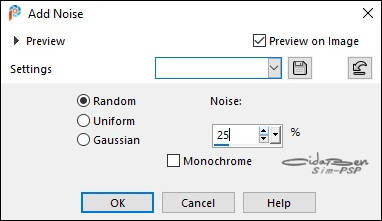 Adjust > Sharpness >
Sharpen.
Selections > Invert.
Effects > 3D Effectas > Drop
shadow: 0 > 0 > 100 > 40 > cor preto
#000000
Selections > Invert.
31 -
Effects > Plugins > AAA Frames > Foto Frame:
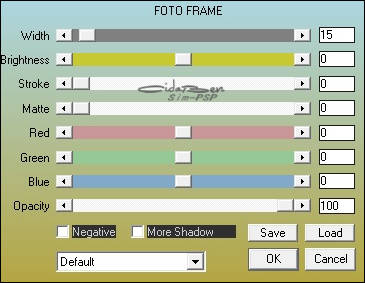 Selections > Select None.
32 - Aplicar
sua marca d'água ou assinnatura.
File > Export > JPEG Optimizer.
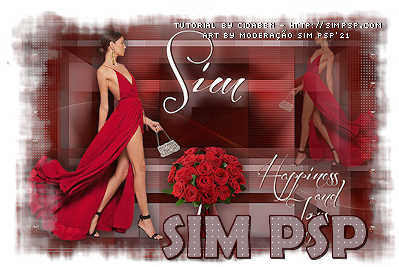 CREDITS: Tutorial by CidaBen English Translation by Moderation SIM-PSP Main Tube: Tubed by LB Tubes & Mists D ecorative Tube: Tubed by GrisiMaks: by NarahMask Feel free to send your versions. I will be happy to publish them on our website.
|