|
TRADUÇÕES:
Obrigada aos nossos tradutores!
Material: 1 Tube a sua escolha Narah_Mask_1201 loveisintheair_bykel'skreations decor_loveisintheair alpha_loveisintheair
Plugins: AAA Frames > Foto Frame FM Tile Tools > Saturation Emboss Mehdi > Vibrations, Weaver. Simple > Plizza Slice Miror
Execução: 01- Abrir o material no PSP, duplique e
feche o original.
02- Abrir o alpha_loveisintheair. Pinte com o gradiente formado pelas cores escolhidas:
03- Effects > Plugin Mehdi > Vibrations.
04- Effects > Plugin Simple > Plizza Slice Miror.
05- Layers > Duplicate. Image > Mirror > Mirror horizontal Layers > Properties > General >Opacity: 50% Layers > Merge > Merge Down.
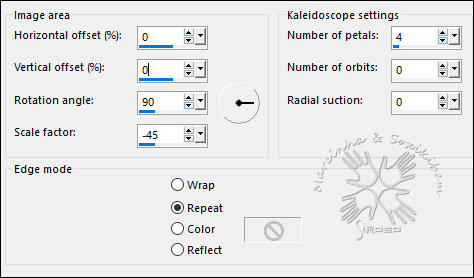
06- Effects > Reflection Effects > Kaleidoscope.
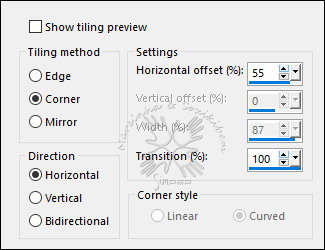
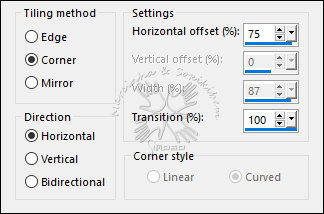
07- Effects > Image Effects > Seamless Tiling.
08- Selections > Load/Save Selection > Load Selection From Alpha Channel: Selection#1. Selections > Promote Selections to Layer.
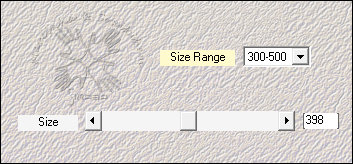
09- Effects > Texture Effects > Tiles.
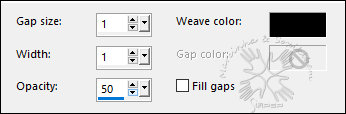
10- Effects > Texture Effects >Weave. Com a cor do Foreground.
11- Selections > Select None.
12- Filters Unlimited 2.0 > Bkg Designer sf10 I > Cruncher: 91, 35.
13- Layers > Properties: Blend Mode Overlay.
14- Adjust > Sharpness > Sharpen.
15- Ativar a layer Raster1.
16- Selections > Load/Save Selection > Load Selection From Alpha Channel: Selection 2. Selections > Promote Selection to Layer. Layers > Arrange > Bring to Top.
17- Selections > Select None. Plugin Alien Skin > Eye Candy 5 Impact > Glass. Settings: Clear, Bevel Profile Button.
18- Ativar a layer Raster1. Effects > Texture Effects > Blinds.
19- Layers > New Raster Layer. Pintar com a cor branca.
20- Layers > New Mask Layer > From Image: Narah_Mask_1201. Layers > Merge > Merge Group. Layers > Arrange > Move UP.
21- Ativar a layer Promoted Selection 1. Layers > Duplicate.
22- Effects > Image Effects > Seamless Tiling.
23- Layers > Duplicate. Image > Mirror > Mirror Horizontal. Layers > Merge > Merge Down.
24- Layers > Duplicate. Effects > Image Effects > Seamless Tiling: Default.
25- Plugin Mehdi > Weaver
26- Plugin FM Tile Tools > Saturation Emboss: Deafult.
27- Layers . Arrange > Move Down.
28- Ativar a layer Copy of Promoted Selection1. Layers > Merge > Merge Visible.
29- Plugin AAA Frames > Foto Frame.
30- Edit > Copy no Tube. Edit > Paste a New Layer. Posicione à direita. Effects > 3D Drop Shadow: Como preferir.
31- Edit > Copy no loveisintheair_bykel'skreations. Edit > Paste a New Layer.
32- Edit > Copy no decor_loveisintheair. Edit > Paste a New Layer.
33- Com a ferramenta Pick Tool configure Postion X e Position Y: Positon X 73,00, Position Y 74,00.
34- Layers > Merge > Merge Visible. Plugin AAA Frames > Foto Frame.
35- Se você desejar, redimensiona seu trabalho. Aplicar sua marca d'água ou assinatura. File > Export > JPEG Optimizer.
Tutorial by Marcinha & Soxikibem'20
Créditos:
Tube: Tubedy by
Maryse
Sinta-se à vontade para enviar suas versões.
Terei todo o prazer em publicá-las em nosso site.
|