|
TRADUÇÕES:
Obrigada aos nossos tradutores!
MATERIAL 1 tube Misted de Flor à sua escolha Narah_Mask_1262 4maos_decor1_pipink 4maos_decor2_pipink 4maos_titulo_pipink
PLUGINS Greg's Factory Output Vol II Medhi Unlimited 2.0 > Déformation VM Distortion VM Toolbox °V° Kiwi's Oefilter
Roteiro: 01- Abrir o material no PSP, duplique e feche o original. Escolher duas cores para trabalhar. 1- Foreground #a8546b 2- Background #f1decb cores extras: 3- #ffffff 4- #77153c
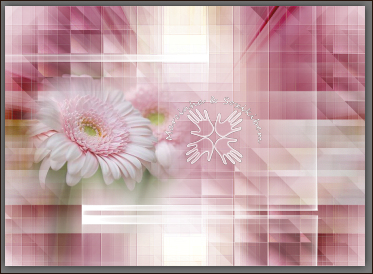
02- Abrir uma imagem transparente de 900x650px. Effects > Plugin Medhi > Wavy Lab 1.1:
03- Layers > Duplicate Image > Mirror > Mirror horizontal Layers > Properties > Genenal >Opcaity: 50 Layers > Merge > Merge Down
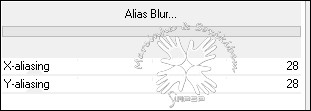
04- Effects > Plugin Unlimited 2.0 > Déformation > Alias Blur...
05- Layers > Duplicate Image > Mirror > Mirror horizontal Layers > Properties > Genenal >Opcaity: 50 Layers > Merge > Merge Down
06- Effects > Edge effects > Enhance. Edit > Repeat Enhance Edges
07- Layers > New Raster Layer. Selections > Select All. Edit > Copy no Tube Misted flor. Edit > Paste Into Selection. Selections > Select None.
08- Adjust > Blur > Motion Blur: 180, 100. Edit > Repeat Motion Blur. Effects > Edge Effects > Enhance. Edit > Repeat Enhance Edges.
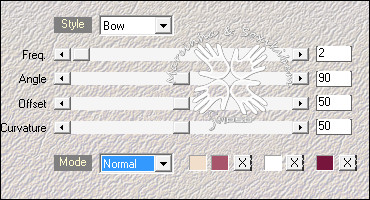
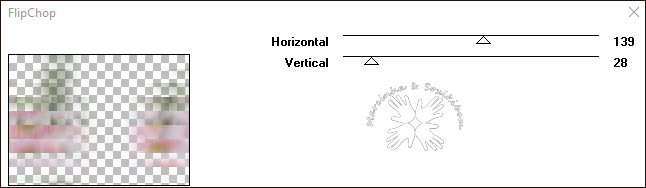
09- Plugin VM Distortion > FlipChop.
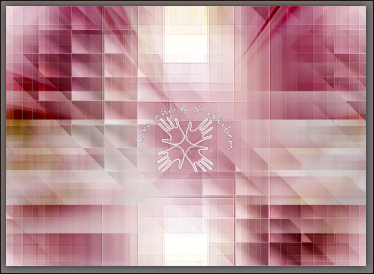
10- Layers > Duplicate. Plugin Simple > Diamonds. Layers > Properties > General > Blend Mode: Soft Light. Effects > 3D Effects > Drop Shadow: 1, 1, 100, 0, cor preta.
11- Plugin °V° Kiwi's Oefilter > Setzboard: 23.
12- Ativar a layer Raster 2. Filters Unlimited 2.0 > Special Effects 1 > Shiver: 76, 137.
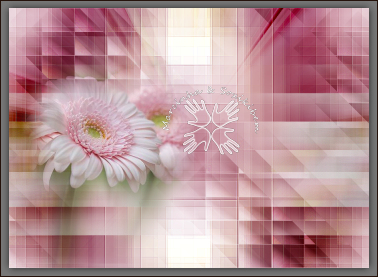
13- Edit > Copy no Misted Flor. Edit > Paste a New Layer. Posicione como no print abaixo.
Adjust > Sharpness > Sharpen.
14- Plugin VM Toolbox > Zoom Blur: 194, 35. Layers > Properties > General > Blend Mode: Burn.
15- Ativar a layer Copy of Raster 2. Edit > Copy no Misted Flor. Edit > Paste a New Layer. Posicione como no print abaixo.
Adjust > Sharpness > Sharpen.
16- Layers > New Raster Layer. Pintar essa layer com a cor branca. Layers > New Mask Layer > From Image: Narah_Mask_1262. Layers > Merge > Merge Group. Image > Mirror > Mirror Horizontal. Adjust > Sharpness > Sharpen.
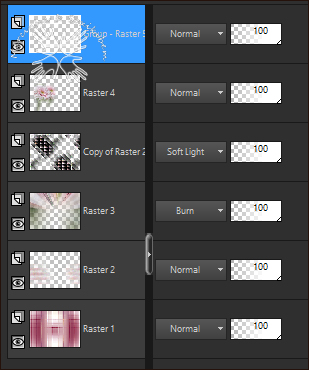
17- Confira as layers.
Mude o Blend das layers se preferir.
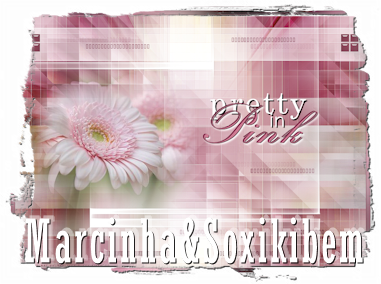
18- Edit > Copy no 4maos_decor1_pipink. Edit > Paste a New Layer. Com a ferramenta Pick Tool posicione: Position X 0, POsition Y 33.
19- Edit > Copy no 4maos_decor2_pipink. Edit > Paste a New Layer. Com a ferramenta Pick Tool posicione: Position X 0, POsition Y 58.
20- Edit > Copy no 4maos_titulo_pipink. Edit > Paste a New Layer. Com a ferramenta Pick Tool posicione: Position X 480, POsition Y 201.
21- Image > Add Borders: 1px com a cor mais escura escolhida (Cor 4) Edit > Copy. Selections > Select All. Image > Add Borders: 10px com qualquer cor. Selections > Invert. Edit > Paste Into Selection.
22- Adjust > Blur > Gaussian Blur: 20. Plugin Greg's Factory Output Vol II > Pool Shadow.
Selections Select None.
23- Image > Add Borders: 1px com a cor mais escura escolhida (Cor 4) 10px na cor branca 1px com a cor mais escura escolhida (Cor 4) 10px na cor branca 5px com a cor mais escura escolhida (Cor 4)
24- Se você desejar, redimensione seu trabalho. Aplicar sua marca d'água ou assinatura. File > Export > JPEG Optimizer. CRÉDITOS Tutorial by Marcinha & Soxikibem'20 Tube: Tubed by Nikita WordArt by Soxikibem
Sinta-se à vontade para enviar suas versões. Teremos todo o prazer em publicá-las em nosso site.
|