|
Nas telas do PSP, arte se
faz,
Soxikibem - Owner SIM PSP - Inglaterra/2024
TRADUÇÕES: Obrigada aos nossos Tradutores
MATERIAL: 1 Misted Personagem à sua escolha Outros Materiais by Soxikibem
PLUGINS: AAA Frames > Foto Fame Filter Factory Gallery D > Shoutin'! Filters Unlimited 2.0 > Bkg Designer sf10 II > Line Side Line Italian Editors Effect > Mosaico Virtual Painter > Virtual Painter 4
Este Tutorial foi escrito por Soxikibem, qualquer semelhança é mera coincidência. Tutorial testado e revisado pela
Owner/Moderadora Márcinha.
2 - Abra uma imagem transparente de 900x600px. Pintar com a cor do Foreground. Selections > Select All.
3 - Edit > Copy no Misted Personagem. Edit > Paste Into Selection. Selections > Select None. 4 - Effects > Image Effects > Seamless Tiling: Default. Adjust > Blur > Radial Blur.
5 - Layers > Duplicate. Plugin Filter Factory Gallery D > Shoutin'!.
6 - Selections > Select All. Selections > Float. Selections > Defloat. Selections > Modify > Select Selection Borders.
7 - Layers > New Raster Layer. Ative a ferramenta Flood Fill Tool e baixe em Opacity para 20%. Pintar com a cor do Backgorund esta seleção.
Nota: Retorne em opacity para 100%.
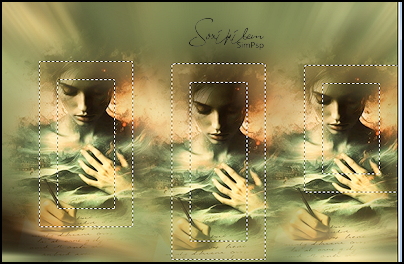
8 - Edit > Copy no misted personanem. Edit > Paste As New Layer. Com a ferramenta Move posicione a imagem encaixando na moldura da esquerda. Paste As New Layer novamente e encaixe na moldura central. Paste As New Layer novamente e encaixe na moldura da direita.
9 - Selections > Invert. Com a layer Raster 5 ativa > Aperte a tecla Delete. Ative a Layer Raster 4 > Aperte a tecla Delete. Ative a Layer Raster 3 > Aperte a tecla Delete.
10 - Selections > Invert. Com a layer Raster 3 ativada... Effects > Texture Effects > Blinds com a cor do Foreground.
Adjust > Sharpness > Sharpen.
11 - Ative a Layer Raster 4. Effects > Texture Effects > Tiles.
12 - Ative a Layer Raster 5. Effects > Texture Effects > Weave, com a cor: #000000 (preta).
13 - Mantenha a seleção... Layers > Merge Down: 2 vezes. Layers > Arrange > Move Down.
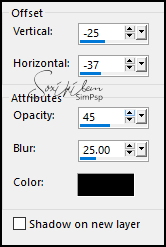
14 - Effects > 3D Effects > Drop Shadow.
15 - Ativar a Layer Raster 2. Layers > New Raster Layer. Effects > 3D Effects > Cutout.
16 - Selections > Select None. Coma Ferramenta Magic Wand > Mode: Add (Shift), selecione o meio dos retângulos.
17 - Ative a Layer Raster 1. Selections > Promote Selection to Layer. Layers > Arrange > Move Up. Effects > Texture Effects > Fine Leather, com a cor do Foreground.
18 - Edit > copy no misted personagem. Edit > Paste As New Layer. Use a ferramenta Move para posicionar no retângulo esquerdo uma parte do misted. Edit > Paste As New Layer novamente e posicione outra parte do misted para o retângulo do meio. Edit > Paste As New Layer novamente e posicione uma parte do misted para o terceiro retângulo.
19 - Layers > Merge > Merge Down 2 vezes. Selections > Invert. Aperte a tecla Delete do teclado.
20 - Selections > Invert. Layers > New Raster Layer. Effects > 3D Effects > Cutout.
Selections > Select None.
21 - Ativar a layer Copy of Raster 1. Effects > Reflection Effects > Rotating Mirror.
22 - Effects > Image Effects > Seamless Tiling.
23 - Plugin Italian Editors Effect > Mosaico.
24 - Filters Unlimited 2.0 > Bkg Designer sf10 II > Line Side Line.
Layers > Properties > General > Blend Mode: Lighten ou outro que preferir. Effects > 3D Effects > Drop Shadow: -27, -17, 100, 0, cor #000000 (preta).
25 - Ativar a layer Raster 1. Plugin Virtual Painter > Virtual Painter 4.
26 - Fechar a visibilidade das layers Copy of Raster 1 e Raster 1. Layers > Merge > Merge Visible. Pick Tool: Position X: -4, Position Y: 54. Abra a visibilidade de todas as layers. Layers > Merge > Merge Visibile.
27 - Plugin AAA Frames > Foto Fame.
28 - Plugin AAA Frames > Foto Fame.
29 - Edit > Copy no tituloSim_BySoxikibem. Edit > Paste As New Layer. Pick Tool: Position X: 42, Position Y: 147.
30 - Se você desejar
redimensione seu trabalho.
Versão:
Créditos: Formatação, Arte Final e Tutorial by Soxikibem Tube Principal: Tubed by Pqna&Alice Outros Materiais: by Soxikibem
Sinta-se à vontade para enviar suas versões. Terei todo o prazer em publicá-las em nosso site.
|


