Tutorial by
Tati Designs
MATERIAL 1 Tube Principal TD_Canal_Alfa_Kniri TD_Deco1_Kniri TD_Titulo_Kniri TD_WordArt_Kniri TD_Mask_Kniri TD_Grad_Kniri (Save to the PSP Gradient folder.)
PLUGINS
Toadies / Weaver ** Import this filter with "Unlimited". There are people who have had problems with the "Factory Gallery B / Circulator" filter, its result did not match mine, which meant that the effects of the following steps did not work as they should either. I have added an "Option B" for Steps 29 and 31.
IMPORTANT
Colors
Color palette the borders.
TUTORIAL
01 - Open the material on the PSP, duplicate and close the original. In your Materials palette: Foreground color (2) # 705278 Background color (3) # a289c3
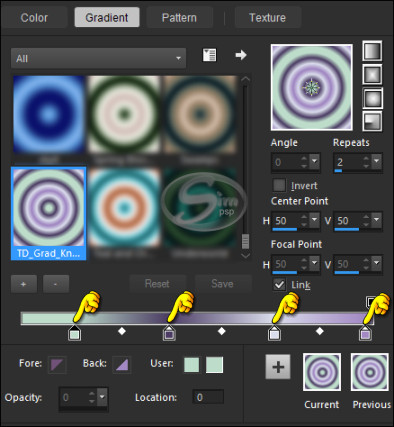
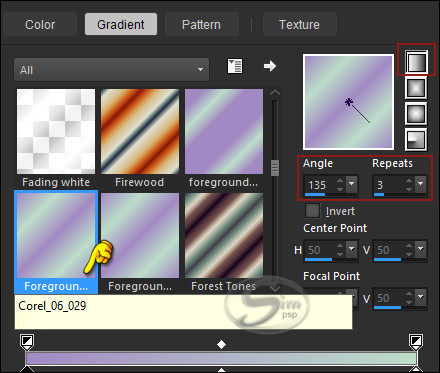
02 - Click on the foreground color and choose the supplied gradient, "TD_Grad_Kniri":
Note: You can customize the gradient with your own colors: Click on the indicated colors and change to the colors you choose. When you're done, click "Save" and give it a new name.
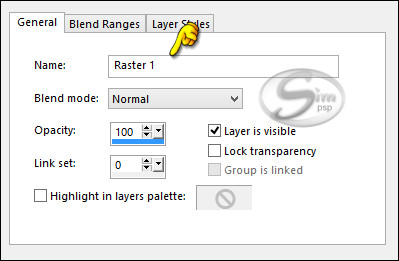
03- Open the file "TD_Canal_Alfa_Kniri.pspimage". Layers > Properties > General > Name: Raster 1
04- Fill your transparent image with the foreground
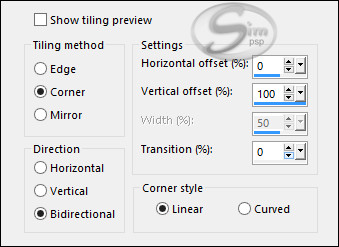
gradient. 05- Effects > Image Effects > Seamless Tiling:
06- Adjust > Blur > Gaussian Blur: 50
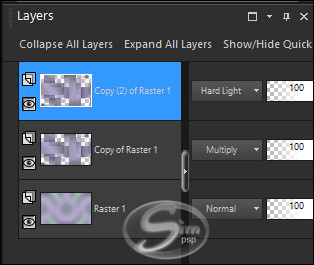
07- Layers > Duplicate.
08- Effects > Texture Effects > Weave. Weave color: color 1 #4c3d64 Gap Color: #FFFFFF (white)
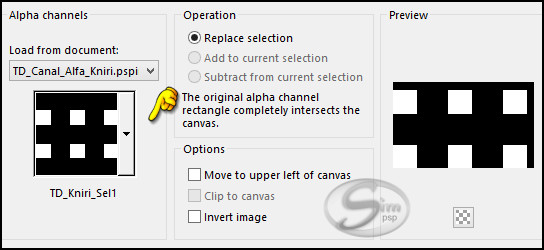
09- Selections > Load/Save Selections > Load Selection from Alpha Channel: "TD_Kniri_Sel1"
10- Press the "Delete" key on your keyboard.
11- Selections > Select None.
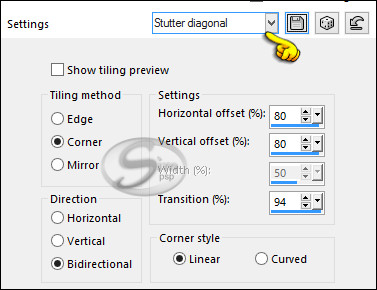
12- Effects > Image Effects > Seamless Tiling: Stutter diagonal
13- Image > Resize: 105% (Unchecked "Resize all layers").
14- Adjust > Sharpness > Sharpen.
15- Layers > Properties > General > Blend Mode: Multiply
16- Layers > Duplicate.
17- Layers > Properties > General > Blend Mode: Hard Light
18- Activate Layer Raster 1.
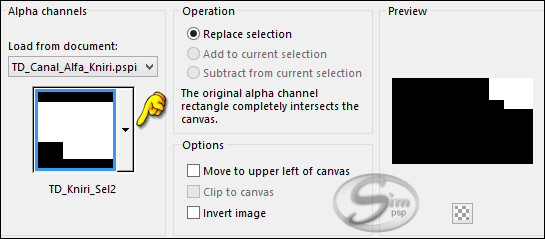
19- Selections > Load/Save Selections > Load Selection from Alpha Channel: "TD_Kniri_Sel2"
20- Selections > Promote Selection to layer.
21- Selections > Select None.
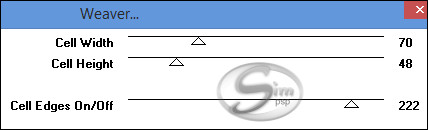
22- Effects > Plugins > Toadies > Weaver:
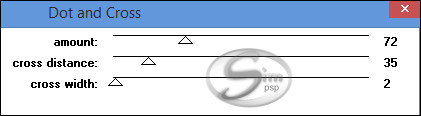
23- Effects > Plugins > Penta > Dot and Cross:
24- Layers > Properties > General > Blend Mode: Burn
25- Activate Layer Raster 1.
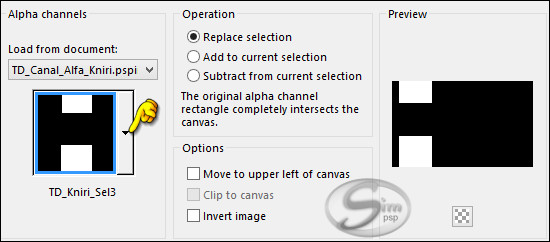
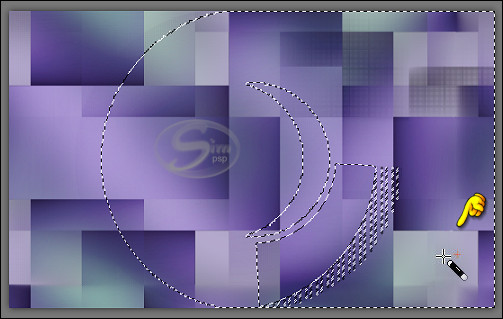
26- Selections > Load/Save Selections > Load Selection from Alpha Channel: "TD_Kniri_Sel3"
27- Selections > Promote Selection to layer.
28- Selections > Select None.
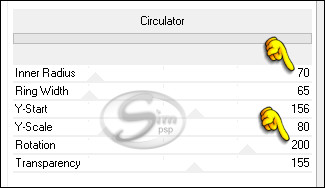
29- Effects > Plugins > Filters Unlimited 2.0 > Filter Factory Gallery B > Circulator. Option B: Before applying the filter, put the color #ffffff in the background
30- Image > Rotate right. Edit > Repeat > Rotate right.
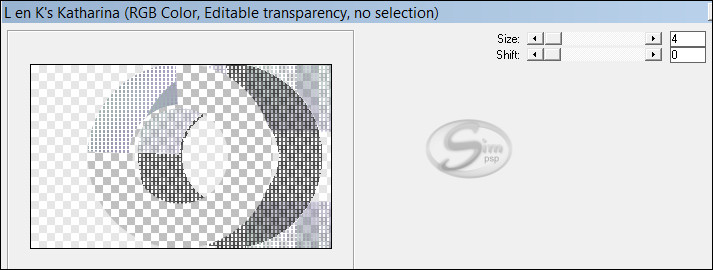
31- Effects > Plugins > L&K landksiteofwonders > L en K's Katharina: Option B: Before applying the filter, put the color (3) # a289c3 in the background
32- Effects > Plugins > Transparency > Eliminate White.
33- Image > Rotate Left Edit > Repeat > Rotate Left
34- Layers > Properties > General > Blend Mode: Multiply
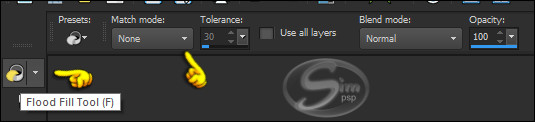
35- Activate the "Magic Wand" Tool, Tolerance and
Feather to 0.
36- Activate the "Flood Fill" Tool (F) and change the Setting Mode to "None":
37- Layers > New Raster Layer and fill the selection with the color (2) # 705278
38- Selections > Select None.
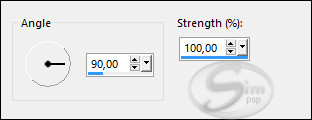
39- Adjust > Blur > Motion Blur: Angle 90, Strength 100.
40- Edit > Repeat > Motion Blur.
41- Layers > Properties > General > Blend Mode: Overlay
42- Effects > Edge Effects > Enhance More.
43- Activate Layer Copy (2) of Raster 1
44- In your Materials palette: Foreground color (3) #a289c3 Background color (4) #bddcca
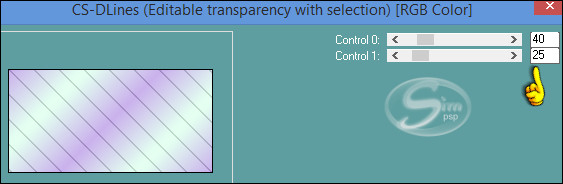
45- Click on the foreground color and prepare a "Foreground-background" gradient (Corel_06_029):
46- Layers > New Raster Layer.
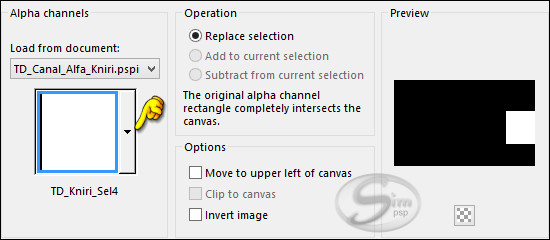
47- Selections > Load/Save Selections > Load Selection from Alpha Channel: "TD_Kniri_Sel4"
48- Fill the selection with the gradient. Keep the selection!
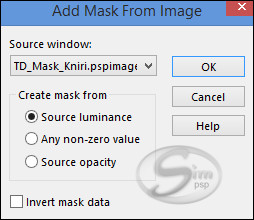
49- Effects > Plugins > Filters Unlimited 2.0 >Tramages > Tow The Line
50- Selections > Select None.
51- Layers > Properties > General > Blend Mode: Soft light
52- Layers > New Raster Layer.
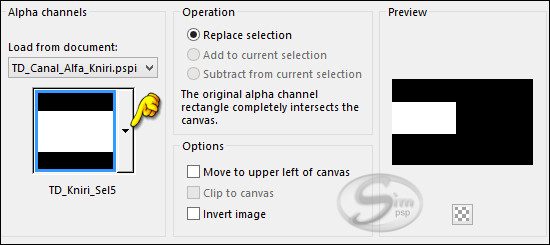
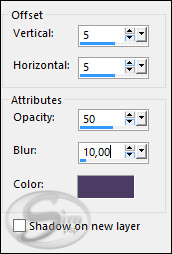
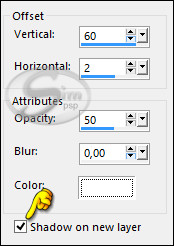
53- Selections > Load/Save Selections > Load Selection from Alpha Channel: "TD_Kniri_Sel5"
54- Fill the selection with the gradient. Keep the selection!
55- Effects > Plugins > Carolaine and Sensibility > CS-DLines:
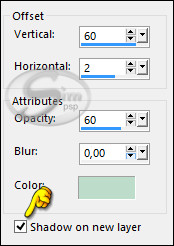
56- Selections > Select None.
57- Layers > Properties > General > Blend Mode: Multiply
58- Layers > New Raster Layer and fill with the color (4) #bddcca
59- Layers > New Mask Layer > From image: TD_Mask_Kniri
60- Layers > Merge > Merge Group.
61- Layers > Properties > General > Blend Mode: Dodge - Opacity: 50
62- Edit > Copy the "TD_Deco1_Kniri"
63- Effects > 3D Effects > Drop Shadow: 5 / 5 / 50 / 10 / Color: (1) #4c3d64
64- Edit > Copy the "TD_Titulo_Kniri"
65- Activate the "Pick" Tool (K) and modify the positions of X (726.00) and Y (219.00):
66- Effects > 3D Effects > Drop Shadow: 60 / 2 / 60 / 0 / Color: (4) #bddcca
67- Effects > 3D Effects > Drop Shadow: 60 / 2 / 50 / 0 / Color: #FFFFFF
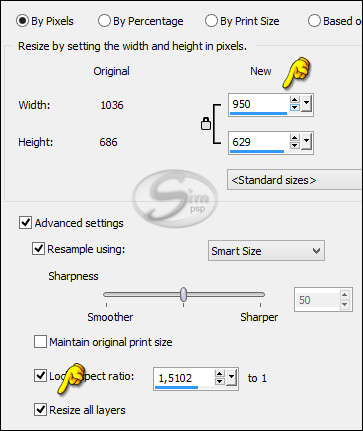
68- Activate the top layer (Raster 6 layer)
69- Edit > Copy the "TD_WordArt_Kniri"
70- Activate the "Pick" Tool (K) and modify the positions of X (11.00) and Y (149.00):
71- Effects > 3D Effects > Drop Shadow: 5 / 5 / 50 / 10 / Color: (1) #4c3d64
72- Layers > Properties > General > Opacity: 75
73- Color palette used for the borders.
Image > Add Bordes > 1px - simmetric - color: #332973 Image > Add Bordes > 3px - simmetric - color: #745adc Image > Add Bordes > 1px - simmetric - color: #332973 Image > Add Bordes > 10px - simmetric - color: #c8bcfe Image > Add Bordes > 1px - simmetric - color: #332973 Image > Add Bordes > 15px - simmetric - color: #ffffff Image > Add Bordes > 1px - simmetric - color: #5c47c3 Image > Add Bordes > 35px - simmetric - color: #ffffff
74- Edit > Copy the Jeanne_Woman_16_01_2021 (or
main tube of your choice).
75- Activate the "Pick" Tool (K) and modify the positions of X (358.00) and Y (31.00) If you use another tube skip this step.
76- Effects > 3D Effects > Drop Shadow: 10 / 0 / 80 / 50 / color: #000000
77- Image > Add Bordes > 1px - simmetric - color: #332973
78 - Image > Resize: 950 Width - all layers checked
79- Adjust > Sharpness > Sharpen.
80- Apply your watermark or signature. File > Export > JPEG Optimizer.
CREDITS:
Versão by Márcinha - Owner SIM PSP
CREDITS: Art by Márcinha - Tutorial Kniri by Tati Designs - Main Tube: Tubed by Lily
Versão by Soxikibem - Owner SIM PSP
CREDITS: Art by Soxikibem - Tutorial Kniri by Tati Designs - Main Tube: Tubed by Nicole
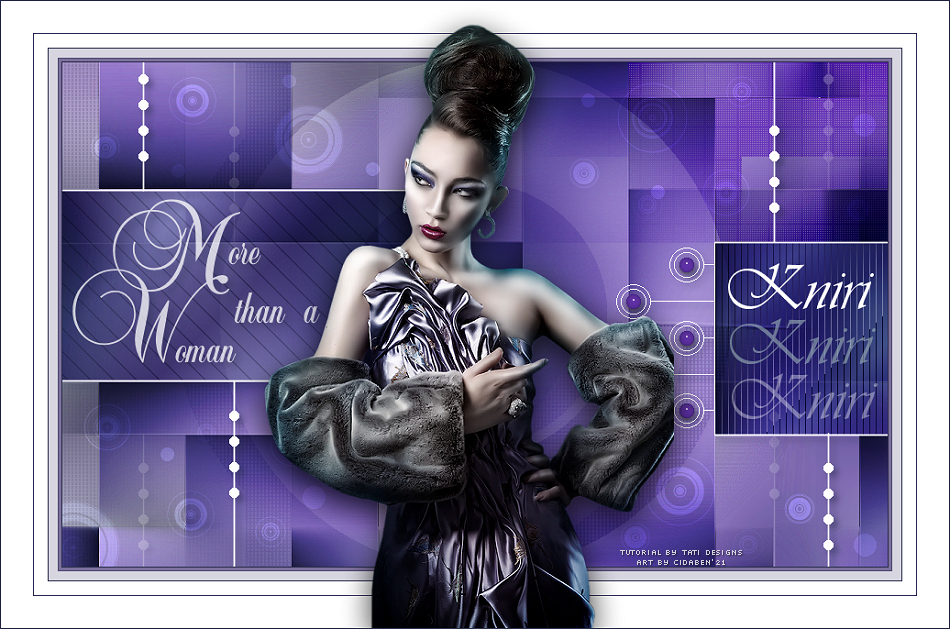
Versão by CidaBen - Moderação SIM PSP
CREDITS: Art by CidaBen - Tutorial Kniri by Tati Designs - Main Tube: Tubed by KarineDreams
Versão1 by RobertaMaver - Moderação SIM PSP
CREDITS: Art by RobertaMaver - Tutorial Kniri by Tati Designs - Main Tube: Tubed by Animabelle
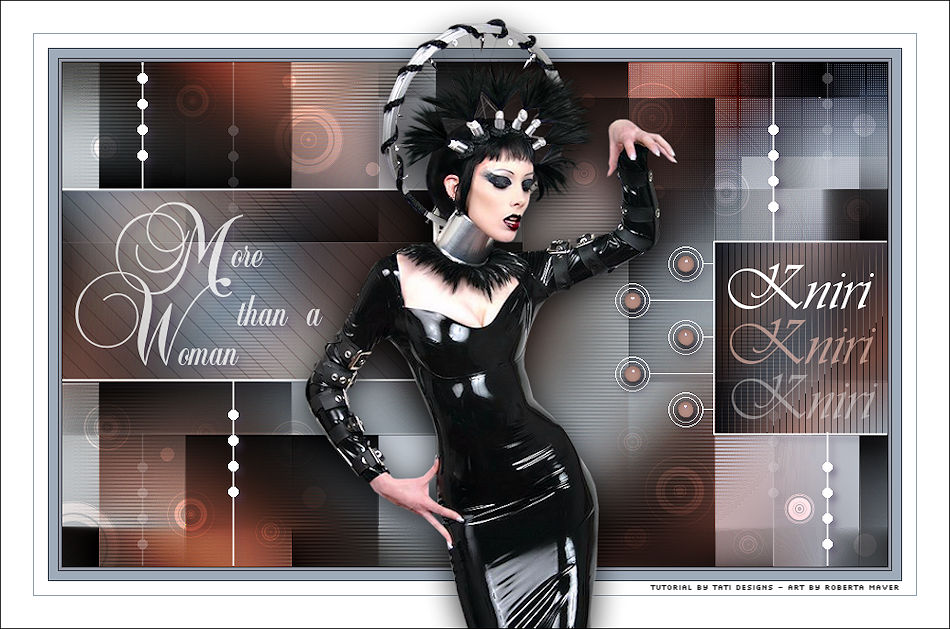
Versão2 by RobertaMaver - Moderação SIM PSP
CREDITS: Art by RobertaMaver - Tutorial Kniri by Tati Designs - Main Tube Tubed by Jeanne
Feel free to send your versions.
|