|
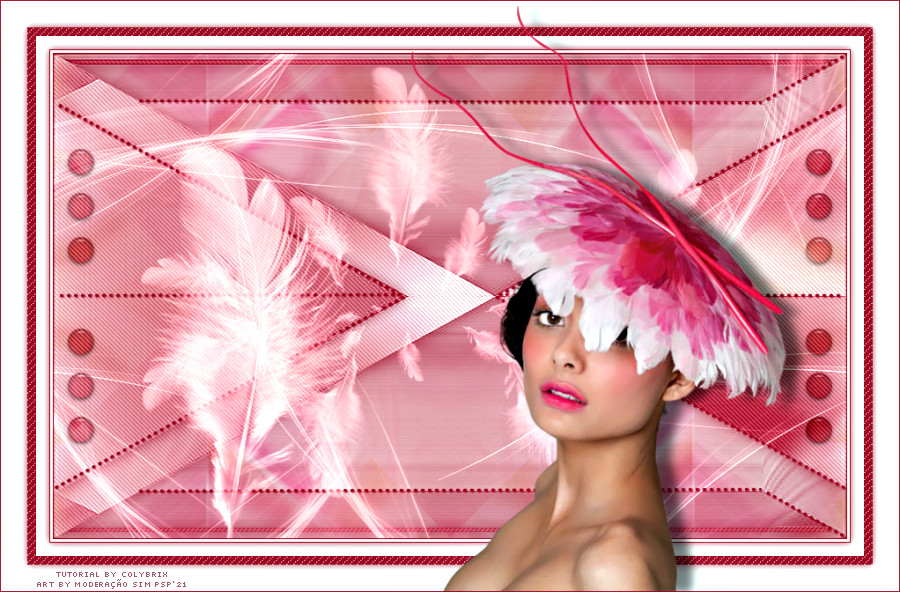
Tutorial by Colybrix Traduzido para o Português pela Moderação do SIM PSP Tutorial Original:
MATERIAL 1 Tube Principal Todos os demais materiais foram fornecidos por Colybrix. Dê um duplo clique no Preset Glass coly 01, ele será instalado em seu plugin
PLUGINS
VM Distortion
CORES: Escolher 2 cores para trabalhar + a cor #FFFFFF (branca)
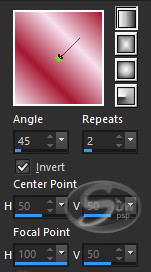
Cor 1: #a51832 - Foreground Clique no Foreground e prepare um gradiente "Foreground-background": Linear
TUTORIAL
01 - Abrir o material no PSP, duplique e feche o original. Abra o arquivo Alpha Plumes
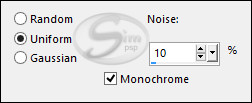
02- Pinter com o Gradiente. Adjust > Blur > Gaussian Blur: 25 Adjust > Add/Remove Noise > Add Noise
03- Layers > New Raster Layer. Selections > Select all. Edit > Copy no Tube femme755-coly. Edit > paste into selection. Selections > Select None.
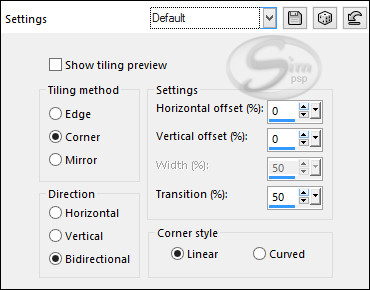
04- Effects > Image Effects > Seamless Tiling: Default
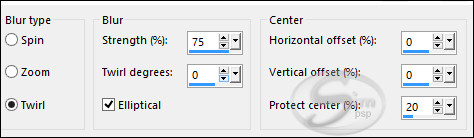
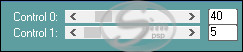
05- Adjust > Blur > Radial Blur:
06- Effects > Edge effects > Enhance. Layers > Merge > Merge Down.
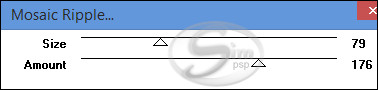
07- Effects > Plugins > VM Distortion > Mosaic Ripple
08- Effects > Plugins > Simple > Half Wrap. Effects > Plugins > Simple > Blintz.
09- Layers > Duplicate. Image > Mirror > Mirror Vertical. Layers > Properties > General > Blend Mode: Screen Layers > Merge > Merge Down.
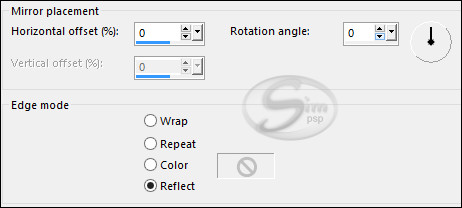
10- Effects > Reflection Effects > Rotating Mirror:
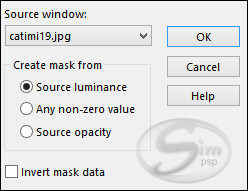
11- Layers > New Raster Layer. Pintar com a cor do Foreground (cor escura) Layers > New Mask Layer > From image: catimi19
Layers > Merge > Merge Group.
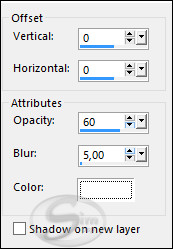
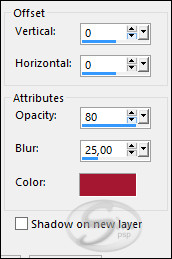
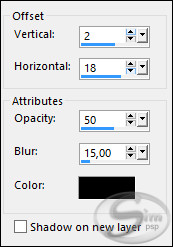
13- Effects > 3D Effects > Drop Shadow: Color: #FFFFFF
Layers > Merge > Merge Down.
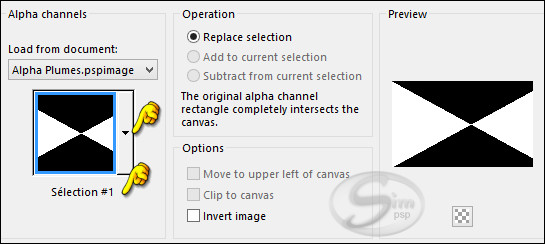
14- Selections > Load/Save Selections > Load Selection from Alpha Channel: Sélection#1
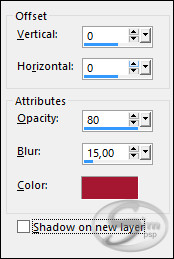
Selections > Promote Selection to layer. Effects > 3D Effects > Drop Shadow: Color: Foreground (cor escura)
15- Effects > Plugins > Carolaine and Sensibility > CS-DLines:
Selections > Select None.
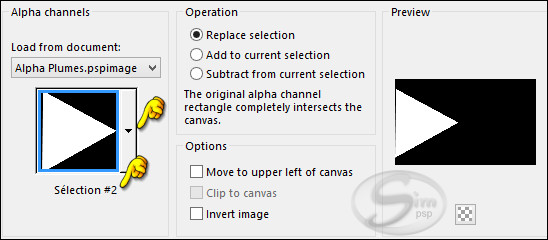
16- Selections > Load/Save Selections > Load Selection from Alpha Channel: Sélection#2
Selections > Promote Selection to layer.
17- Effects > 3D Effects > Drop Shadow: Color: Foreground (cor escura)
Selections > Select None
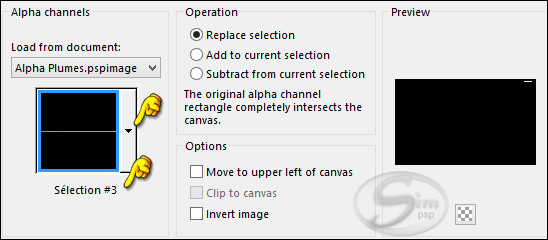
18- Ativar a layer Raster 1. Selections > Load/Save Selections > Load Selection from Alpha Channel: Sélection#3
Selections > Promote Selection to layer.
19- Effects > Plugins > Carolaine and Sensibility > CS-DLines:
20- Effects > 3D Effects > Drop Shadow: Color: Foreground (cor escura)
Selections > Select None
21- Layers > Duplicate. Image > Mirror > Mirror Vertical. Layers > Merge > Merge Down.
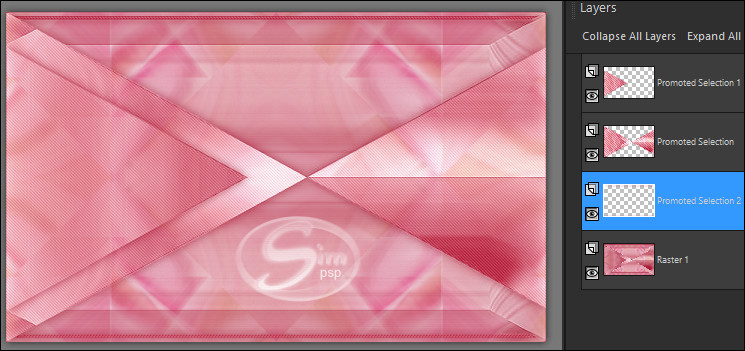
22- Confere seu resultado e a posição das layers:
23- Layers > Merge > Merge Visibile.
24- Edit > Copy no deco 1 Edit > Paste a New Layer. Não mover. Effects > 3D Effects > Drop Shadow: Color: Foreground (cor escura)
25- Ativar a layer Merged. Selections > Load/Save Selections > Load Selection from Alpha Channel: Sélection#4
26- Selections > Promote Selection to layer.
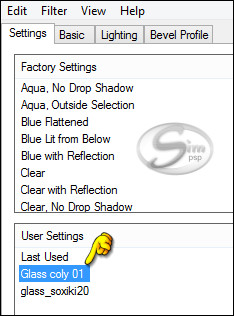
27- Effects > Plugins > Eyes Candy 5 Impact > Glass: User Settings: Glass coly 01
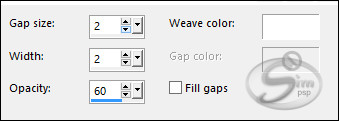
Selections > Select None. Layers > Properties > General > Blend Mode: Multiply
28- Layers > New Raster Layer. Pintar com a cor #FFFFFF (branca)
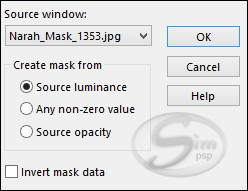
29- Layers > New Mask Layer > From image: Narah_Mask_1353
30- Effects > Edge effects > Enhance. Layers > Merge > Merge Group.
31- Layers > Duplicate. Effects > Image Effects > Seamless Tiling: Default
Layers > Merge > Merge Down. Layers > Properties > General > Blend Mode: Luminance (Legacy) - Opacity: 80
32- Layers > Arrange > Move Down.
33- Ativar a Layer do topo. Edit > Copy no tube "plume". Edit > Paste a New Layer.
34- Com a Ferramenta Pick Tool, posicionar: Positions: X (-60.00) Y (84.00)
Layers > Properties > General > Blend Mode: Luminance (Legacy)
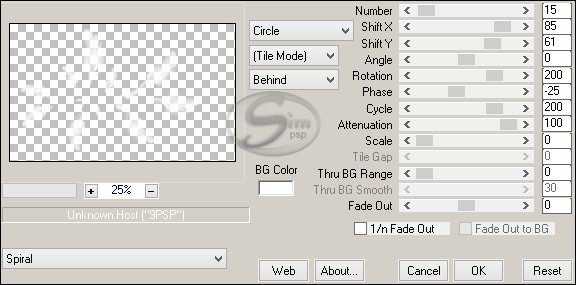
35- Layers > Duplicate. Image> Resize: 50% - all layers unchecked. Effects > Plugins > Mura’s Meister > Copies
36- Objects > Align > Center in Canvas. OU Ferramenta Pick Tool, posicionar: Positions: X (66.00) Y (6.00) Layers > Arrange > Move Down. Layers > Properties > General > Opacity: 77%
37- Image > Add Borders > Symmetric: 1px - cor 1: Foreground > #a51832 3px - cor: Branca > #FFFFFF 1px - cor 1: Foreground > #a51832
38- Selections > Select All.
39- Image > Add Borders > Symmetric: 15px - cor: Branca > #FFFFFF
40- Effects > 3D Effects > Drop Shadow: Color: Foreground (cor escura)
Selections > Select None.
41- Image > Add Borders > Symmetric: 10px - cor 1: Foreground > #a51832
42- Com a Ferramenta Magic Wand Tool > Tolerance e Feather: 0, selecione essa borda. Effects > Texture Effects > Weave: Weave color: #FFFFFF
43- Selections > Select All.
44- Image > Add Borders > Symmetric: 30px - cor: Branca > #FFFFFF
45- Effects > 3D Effects > Drop Shadow: Color: Foreground (cor escura)
46- Selections > Select None.
47- Edit > Copy no tube "femme 755 Coly". Image > Mirror > Mirror Horizontal. Image> Resize: 82% - all layers desmarcado. Posicione.
48- Effects > 3D Effects > Drop Shadow: Color: #000000
49- Image > Add Borders > Symmetric: 1px - cor 1: Foreground > #a51832
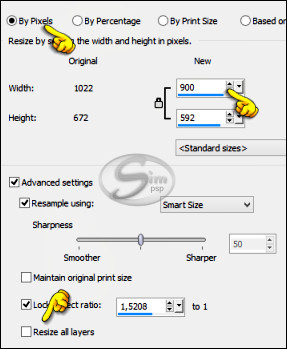
50- Image - Resize: by Pixels > 900 Width, all layers marcado.
Adjust > Sharpness > Sharpen.
51- Aplicar sua marca d'água ou assinatura. File > Export > JPEG Optimizer.
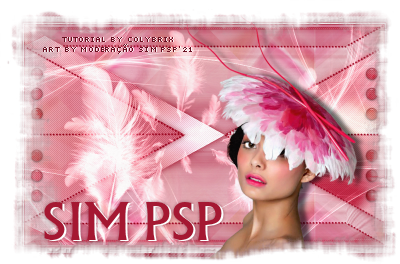
CREDITOS: Tutorial Plumes by ColybrixTradução, Formatação e Art Final by Moderação SIM PSP Tube Principal: Tubed by Colybrix
Versão by Márcinha - Owner SIM PSP
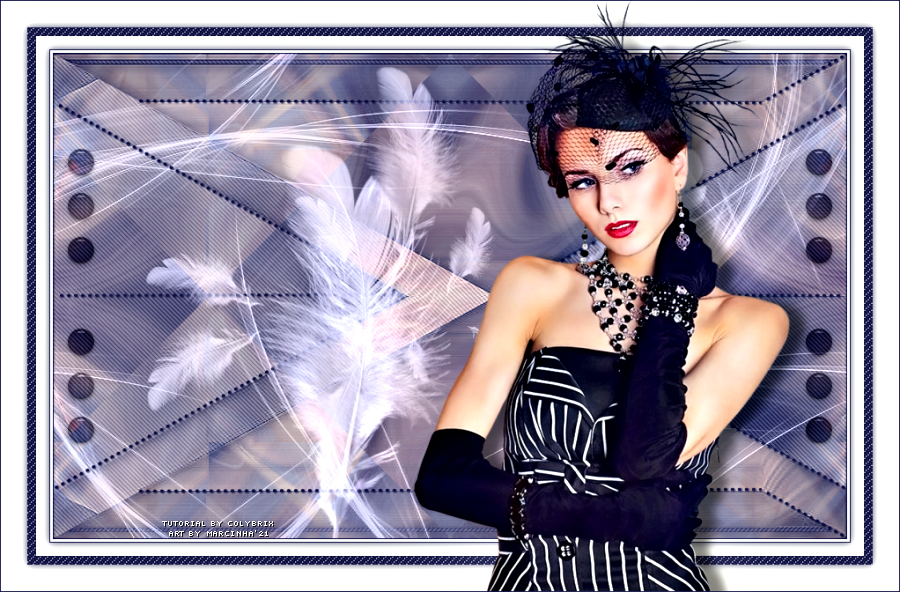
CREDITOS Versão by Marcinha Tutorial Plumes by ColybrixTradução by Moderação SIM PSP Tube: Tubed by Colybrix
Versão by Soxikibem - Owner SIM PSP
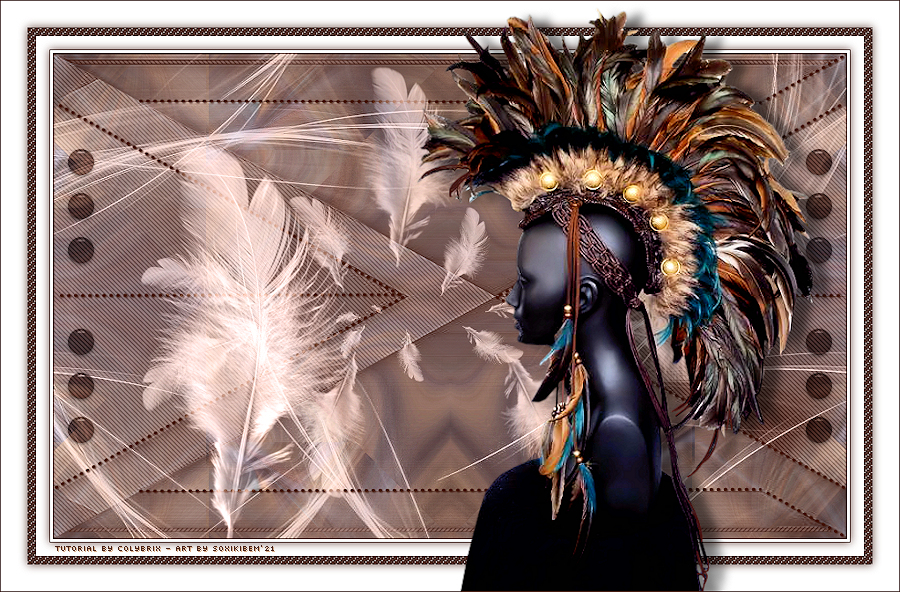
CREDITOS Versão by SoxikibemTutorial Plumes by ColybrixTradução by Moderação SIM PSP Tube: Tubed by Gabry
Versão by CidaBen - Moderadora do SIM PSP
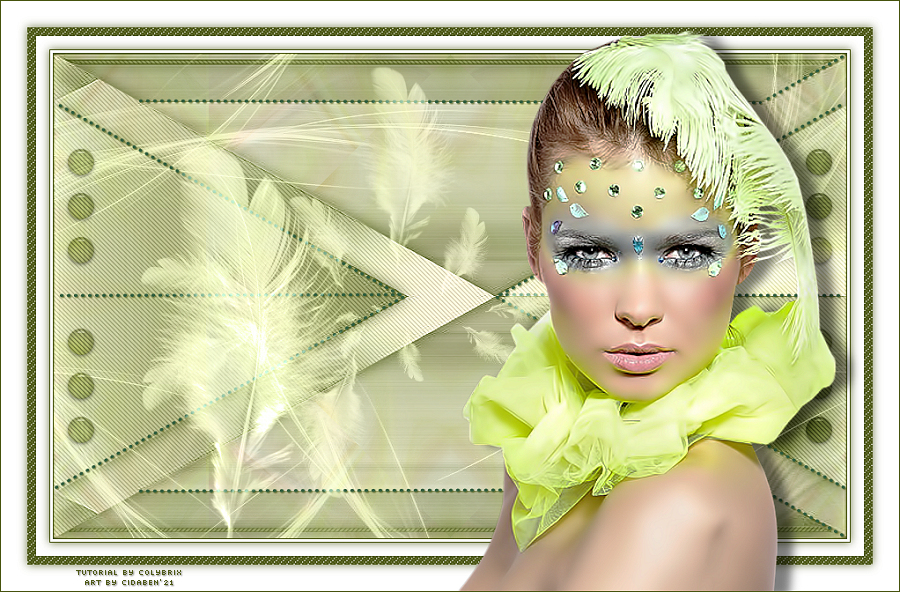
CREDITOS Versão by CidaBenTradução by Moderação SIM PSP Tube: Tubed by D'Isa
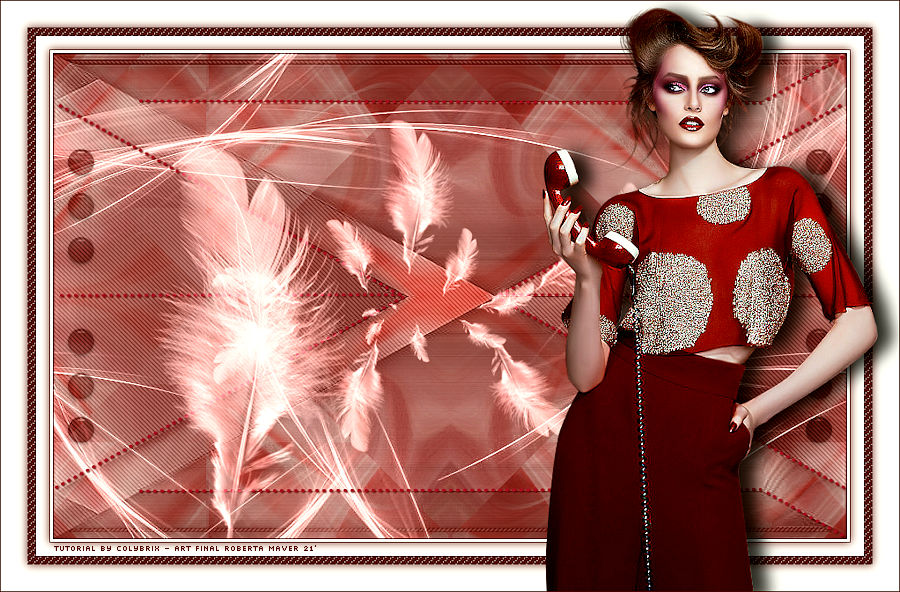
Versão by Roberta Maver - Moderadora do SIM PSP
CREDITOS Versão by RobertaMaverTradução by Moderação SIM PSP Tube: Tubed by Tocha
|