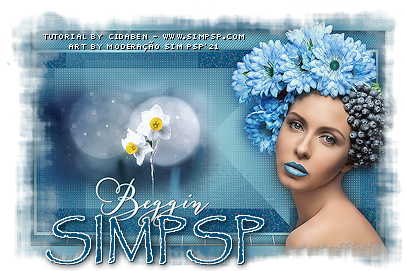
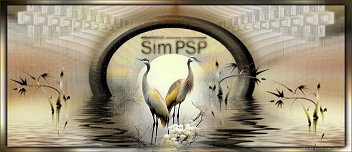
Tutorial By
CidaBen
Narah_Mask_0911 Mask_VSP176 Masker-08-Casimage Texture JC_049 (Save to PSP Texture folder) selection_cben01 (Save PSP Selections folder)
PLUGINS Simple Caroline and Sensibility Graphics Plus
Tutorial created in PSP
2020 Ultimate
1 - Open the
material in PSP, duplicate and close the original. Extra Color: #FFFFFF
2 - Open a 950 x
600 px transparent image.
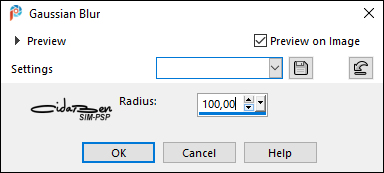
3- Adjust > Blur > Gaussian Blur: 100
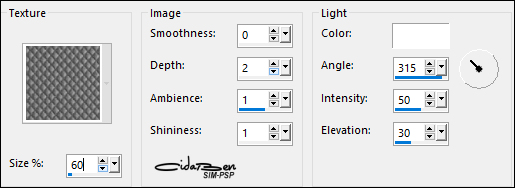
4- Effects > Texture Effects > Texture: JC_049
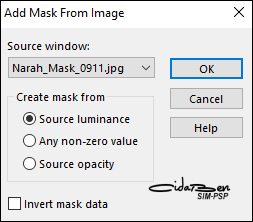
5 - Layers > New Raster Layer. Paint with white color (#FFFFFF). Layers > New Mask Layer > From image: Narak_Mask_0911
Layers > Merge > Merge Group. Effects > Edge Effects > Enhance.
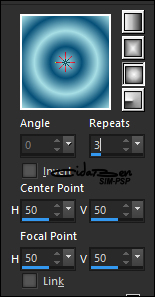
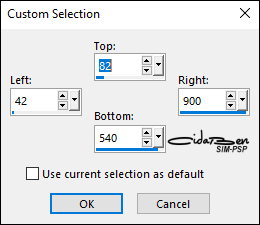
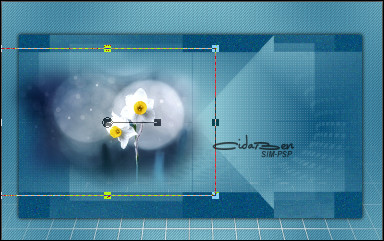
6 - Layers > New Raster Layer. Activate the Selection Tool > Custom Selection:
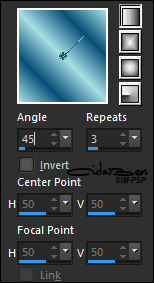
Paint the selection with the gradient formed with the chosen colors: Linear: Angle 45 > Repeats 3 > Invert unchecked.
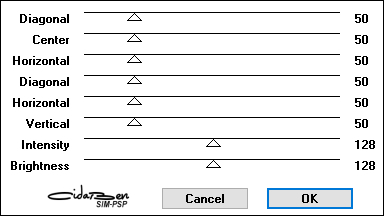
7- Effects > Plugins > Simple > 4 Way Average. Effects > Plugins > Caroline and Sensibility > CS-LDots.
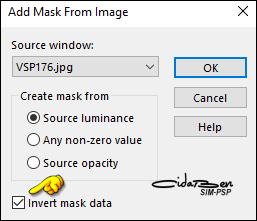
8 - Layers > New Mask layer > From image: VSP176. Invert mask data > marked.
Layers > Properties > General > Opacity: 60% Adjust > Sharpness > Sharpen Layers > Merge > Merge Group. Still with the Selection...
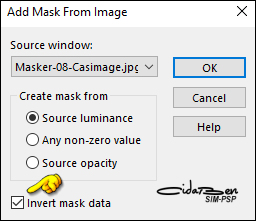
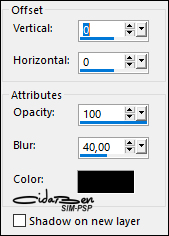
9 - Layers > New Raster Layer. Paint with the background color: (#074f77) Layers > New Mask Layer > From image: Masker-08-Casimage Invert mask data > marked.
Layers > Merge > Merge Group.
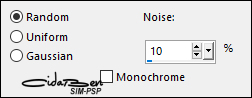
Adjust > Add/Remove Noise > Add Noise.
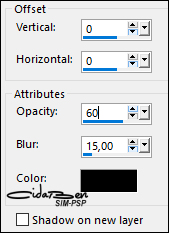
Effects > 3D Effects > Drop Shadow: 0, 0, 60, 15, Color #000000 (black).
Edit > Repeat Drop Shadow. Selections > Select None.
11 - Edit > Copy in Misted Landscape. Edit > Paste New Layer. Image > Resize if necessary, in this material I used the 70% resize. Adjust > Sharpness > Sharpen. Position to the left as in the example:
12 - Layers > Merge > Merge All. Selections > Load/Save Selection > Load Selection
Fron Disk: selection_cben01. Paint the selection with the gradient formed with the chosen colors: Linear: Angle 45 > Repeats 3 > Invert unchecked.
Layers > Merge > Merge Visibile.
13 - Selections > Select All. Selections > Modify > Contract: 30. Selections > Invert. Paint the selection with the gradient formed with the chosen colors: Linear: Angle 45 > Repeats 3 > Invert unchecked.
Effects > 3D Effects > Drop Shadow: 0, 0, 100, 40, color: #000000 (black)
Selections > Select None
14
- Edit > Copy the Main Tube. Image > Resize: if necessary. Adjust > Sharpness > Sharpen. Position to the right. Effects > 3D Effects > Drop Shadow: your choice.
15 - Image > Add Borders: 1px - symmetric - color: Foreground #a7dee5. 2px - symmetric - color: Background #074f77. 1px - symmetric - color: background #a7dee5.
16 - Selections > Select All. Image Add Borders > 40px - symmetric > with any color. Selection > Invert. Paint the selection with the gradient formed with the chosen colors: Sunburst: Angle 0 > Repeats 3 > invert unchecked.
17 - Effects > Plugins > Graphics Plus > Cross Shadow: Default.
Selections > Select None.
18 - Edit > Copy no titulo_beggin_cben01 Edit > Paste As New Layer Position your choice.
19 - Image > Add Border > Symmetric: 1px, color: Background (#074f77) Adjust > Sharpness > Sharpen.
20- If you want to resize your work.
CREDITS: Feel free to send your versions.
Tutorial created by CidaBen, in August /
2021. Translated into English in August /
21, by the Moderation of SIM-PSP. It cannot
be copied, removed from its place,
translated or used in learning lists or
groups without the author's prior consent. |