Material
1 Main Tube of your choice
1 Decorative tube Tree
estrelinhas_png_by Jc4everever_d4rebig
WortArt:
Creativenn
Mask:
by Narah_mask
 Plugins
Plugin
Mehdi
Plugin
Galaxy
Plugin
Mura's Meister
Plugin
AAA Frames
Ferramentas do
PSP
Tutorial
1
- Open the material on the PSP,
duplicate and close the original.
Choosing colors for work. Foreground #656472
Background
#e9eafd
Cor 3 #FFFFFF
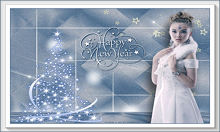
2 - Open a transparent 850x600px image.Paint with a Radial gradient formed by the chosen colors.
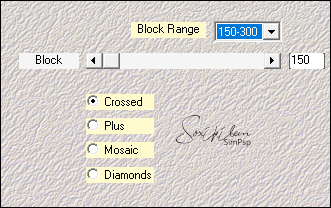
3 - Adjust > Blur > Gaussian Blur: Radius 10.4 - Effects > Plugin Mehdi > Sorting Tiles.
5 - Effects > Edge Effects > Enhance.Layers Duplicate.
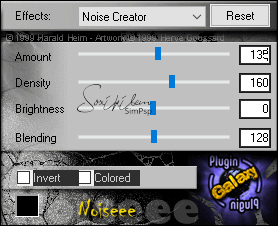
6 - With Layer Copy of Raster 1 active...Effects > Plugins > Plugin Galaxy > Noiseee: 135, 160, 0, 128.
7 - Layer > New Raster Layer. Paint with white color #FFFFFF. Layers > New Mask Layer > From Image: Narah_mask_0610. Layers > Merge > Merge Group.
8 - Effects > Edge Effects > Enhance.
9 - Effects > 3D Effects > Drop Shadow: 1, 1, 60, 2 (color #FFFFFF).
10 - Layer > New Raster Layer. Paint with white color #FFFFFF. Layers > New Mask Layer > From Image: Narah_Mask_1238. Layers > Merge > Merge Group.
11 - Effects > Edge Effects > Enhance.
12 - Image > Mirror > Mirror Horizontal.
13 - Close visibility of Raster 1Layers > Merge > Merge Visible.
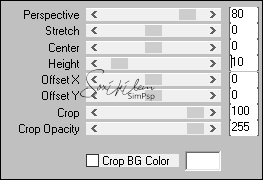
14 - Activate and open the visibility of the Layer Raster 1Effects > Plugin Mura's Meister > Perspective Tiling.
Layers > Arrange > Bring to Top.
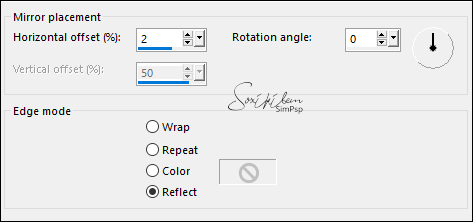
15 - Effects > Reflections Effects > Rotating Mirror.
16 - Effects > 3D Effects > Drop Shadow: 0, 0, 100, 70 (white color #FFFFFF).17 - Edit > Copy > arvore_noel_nikita Edity > Paste As New Layer (colorize if you wish) Position left. Adjust > Sharpness > Sharpen.
18 - Edit > Copy > estrelinhas_png_byJc4everever_d4r3big. Edity > Paste As New Layer. Image > Mirror > Mirror horizontal Position the upper right corner Adjust > Sharpness > Sharpen.
19 - Edit > Copy in the Main Tube. Edit > Paste a New Layer. Adjust > Sharpness > Sharpen. Effects > 3D Effects > Drop Shadow of your choice.
20 - Edit > Copy in titulo > wordart_creativenn_happy_new_year. Edit > Paste As New Layer. Position in the center.
21 - Image > Add Borders: 2px Foreground color. Selections > Select All. Image > Add Borders: 40px white color (#FFFFFF). Selections > Invert.
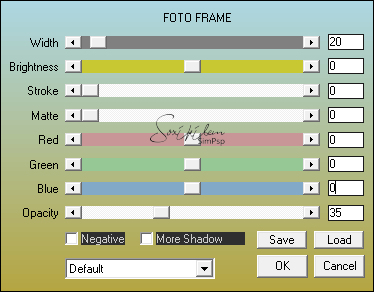
22 - Effects > Plugin AAA Frames > Foto Frame.
Selections > Select None. Image > Add Borders: 1px Foreground color.
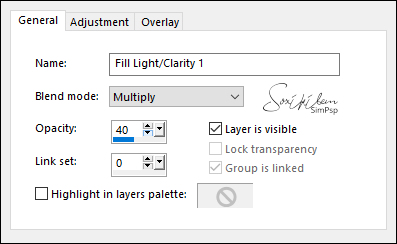
23 - Layers > New Adjustment Layer > Fill Light/Clarity: General > Blend mode: Multiply - Opacity: 40.
Laayers > Merge > Merge All (Flatten).
24 - If you want to resize your work. Apply your watermark or signature. File> Export> JPEG Optimizer.
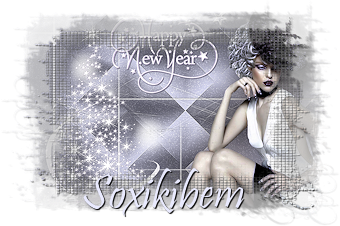
Credits: Tube: by Gabry - Tube árvore: by Nikita - Decor: estrelinhas_png_by Jc4everever_d4rebig WortArt: Creativenn - Mask: by Narah_mask
Créditos:
Versão 2: Tube by Gabry
Tutorial by CidaBen'20
Feel free to send your versions. I will be happy to publish them on our website.   
|