|
Tutorial by Soxikibem English Translation by Moderation SIM-PSP Original Tutorial: Here
MATERIAL GoldenBalls_MistedByXiki or use one of your choice Preset_UserDefinedFilter_High pass.PspScript (Save in PSP Presets folder)
PLUGINS Mura's Meister
NOTE: In item 13 asks to apply the plugin Mura's Meister > Copies, this can give a variation, sometimes it happens because the plugin was used before. Don't worry if the position is different, it will make your creation unique. Compare my first and second versions... they have different distributions in the copies.
TUTORIAL 1 – Open the material on the PSP, duplicate and close the original.
2 - Open a 900x550px transparent image. Selections > Select All. Edit > Copy in Misted GoldenBalls_MistedByXiki. Edit > Paste Into Selection. Selections > Select None.
3 - Effects > Image Effects > Seamless Tiling: Default. Adjust > Blur > Motion Blur:
Edit > Repeat Motion Blur.
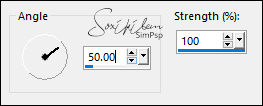
4 - Effects > Geometric Effects > Perspective - Horizontal:
Repeat > Perspective - Horizontal: change the value to -98.
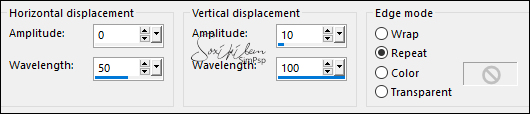
5 - Effects > Distortion Effects > Wave:
Layers > Duplicate. Layers > Merge > Merge Down.
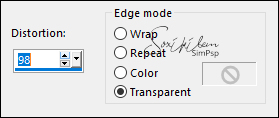
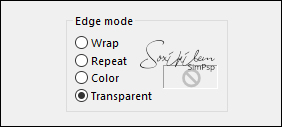
6 - Effects > Geometric Effects > Circle: Transparent
Layers > Duplicate.
7 - Layer Copy of Raster 1 activate. Layers > Duplicate. Layers > Merge > Merge Down.
8 - Effects > Plugins > Mura's Meister > Pole Transform:
9 - With the Pick Tool tool, position: Position X: 401, Position Y: 269. Layers > Duplicate. Image > Mirror > Mirror Horizontal. Image > Mirror > Mirror Vertical. Layers > Merge > Merge Down.
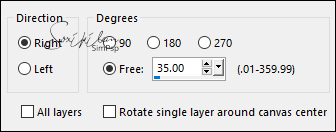
10 - Layers > Duplicate. Image > Free Rotate:
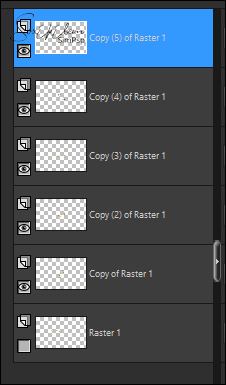
Layers > Duplicate. Repeat > Free Rotate. Layers > Duplicate. Repeat > Free Rotate. Layers > Duplicate. Repeat > Free Rotate.
Layers > Merge > Merge Visibile. Adjust > Sharpness > Sharpen.
11 - Layers > New Raster Layer. Selections > Select All. Edit > Copy in GoldenBalls_MistedByXiki. Edit > Paste Into Selection. Selections > Select None. ADjust > Blur > Gaussian Blur: 30. Effects > Geometric Effects > Circle: Transparent. Image > Resize: 10%, all layers unchecked. Layers > Duplicate. Layers > Merge > Merge Down.
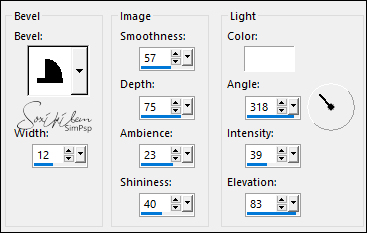
12 - Effects > 3D Effects > Inner Bevel:
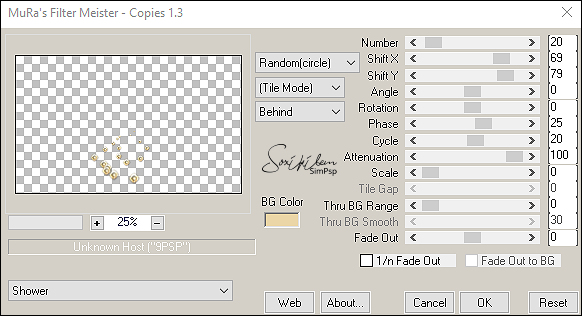
13 - Layers > Duplicate. Effects > Plugins > Mura's Meister > Copies:
With the Pick Tool tool, position: Position X: 521, Position Y: 169.
13 - Layers > Duplicate. Image > Mirror > Mirror Horizontal. Image > Mirror > Mirror Vertical. Layers > Merge > Merge Down.
14 - Layers > Merge > Merge Visible. Effects > User Defined Filter: High pass.
15 - It is ready to be used in our work. You can use your creativity to create other decorations.
16 - File > Export > PNG Optimizer.
CREDITOS: Tutorial, Art & Misted by Soxikibem English Translation by Moderation SIM-PSP
Feel free to send your versions. I will be happy to publish them on our website.
|