|
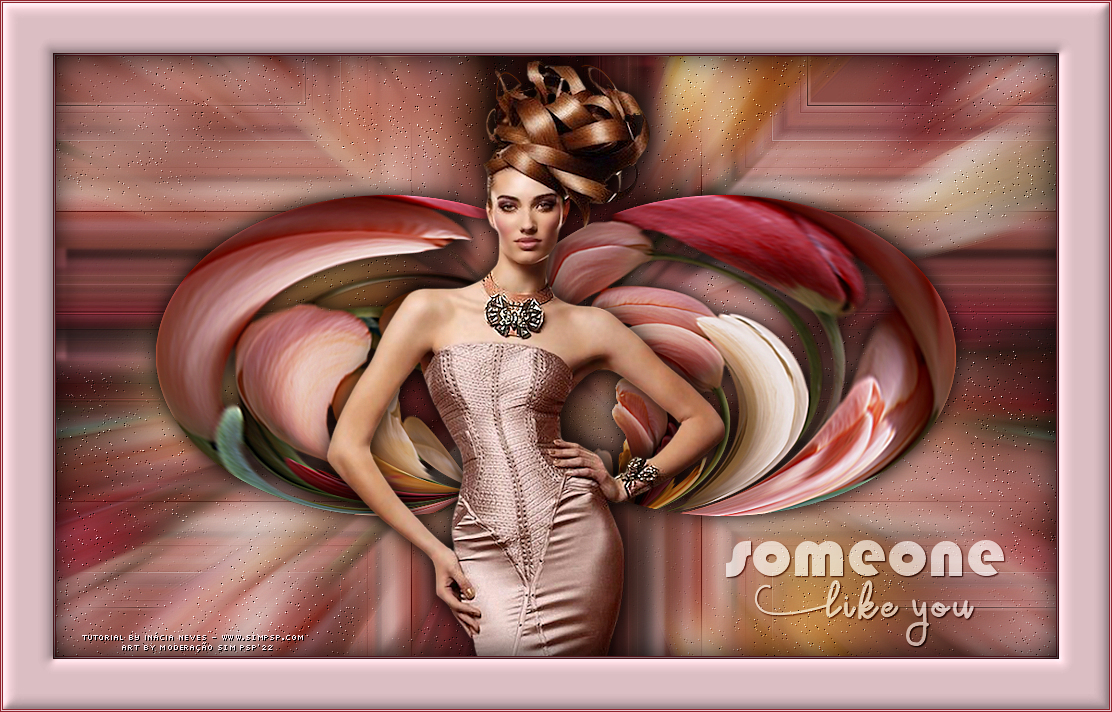
MATERIAL 1 Main Tube of your choice 1 Misted or Tube Flowers of your choice wordart_someonelikeyou_inacia
PLUGINS FM Tile Tools > Blend Emboss Flaming Pear > Flexify 2
Corel PaintShop Pro 2022 Ultimate Effects Version for the English translation made in Corel PaintShop Pro 2020 Ultimate
TUTORIAL
1-
Activate the tube or misted of flowers. Foreground: #e9cbd1 Background: #8f222c
Edit > Copy the tube or misted of flowers.
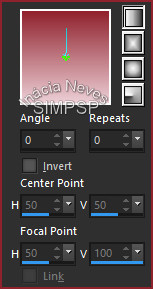
2- Form a gradient: Style > Linear, Angle > 0, Repeats > 0 Open a new transparent image of 1000 x 600 px. Paint with the gradient.
3- Layers > New Raster Layer. Selections > Select All. Edit > Paste Into Selection. Selections > Select None.
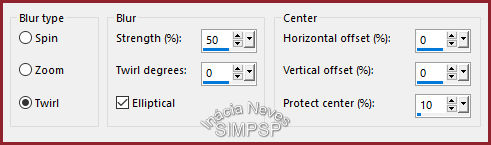
4- Layers > Duplicate. Activate the layer Raster 2. Effects > Image Effects > Seamless Tiling: Default. Adjust > Blur > Radial Blur:
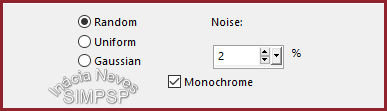
Adjust > Add/Remove Noise > Add Noise:
Effects > Plugins > FM Tile Tools > Blend Emboss: Default
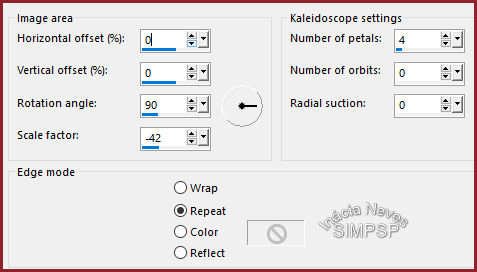
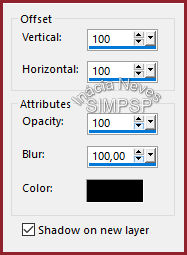
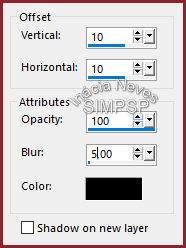
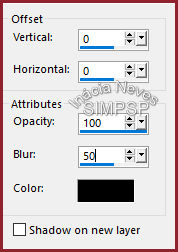
5- Layers > Duplicate: Activate the Raster 2. Effects > Reflection Effects > Kaleidoscope: Effects > 3D Effects > Drop Shadow: Activate the Layer Raster 2 Shadow 1. Layers > Properties > General > Blend Mode: Hue or your choice. 6- Activate the Layer Raster 2. Effects > 3D Effects > Drop Shadow:
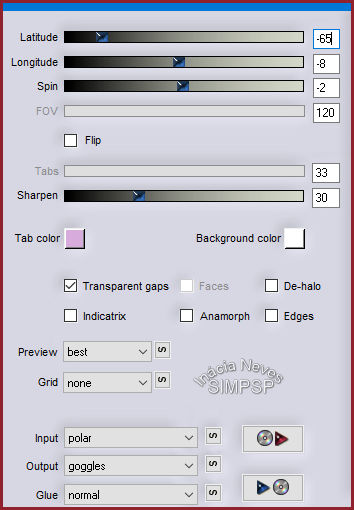
7- Activate the top layer. Effects > Plugin > Flaming Pear > Flexify 2: Image > Resize > 80% > All Layers Unchecked. Effecs > 3D Effects > Drop Shadow:
Adjust > Sharpness > Sharpen More.
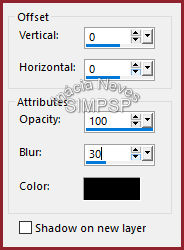
8- Edit > Copy on the main tube. Edit > Paste as New Layer Reduce, apply effects and Drop Shadow of your choice. Adjust > Sharpness > Sharpen.
9- Create the Borders: Image > Add Borders > 1 px > symmetric > #8f222c (dark color) Image > Add Borders > 1 px > symmetric > #e9cbd1 (light color) Image > Add Borders > 1 px > symmetric > #8f222c (dark color)
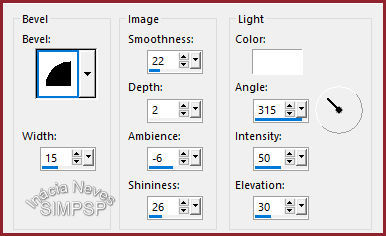
10- Selections > Select All. Image > Add Borders > 50 px > symmetric > #e9cbd1 (light color) Selections > Select > Invert. Effects > 3D Effects > Drop Shadow: Effects > 3D Effects > Inner Bevel: Selections > Select None.
11- Repeat borders: Image > Add Borders > 1 px > symmetric > #8f222c (dark color) Image > Add Borders > 1 px > symmetric > #e9cbd1 (light color) Image > Add Borders > 1 px > symmetric > #8f222c (dark color)
12- Edit > Copy na wordart_someonelikeyou_inacia Edit > Paste as New Layer Position
and apply effects and/or Blend Mode of your choice.
13- If you wish, resize your work.

CREDITS: Main Tube: Tubed by d'Isa
Tube Flowres: by
LB Tubes & Mistis
Sinta-se à vontade para enviar suas versões. Terei todo o prazer em publicá-las em nosso site.   
|