|
TRADUÇÕES
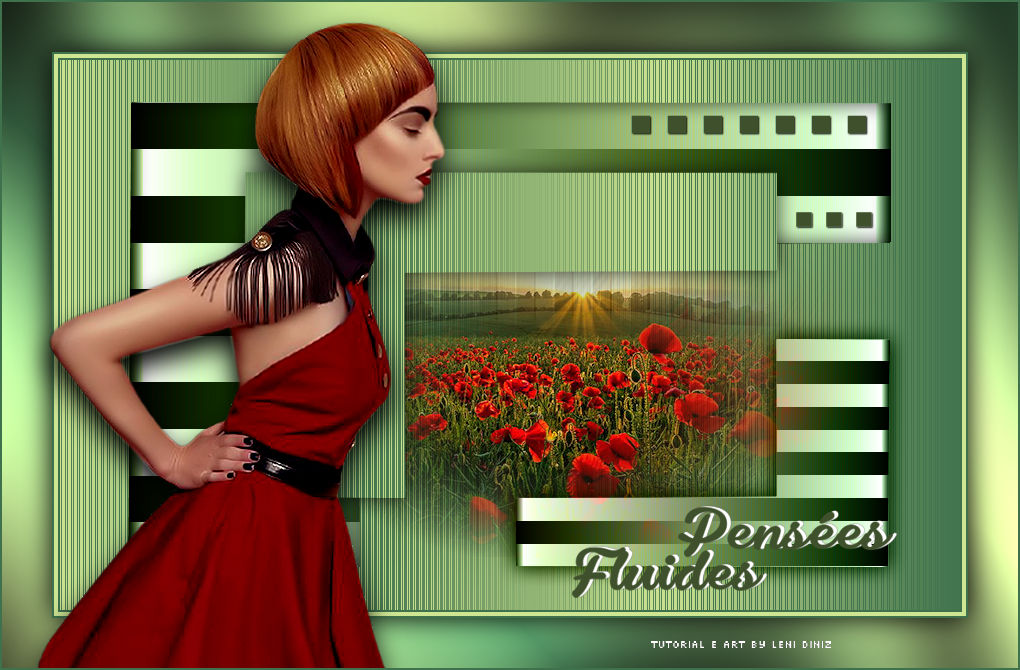
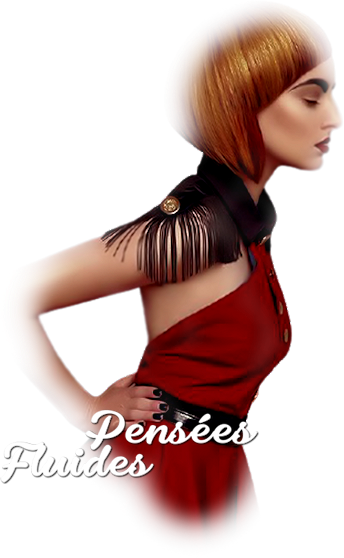
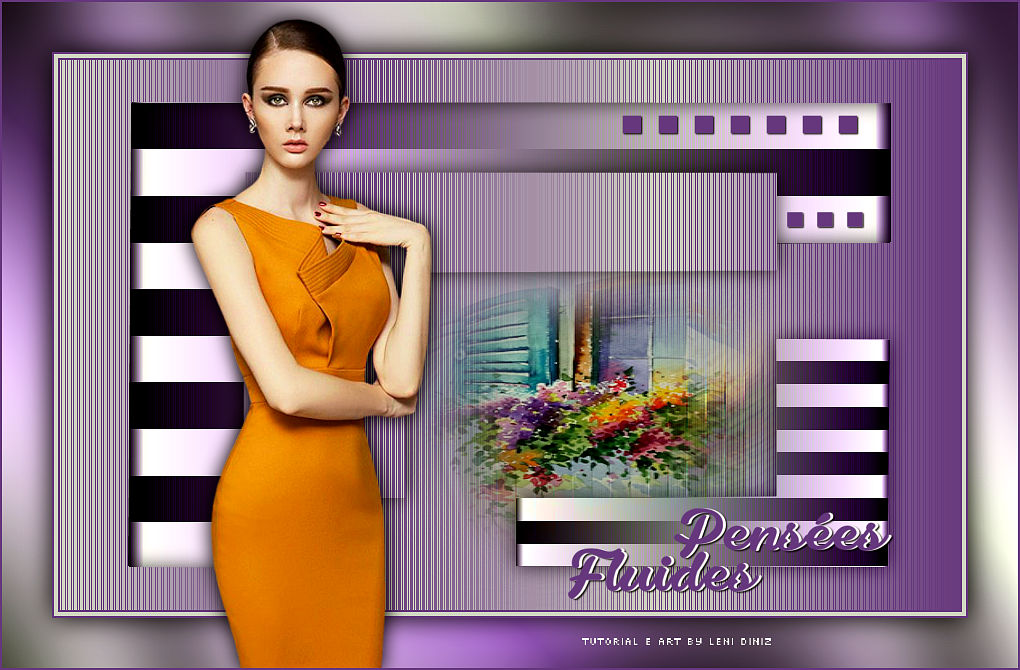
Obrigada aos nossos tradutores! MATERIAL 1 Tube Principal à sua escolha 1 Misted Paisagem à sua escolha alpha_channel_pensee_fluides Título_pensées_fluides Decor_pensées_fluides
PLUGINS Filter Factory Gallery > Loom Len K landksiteofwonder > Len K' trouble dsb flux > Linear Transmission Filter Options Grafics Plus > Cross Shadow Cores #cee592 (Foreground cor clara) #3f714c (Background cor escura)
TUTORIAL
01- Abrir o material no PSP copie e feche o original. 02 - Escolha duas cores para trabalhar. Prepare um gradiente Linear formado pelas cores escolhidas
03 - Abrir a alpha_channel_pensées_fluides. Pintar com o gradiente Linear. Adjust > Blur > Gaussian Blur: 20
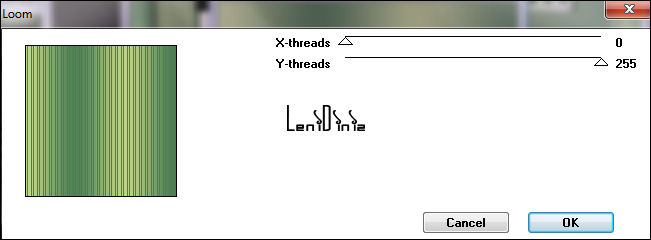
04 - Effects > Plugins > Filter Factory Gallery M > Loom:
05 - Layers > New Raster Layer. Selections > Load/Save Selections > Load Selection from Alpha Channel: leni #1 Pintar a seleção com o gradiente Linear, mudando o repeat para 1:
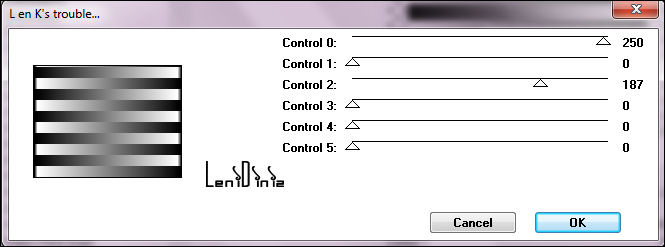
06 - Effects > Plugins > Len K landksiteofwonders > Len K's trouble:
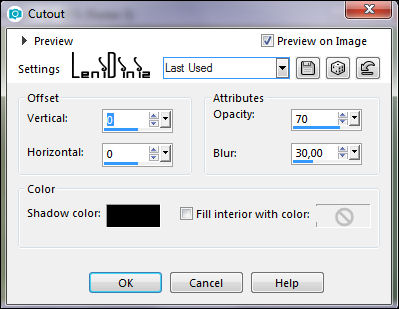
07 - Layers > Properties > General > Blend Mode: Luminance (Legacy) - Opacity: 100 08 - Ainda com a seleção... Layers > New Raster Layer. Effects > 3D Effects > Cutout: Shadow color: #000000
09 - Selections > Select None 10 - Ativar a layer Raster 1. Selections > Load/Save Selections > Load Selection from Alpha Channel: leni #2
Selections > Promote Selection to
layer. 11 - Effects > 3D Effects > Drop Shadow: 0 > 0 > 70 > 30, Color: #000000 Selections > Select None. 12 - Layers > New Raster Layer. Selections > Load/Save Selections > Load Selection from Alpha Channel: leni #3 Pintar a seleção com o gradiente Linear:
13 - Effects > Plugin > Len K landksiteofwonders > Len K's trouble:
14 - Layers > Properties > General > Blend Mode: Luminance (Legacy) - Opacity: 100 Effects > 3D Effects > Drop Shadow: 0 > 0 > 70 > 30, Color: #000000 Selections > Select None.
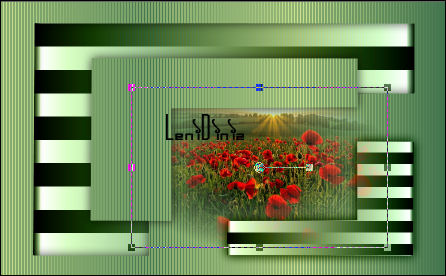
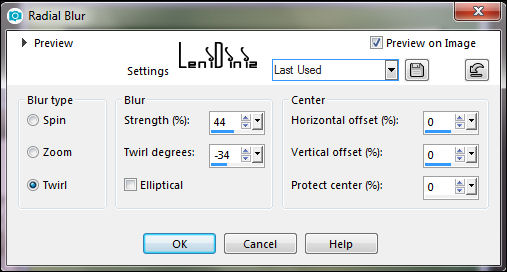
15 - Image > Mirror > Mirror Horizontal. Ferramenta Pick Tool: Position X: 434 - Position Y: 257 16 - Ativar a layer Raster 1. Edit > Copy no Misted Paisagem. Edit > Paste as New Layer. Image > Resize se for necessário (dei resize de 65%) Posicionar como no exemplo:
Adjust > Sharpness > Sharpen. Adjust > Blur > Radial Blur:
17 - Effects > Plugins > dsb flux > Linear Transmission Filter Options:
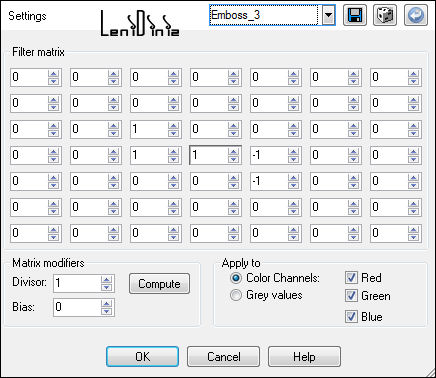
18 - Effects > User Defined Filter: Emboss_3
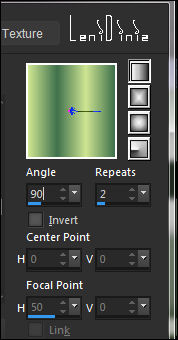
19 - Edit > Paste As New Layer. Image > Resize se for necessário (dei resize de 60%) Adjust > Sharpness > Sharpen. 20 - Image > Add Bordes: 2px > symmetric > color: #3f714c (Background) 4px > symmetric > color: #cee592 (Foreground) 2px > symmetric > color: #3f714c (Background) 22 - Selections > Select All Image > Add Borders > 50 px qualquer cor. Selections > Invert Pintar a seleção com um gradiente Linear > Angle: 45 - Repeats: 2
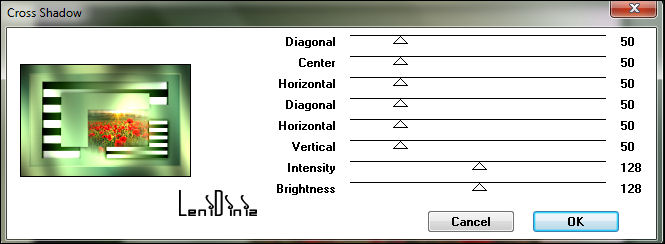
23 - Effects > Plugins > Graphics Plus > Cross Shadow:
24 - Selections > Invert. Effects > 3D Effects > Drop Shadow: 0 > 0 > 100 > 40, Color: #000000 Selections > Select None. 25 - Edit > Copy no Tube Principal. Edit > Paste As New Layer. Image > Resize se for necessário Adjust > Sharpness > Sharpen. Posicione à esquerda. Effects > 3D Effects > Drop Shadow à sua escolha. 26 - Edit > Copy no titulo_pensées_fluides. Edit > Paste As New Layer. Posicionar à sua escolha. Effects > 3D Effects > Drop Shadow à sua escolha.
27 - Edit > Copy no decor_pensées_fluides. Edit > Paste As New Layer. Pick Tool: Position X: 629 Position Y: 113 Effects > 3D Effects > Drop Shadow: 1 > 1 > 100 > 2. color #000000 28 - Image > Add Bordes > Symmetric: 2px - color: #3f714c (Background) 29 - Assine ou coloque a sua marca d'água. File > Export > JPG Optimizer. VERSÃO
CRÉDITOS: Tutorial by LeniDiniz Tube Principal: Tubed by Luz Cristina Misted Paisagem: by Calitubes 2ª versão: Tube Principal: Tubed by Pqna&Alice Misted Paisagem: by LeniDiniz
Sinta-se à vontade para
enviar suas versões.
|