|
TRADUÇÕES:


Obrigada aos nossos
tradutores!
MATERIAL
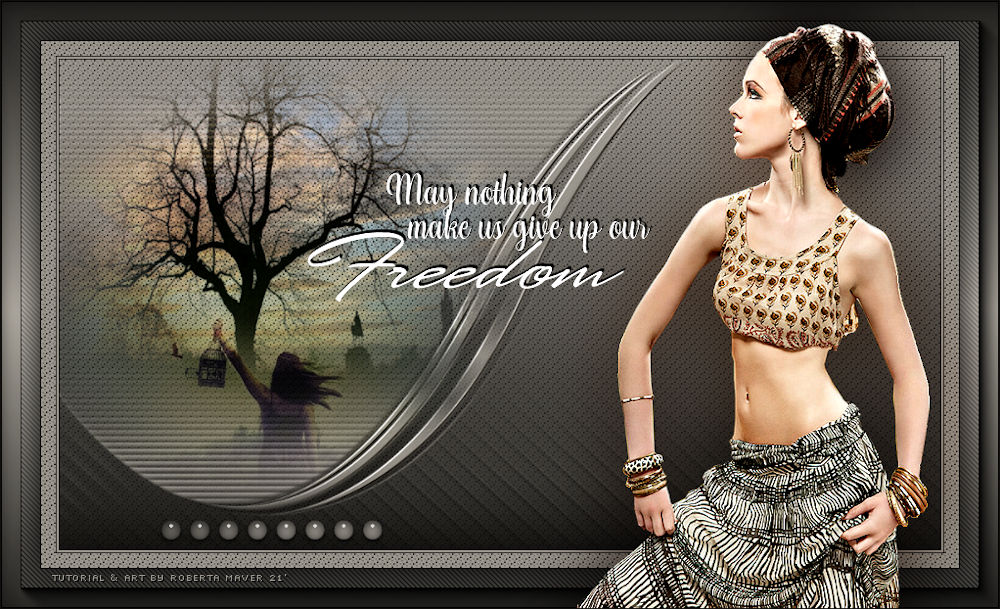
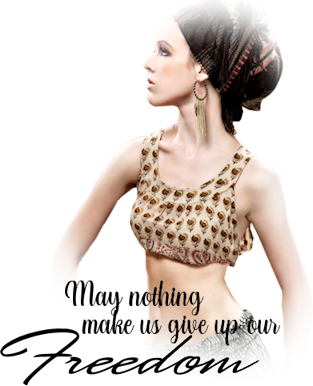
1 Tube Principal à sua escolha
2 Misted Paisagem à sua escolha
Decor_Freedom_byRoberta
Titulo_Freedom_byRoberta

PLUGINS
Plugin AAA Frames
Carolaine & Sensibility
MuRa's Filters Seamless
ROTEIRO
1 - Abrir o material no PSP, duplique e feche o original.
Escolher duas cores para trabalhar.
Foreground #12110f
Background #9d988f

2 - Abra uma imagem transparente 900 x 500 px.
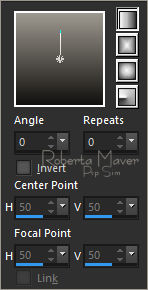
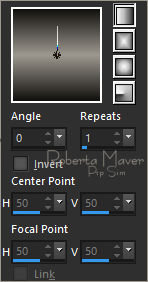
Pintar com o gradiente Linear, Angle 0, Repeats 0, Invert:
Desmarcado
formado pelas cores em uso.
3 - Layers > New Raster Layer.
Pintar com a cor do Background #9d988f
Layers > New Mask Layer > From Image: @masks_narah_naiseminas
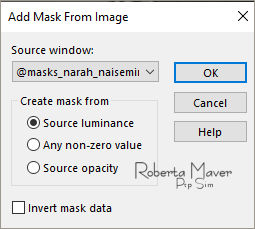
Layers > Merge > Merge Group.
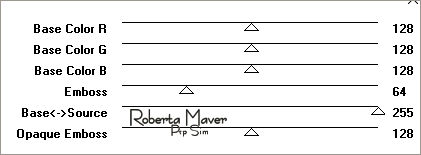
4 - Effects > Plugins > MuRa's Filters Seamless > Emboss at Alpha:
Default
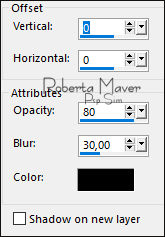
5 - Effects > 3D Effects > Drop Shadow: Color: #000000
Ativar a layer Raster 1
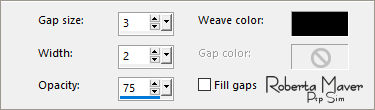
6 - Effects > Texture Effects > Weave:
Weave color: #000000
7 - Edit > Copy no 1º Misted Paisagem.
Edit > Paste a new Layer.
Image > Resize se necessário.
Posicionar à esquerda.
Adjust > Sharpness > Sharpen
Layers > Properties > General > Blend Mode: Overlay
8 - Edit > Copy no 2º Misted Paisagem
Edit > Paste a new Layer.
Image > Resize se necessário.
Posicionar à esquerda.
Adjust > Sharpness > Sharpen
Layers > Properties > General > Blend Mode: Soft Light
9 - Image > Add Borders: Symmetric:
1 px - color: Foreground #12110f
2 px - color: Background #9d988f
1 px - color: Foreground #12110f
Selections > Select All.
Image > Add Broders > Symmetric: 15 px - color:
Background #9d988f.
Selections > invert.
10 - Effects > Texture
Effects > Weave
Selections > Select None.
Image > Add Borders > Symmetric:1 px - color: Foreground #12110f
Selections > Select All.
Image > Add Borders > Symmetric: 40 px com qualquer cor.
Selections > invert.
11 - Pintar com o gradiente Linear, Angle 0, Repeats 1, Invert:
Desmarcado
formado pelas cores em uso.
12 - Effects > Plugins > Carolaine & Sensibility > CS - DLines:
Default
Selections > invert.
13 - Effects > 3D Effects > Drop Shadow: 0, 0, 100, 50, color:
#000000
Selections > Select None.
14 - Effects > Plugins > AAA Frames > Foto Frame.

15 - Edit > Copy no Tube Principal.
Edit > Paste as new Layer.
Image > Resize se necessário.
Posicionar à direita.
Effects > 3D Effects > Drop Shadow: à sua escolha.
16 - Edit > Copy no Titulo_Freedom_byRoberta.
Edit > Paste as New Layer.
Posicione como desejar.
17 - Edit > Copy no Deco_Freedom_byRoberta
Edit > Paste as New Layer.
Com a Ferramenta Pick Tool, posicionar: Position X: 157 Position Y:
526
Image > Add Borders > Symmetric: 1px - color: Preto
18 - Plugin > AAA Filters > Custom> Landscape(Opcional)
Image > Resize > by Pixels: Width 1000 px
Adjust > Sharpness > Sharpen.
19 - Aplicar sua marca
d'água ou assinatura.
File > Export > JPEG Optimizer.
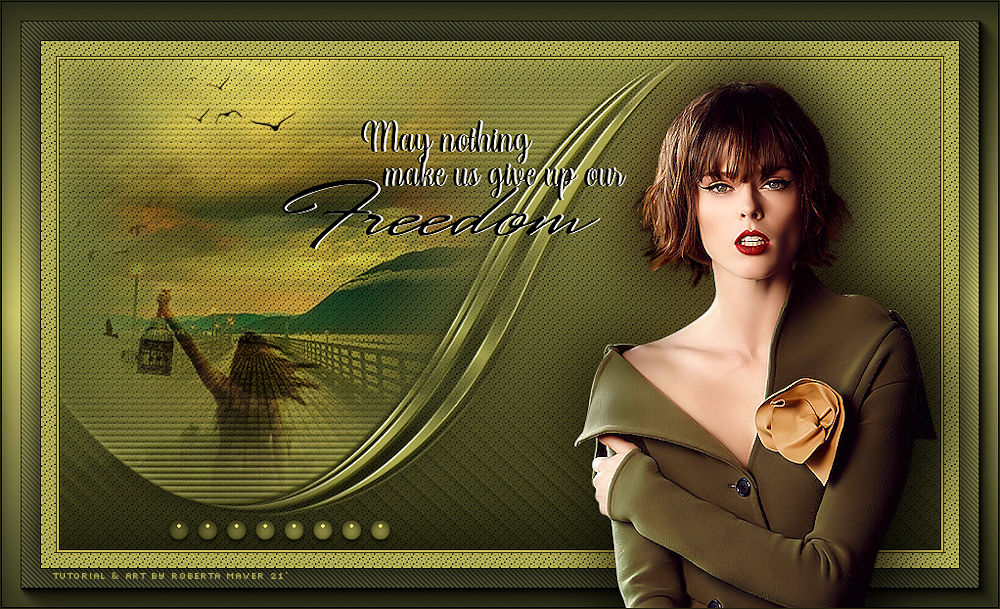
Créditos:Tube:LB Tubes / Paisagem:Angel Star/
ImagembyRoberta

Créditos
Tutorial e art final criado por Roberta Maver
Tube:AnaRidzi1722
Paisagem:PM0018_Isa
Paisagem2: Imagemby Roberta
08/08/2021
Sinta-se à vontade para enviar suas versões.
Terei todo o prazer em publicá-las em nosso site.
|
Tutorial criado por
RobertaMaver, em Agosto de 2021
para
SIM-PSP. Não
poderá ser copiado, retirado de seu lugar,
traduzido ou utilizado em listas de
aprendizados ou grupos sem o
consentimento prévio da autora. |
|