|

Tutorial by
Roberta Maver
English Translation by Moderation SIM-PSP
Original Tutorial

MATERIAL
1 Main Tube of your choice
1
Misted Landscape of your choice
1 Tube
Decorative
of your choice
Alpha_If_I_can_byRoberta
Deco_If_I_can_byRoberta
Deco2_If_I_can_byRoberta
Titulo_byRobertaMaver

PLUGINS
Graphics Plus
Simples
Transparency
Toadies
Muras's meister
MuRa's Filters Seamless
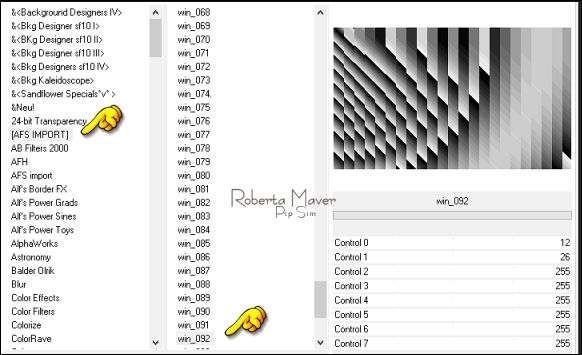
Unlimited 2.0 > AFS IMPORT > win_092 (download)
TUTORIAL
1 - Open the material on the PSP, duplicate and close the
original.
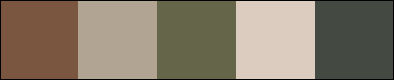
Choose five colors to work with:
Color 1: #7a5640 -
Foreground
Color 2: #b1a493 - Background
Color 3 : #656549
Color 4: #dacabd
Color 5: #444942
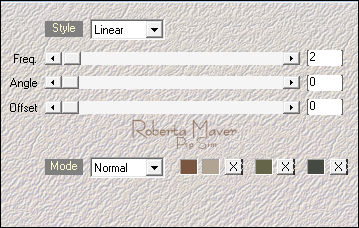
2 - Open the Alpha_If_I_can_byRoberta
Effects > Plugins > Mehdi > Wavy Lab 1.1.
Color sequence: 1, 2, 3, 5.
3 -
Selections > Select All.
Edit > Copy the Misted Landscape.
Edit > Paste Into Selection.
Selections > Select None.
Effects > Image Effects > Seamless Tiling: Default.
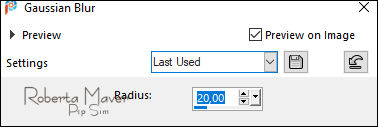
Adjust > Blur > Gaussian Blur: 20.
4 - Layers > Duplicate.
Effects > Plugins > Filters Unlimited 2.0 > AFS IMPORT > win_092:
5 - Effects > Plugins > Transparency > Eliminate Black.
Layers > Duplicate
Image > Mirror > Mirror Horizontal.
Layers > Merge > Merge Down.
Effects > Plugins > Simple > Top Left Mirror.
6 - Effects > Plugins > Mehdi > Weaver:
Layers > Properties > General > Blend Mode: Soft Light
7 -
Effects > Plugins > MuRa's Filters Seamless > Emboss at Alpha:
Default
Activate Layer Raster 1.
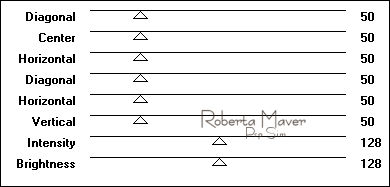
8 - Effects > Plugins > Mehdi > Sorting Tiles:
Effects > Edge effects > Enhance.
9- Effects > Plugins > Toadies > Weaver:

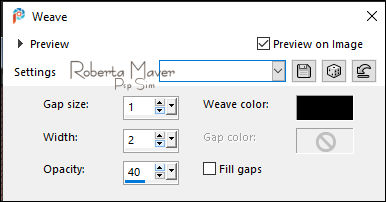
10 - Effects > Texture Effects > Weave:
Activate Top Layer
11 - Layers > New Raster Layer.
Selections > Select All.
Edit > Copy the Misted Paisagem
Edit > paste into selection.
Selections > Select None.
12 - Effects > Image Effects > Seamless Tling:
Layers > Properties > General > Blend Mode: Normal -
Opacity: 77
Adjust > Sharpness > Sharpen.
13 - Edit > Copy the Deco_If_I_can_byRoberta.
Edit > Paste as New Layer.
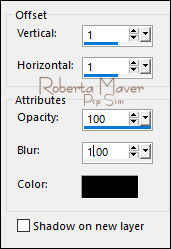
14 - Effects > 3D Effects > Drop Shadow:
Still on the same
Layer
15 - Selections > Load/Save Selection > Load Selection From
Alpha Channel: Selection #2
Press the Delete key on the keyboard
Selections > Select None.
16 - Layers > New Raster Layer.
Selections > Load/Save Selection > Load Selection From Alpha Channel:
Selection #1
Paint with Color 3.
Still with the selection...
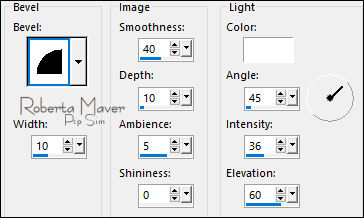
17 - Effects > 3D Effects > Inner Bevel:
Selections > Select None.
18 - Effects > 3D Effects > Drop Shadow:
Activate the layer Raster 1
19 - Layers > Duplicate.
Layers > Arrange > Bring To Top.
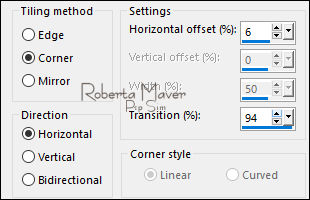
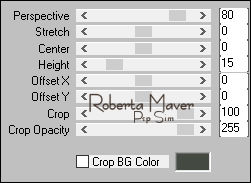
Effects > Plugins > MuRa's Filters Meister > Perspective Tiling:
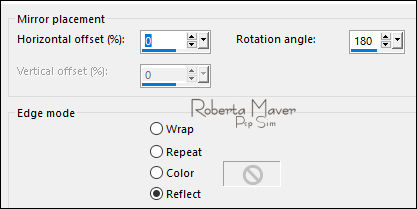
20 - Effects > Reflection Effects > Rotation Mirror:
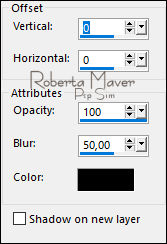
21 - Effects > 3D Effects > Drop Shadow:
Edit >
Repeat Drop Shadow.
22 - Image > Add Borders > Symmetric:
1px color 5
1px color 4
1px color 3
10 px color 1
1 px color 5
1px cor 4
1 px color 3
20 px color 4
With the Magic Wand Tool: Tolerance and Feather: 0, select the 20px
border.
Effects > Texture Effects > Weave:
Selections > invert.
Effects > 3D Effects > Drop Shadow: 0, 0, 100, 40, color #000000 (black).
Selections > Select None.
23 - Image > Add Borders > Symmetric:
1px color 1
1px color 2
1px color 3
40 px color 1
With the Magic Wand Tool: Tolerance and Feather: 0, select the 40px
border.
Effects > Plugins > Graphics Plus > Cross Shadow: Default
24 - Effects > Texture Effects > Weave:
Selections > invert.
Effects > 3D Effects > Drop Shadow:
0, 0, 100, 40, color #000000 (black).
Selections > Select None.
25 - Image > Resize > By Pixels: Width 1.000 px, Resize all layers
Marked
Adjust > Sharpness > Sharpen.
26 - Edit > Copy no Deco2_If_I_can_byRoberta.
Edit > Paste as New Layer.
27 - Edit > Copy no Tube Principal.
Edit > Paste as new Layer.
Image > Resize if necessary.
Adjust > Sharpness > Sharpen.
Position of your choice.
Effects > 3D Effects > Drop Shadow: your choice.
28 - Edit > Copy no Tube Decorativo.
Edit > Paste as new Layer.
Image > Resize if necessary.
Adjust > Sharpness > Sharpen.
Position of your choice.
Effects > 3D Effects > Drop Shadow: your choice.
29 - Edit > Copy
the Titulo_byRobertaMaver
Edit > Paste a New Layer.
Position of your choice.
Apply effects of your choice.
Effects > 3D Effects > Drop Shadow: your choice.
30 -
Image > Add Borders > Symmetric: 1px - color #000000 (black).
31 -
If you wish, resize your work.
Apply your watermark or signature.
File > Export > JPEG Optimizer.
CREDITS:
Tutorial by
Roberta Maver
English Translation by
Moderation
SIM-PSP
Main Tube: Tubed by
LB Tubes & Mists
Misted Landscape:
NHD Mists
Tube Decorative: LuzCristina
Feel free to send your versions.
I will be happy to publish them on our website.

|
Tutorial created by Roberta
Maver, in
September
/ 2021, for SIM PSP. Translated into English in
November
/ 21, by the Moderation of SIM-PSP. It cannot be
copied, removed from its place, translated
or used in learning lists or groups without
the author's
prior consent. |
|