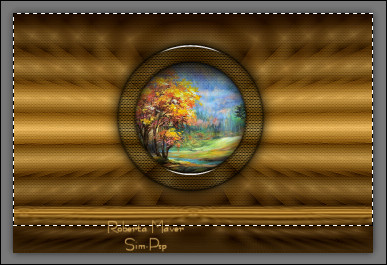
|
TRADUÇÕES
Obrigada aos nossos tradutores!
MATERIAL 1 Tube Decoração à sua escolha AlphaChannel_INFY_byRobertaMaver Deco01_INFY_byRobertaMaver
Deco02_INFY_byRobertaMaver
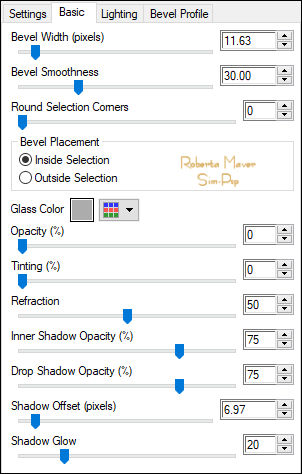
Alien Skin Eye Candy 5 - Impact > Glass
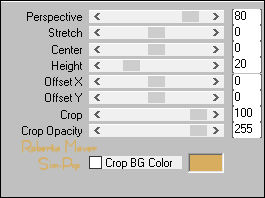
Mura's Meister > Perspective
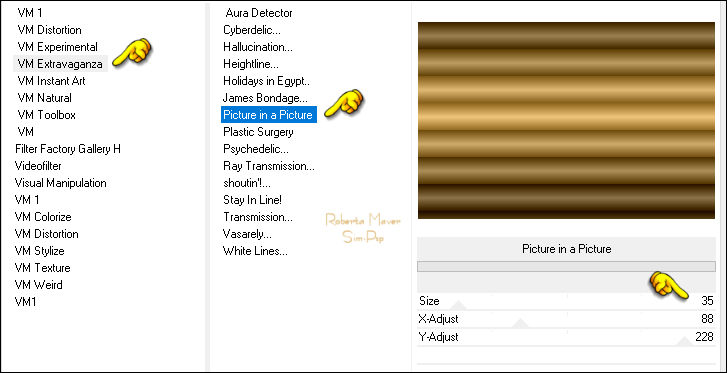
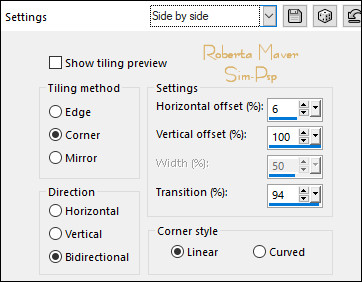
Tiling
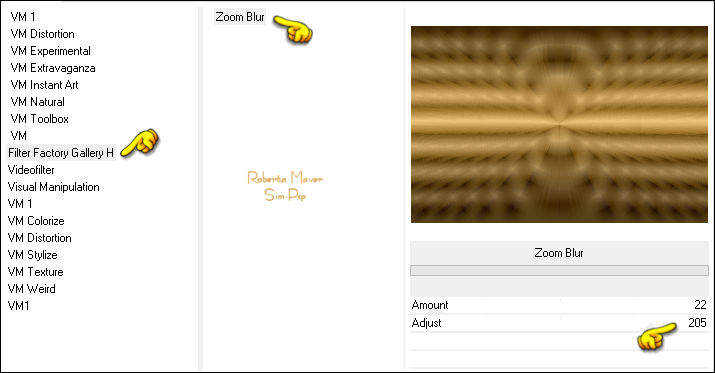
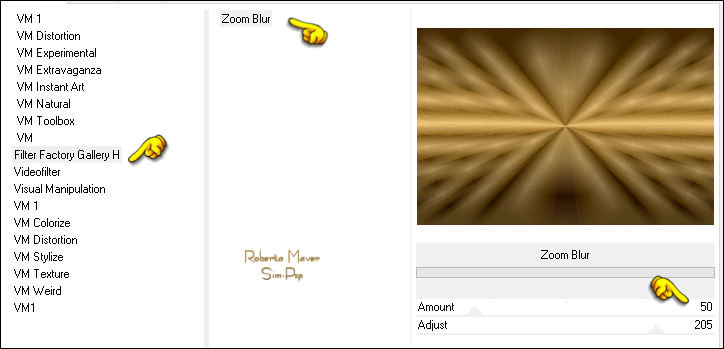
Fechar a visibilidade da layer Copy of Raster 1. Ativar a Layer Raster 1 Effects > Plugins > Filter Factor Gallery H > Zoom Blur:
5 - Effects > Edge Effects > Enhance. Ativar e Abrir a visibilidade da layer Copy of Raster 1.
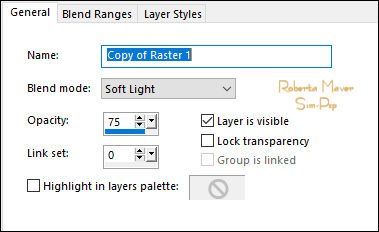
8 - Layers > Properties > General > Blend Mode: Solft Light - Opacity: 75%
Edit > Paste as New Layer.
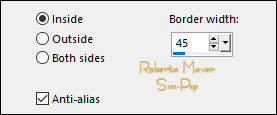
Selections > Modify > Select Selection Borders:
Selections > Promote Selection to Layer. Ainda Selecionada...
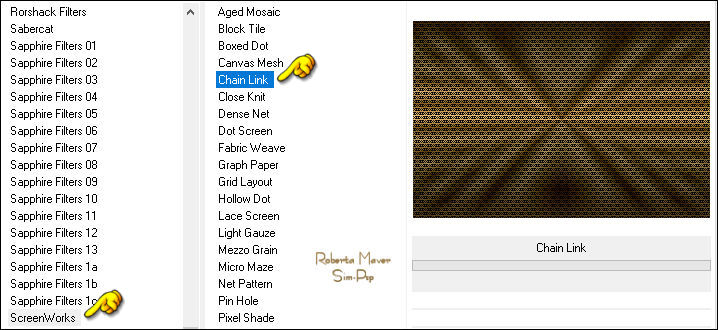
11 - Effects > Plugins > ScreenWorks > Chain Link.
12 - Effects > Plugins > Alien Skin Eye Candy 5 - Impact > Glass:
Effects > Plugins > Alien Skin Eye Candy 5 - Impact > Glass. Layers > Merge > Merge Down. Selections > Select None.
14 - Com a ferramenta Magic Wand: Tolerance e Feather 0: selecionar o centro do círculo.
Selections > Modify > Expand: 20. Layers > New Raster Layer. Pintar com o gradiente Linear em uso. Effects > Plugins > ScreenWorks > Chain Link. Ainda selecionada...
15 - Edit > Copy no Misted Paisagem. Selections > Select None. Adjust > Sharpness > Sharpen. Ativar a layer Promoted Selection (layer do topo)
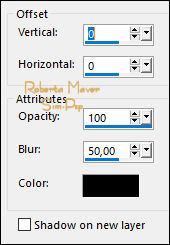
16 - Effects > 3D Effects > Drop Shadow:
Layers > Merge > Merge Down. Edit > Repeat Merge Down. Novamente Edit > Repeat Merge Down.
17 - Ativar a Layer Raster 2
Effects > Plugins > Mura's Meister > Perspective
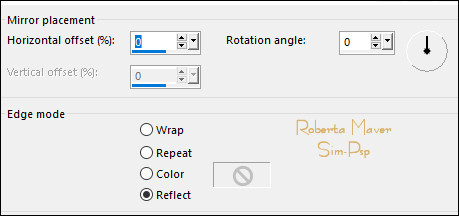
Tiling: 18 - Effects > Reflection Effects > Rotating Mirror:
Effects > Image Effects > Seamless Tiling:
Ativar a layer Copy of Raster 1.
20 - Edit > Copy no Deco01_INFY_byRobertaMaver. Layers > Properties > General: Blend Mode Luminance (legal) - Opacity 100%.
Com a Ferramenta Pick Tool, posicionar: Position X:
32 Position Y: -1
1 px - color: Foreground #5e4821
Edit > Paste Into Selection.
Effects > 3D Effects > Drop Shadow: 0, 0, 100, 50,
Color: #000000.
Layers > Duplicate. Com a Ferramenta Pick Tool, posicionar: Position X: 568 Position Y: 304 Layers > Duplicate. Com a Ferramenta Pick Tool, posicionar: Position X: 602 Position Y: 238 Layers > Merge > Merge Down. Edit > Repeat Merge Down.
25 - Layers > Duplicate. Image > Mirror > Mirror Horizontal. Image> Resize: 80% - all layers unchecked. Com a Ferramenta Pick Tool, posicionar: Position X: 269 Position Y: 216 Layers > Merge > Merge Down.
Nota: Na versão foi invertido a posição do efeito da layer Raster 2, aplicando o Image > Mirror > Mirror Horizontal.
Adjust > Sharpness > Sharpen.
27 - Edit > Copy no Tube Decorativo.
Adjust > Sharpness > Sharpen.
28 - Edit > Copy no Titulo_INFY_byRobertaMaver. Effects > 3D Effects > Drop Shadow: 1, 1, 100, 0, Color: #000000.
Layers > Properties > General > Blend Mode: Overlay
ou Soft Light.
Créditos
Tube Paisagem:
Tine
Decoração:
Maryse
Sinta-se à vontade para enviar suas versões. Terei todo o prazer em publicá-las em nosso site.
|