|
English Translation by Soxikibem Original Tutorial
MATERIAL 1 Tube of your choice Masks: Narah_Mask_1453, Narah_Mask_1418
Plugins Carolaine and Sensibility, Flaming Pear
Execution
1 - Open your material, duplicate and close the original. Choose two colors to work with. Here I used the color #5e0720 in the foreground and #e3ddcf in the background. Edit > Copy no tube.
2 - Open a transparency of 900x650px. Paint with Foreground Color.
3 - Effects > Plugin Carolaine and Sensibility > CS-HLines: 3, 0, 10.
4 - Layers > New Raster Layer. Selections > Select All. Paste Into Selection. Selections > Select None.
5 - Effects > Image Effects > Seamless Tiling: Default.
6 - Adjust > Blur > Gaussian Blur: 40.
7 - Layers > Duplicate. Image > Mirror > Mirror Horizontal. Layers > Merge > Merge Down.
8 - Apply mask: Layers > New Mask Layer > From Image > Narah_Mask_1453. Layers > Merge > Merge Group.
9 - Effects > Plugin Carolaine and Sensibility > CS-LDots: 191, 3, 2. Effects > 3D Effects > Drop Shadow: -20, 0, 100, 0, with background color. Effects > Edge Effects: Enhance.
10 - Layers > New Raster Layer. Paint with background color.
11 - Apply mask: Layers > New Mask Layer > From Image > Narah_Mask_1418. Layers > Merge > Merge Group.
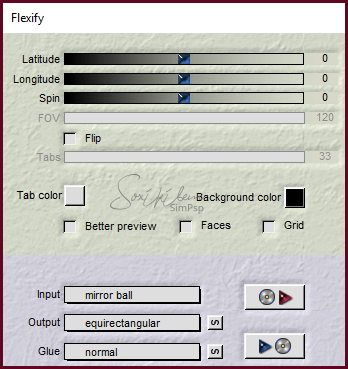
12 - Effects > Plugin Flaming Pear > Flexify.
13 - Effects > Edge Effects: Enhance.
14 - Edit > Copy no tube. Edit > Paste as new layer. Position. Apply Drop Shadow as you prefer.
15 - Image > Add Borders > symmetric; 1px black color 3px background color 3px foreground color 15px cor background 3px foreground color 3px background color 1px black color
16 - Edit > Copy na WordArt-SealedWithAKiss. Edit > Paste as new layer. Colorize if necessary to match your work.
17 - If you want to resize your work now. Apply your watermark or signature. File > Export > JPEG Optimizer...
CREDITS: Tube ©verymany - WordArt by A SouthernQuinnDesign - Masks by Narah
Tutorial by Soxikibem'19
Feel free to submit your versions. I'll be happy to post them on our site.
|