|
English Translation by Soxikibem Original Tutorial
MATERIAL 1 Main Tube of your choice. alpha_channel81_soxikibem cute_solar_system dotted_lines_soxikibem.png elipse_soxikibem.png orange_title_soxikibem,png orange-crush.PspGradient (Put in PSP Gradients folder),
Pluguins Carolaine and Sensiblity FM Tile Tools Mura's Meister Unlimited 2.0
Tutorial
1- Open the material in the PSP, duplicate and close the original.Choose two colors to work with. Foreground #424533 Background #b92215
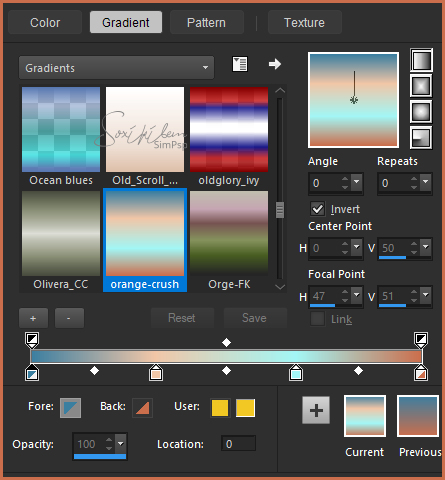
2 - Open the alpha_channel81_soxikibem. Paint with the gradient orange-crush.pspGradient (attached in the material). The Gradient will use the two colors you chose.
3 - Adjust > Blur > Gaussian Blur: 50.
4 - Layers > New Raster Layer. Selections > Select All. Edit > Copy no tube. Edit > Paste Into Selection. Selections > Select None.
5 - Effects > Image Effects > Seamless Tiling: Default.
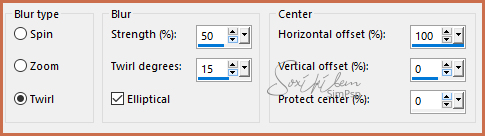
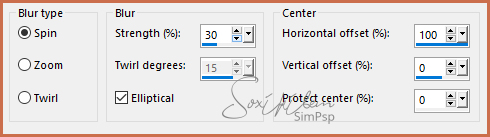
6 - Adjust > Blur > Radial Blur.
7 - Effects > Filters Unlimited 2.0 > Bkg Designer sf10 I > 4 Way Average.
8 - Effects > Edge Effects > Enhance.
9 - Layers > Merge > Merge Down. Layers > Duplicate.
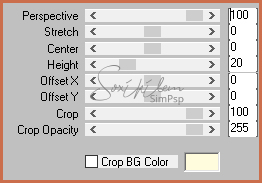
10 - Effects > Plugin Mura's Meister > Perspective Tiling.
11 - Selections > Load/Save Selections > Load Selection From Alpha Channel: Selection #1. Layers > New Raster Layer. Paint this selection with the gradient you are using.
12 - Adjust > Blur > Gaussian Blur: 30. Selections > Select None.
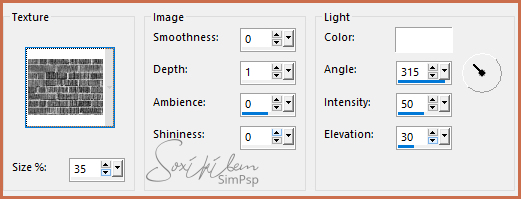
13 - Effects > Texture Effects > Texture. Texture: Brick Wall.
14 - Effects > 3D Effects > Drop Shadow: -10, 0, 70, 30, bakground color. Layers > Arrange > Move Down.
15 - Ative a layer Copy of Raster 1. Effects > 3D Effects > Drop Shadow: -10, 0, 70, 30, bakground color.
16 - Layers > New Raster Layer. Selections > Load/Save Selections > Load Selection From Alpha Channel: Selection #2. Paint this selection with background color. Layers > Properties > General > Blend Mode: Hard Light / Opacity: 50%
17 - Effects > Plugin Carolaine and Sensiblity > CS-LDots: 50, 3, 2. Effects > Edge > Effects: Enhance.
18 - Layers > New Raster Layer. Edit > Copy in the cute_solar_system and paste into selection. Layers > Properties > General > Blend Mode: Soft Light. Selections > Select None.
19 - Layers > New Raster Layer. Selections > Load/Save Selections > Load Selection From Alpha Channel: Selection #3. Paint this selection with foreground color. Effects > Plugin Carolaine and Sensiblity > CS-LDots: 255, 3, 2.
20 - Layers > Properties > General > Blend Mode: Exclusion. Selections > Select None.
21 - Layers > Merge > Merge Visible.
22 - Selections > Load/Save Selections > Load Selection From Alpha Channel: Selection #4.
23 - Adjust > Blur > Gaussian Blur: 30.
24 - Effects > Plugin Carolaine and Sensiblity > CS-LDots: 50, 3, 2.
25 - Effects > Plugin FM Tile Tools > Saturation Emboss.
26 - Selections > Invert. Effects > 3D Effects > Drop Shadow: 0, 0, 70, 50, color #000000. Selections > Select None.
27 - Layers > New Raster Layer. Selections > Load/Save Selections > Load Selection From Alpha Channel: Selection #5. Paint this selection with foreground color. Selections > Select None.
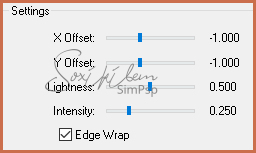
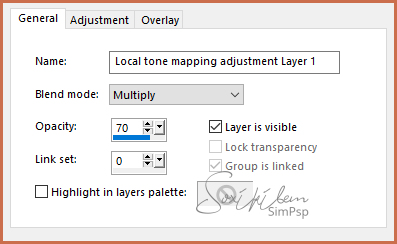
28 - Adjust > Blur > Radial Blur.
29 - Effects > Plugin Carolaine and Sensiblity > CS-DLines: 40, 5.
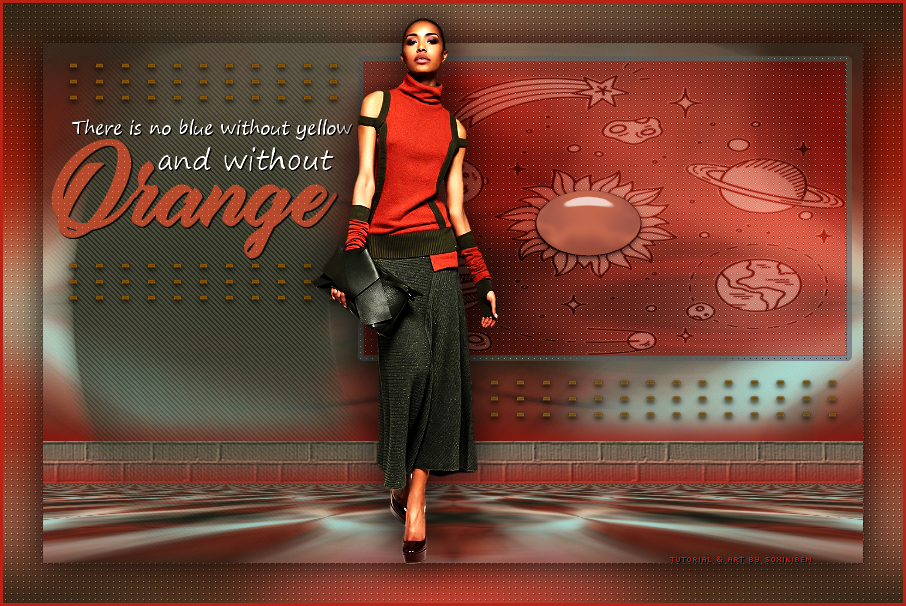
30 - Edit > Copy in the dotted_lines_soxikibem.png Edit > paste a new layer. Effects > Image Effects > Offset: Horizontal 0, Vertical 60, Custom, Transparent.
31 - Edit > Copy in the elipse_soxikibem.png Edit > paste a new layer. Effects > image Effects > Offset: Horizontal 136, Vertical 77, Custom, Transparent.
32 - Layers > New Adjustment Layer > Local tone mapping. Change only in the General tab as shown in print.
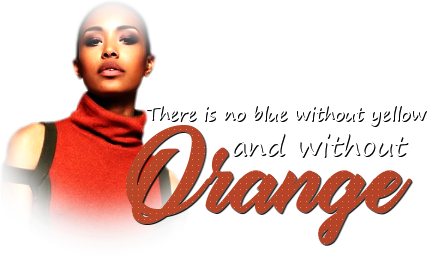
33 - Edit > Copy no orange_title_soxikibem.png Edit > paste a new layer. Effects > image Effects > Offset: Horizontal -251, Vertical 113, Custom, Transparent.
34 - Edit > Copy no tube. Edit > paste a new layer. Position. Effects > 3D Effects > Drop Shadow of your choice.
35 - Image > Add Borders: 3px, background color.
36 - If you want to resize your work now. Apply your watermark or signature. File > Export > JPEG Optimizer...
CREDITOS: Tube by SuizaBella - cute_solar_system recebido em grupos de troca
Tutorial by Soxikibem'19
Feel free to submit your versions. I'll be happy to post them on our site.
|