|
TRADUÇÕES:
O Sim
PSP valoriza e reconhece o trabalho das tradutoras que tornam os
tutoriais acessíveis a diferentes idiomas.
MATERIAL
Tutorial elaborado no PSP X9 Testado e revisado por Marcinha no PSP X5.
Agradeço às Tubeiras pelos Tubes e Masks, pois sem eles não seria
possível criar este trabalho.
Execução
1 - Abrir o material no PSP, duplique e feche o original. Escolher 2 cores para trabalhar. Foreground #51524d Background #f6f6f6
2 - Abra o AlphaChannelWinter. Pintar com a cor do background. Selections > Select All.
3 - Edit > Copy no Misted Paisagem. Edit > Paste Into Selection. Selections > Select None.
4 - Adjust > Blur > Motion Blur: Angle 45, Strenth 100. Edit > Repeat Motion Blur.
5 - Effects > Edge Effects > Enhance. Edit > Repeat Enhance Edges.
6 - Plugin > VanDerLee > UnPlugged-X.
7 - Effects > Image Effects > Seamless Tiling: Default.
8 - Layers > Duplicate. Layers > New Mask Layer > From Image: NarahsMasks_1549. Layers > Merge > Merge Group.
9 - Layers > Properties > General > Blend Mode: Difference, Opacity 50%. Layers > Merge > Merge Visibile.
10 - Selections > Load/Save Selection > Load Selection From Alpha Channel: winter1. Effects > Plugin Visual Manipulation > Transmission.
11 - Layers > Promote Selection to Layer. Selections > Select None. Layers > Properties > General > Blend Mode: Screen.
12 - Ativar a layer Merged. Selections > Load/Save Selection > Load Selection From Alpha Channel: winter2. Effects > Plugin Visual Manipulation > Radial Transmission.
13 - Layers > Promote Selection to Layer. Selections > Select None. Layers > Properties > General > Blend Mode: Screen.
14 - Ativar a layer Merged. Selections > Load/Save Selection > Load Selection From Alpha Channel: winter3. Effects > Plugin Visual Manipulation > Radial Transmission.
15 - Layers > Promote Selection to Layer. Selections > Select None. Layers > Properties > General > Blend Mode: Screen.
16 - Ativar a layer Merged. Selections > Load/Save Selection > Load Selection From Alpha Channel: winter4. Effects > Plugin Visual Manipulation > Transmission.
17 - Layers > Promote Selection to Layer. Selections > Select None. Layers > Properties > General > Blend Mode: Screen.
18 - Ativar a layer Merged. Selections > Load/Save Selection > Load Selection From Alpha Channel: winter5. Layers > Promote Selection to Layer. Effects > Plugin Carolaine and Sensibility > CS-DLines.
19 - Selections > Select None. Layers > Properties > General > Blend Mode: Multiply.
20 - Confira as Layers. Se desejar altere os blens.
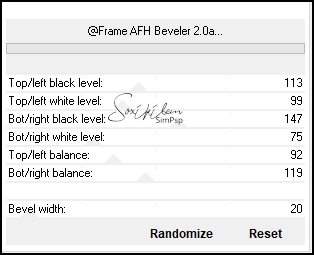
21 - Layers > Merge > Merge Visible. Layers > Duplicate.
22 - Adjust > Blur > Gaussian Blur: 20. Effects > Plugin Mura's Meister > Perspective Tiling.
23 - Effects > 3D Effects > Drop Shadow: -10, 0, 35, 20, cor preta.
24 - Edit > Copy no Misted Paisagem. Edit > Paste a New Layer. Posicione como abaixo.
25 - Edit > Copy no tituloWinterBySoxikibem. Edit > Paste a New Layer. Com a ferramenta pick Tool posicione: Position X 369, Position Y 320.
26 - Edit > Copy no decorWinter1BySoxikibem. Edit > Paste a New Layer. Com a ferramenta pick Tool posicione: Position X 2, Position Y 101. Layers > Properties > General > Blend Mode: Multiply, Opacity: 50%.
27 - Layers > Duplicate. Image > Free Rotate: Right, 90. Com a ferramenta pick Tool posicione: Position X: 726, Position Y: 0.
28 - Edit > Copy no Tube principal. Posicione. Effects > 3D Effects > Drop Shadow como preferir.
29 - Image > Add Borders: 2px na cor do foreground 40px na cor do background
30 - Effects > Filters Unlimited 2.0 > Background Designers IV > @FRame AFH Beveler 2.0a
31 - Selections > Select All. Selections > Modify > Contract: 20. Effects > 3D Effects > Drop Shadow: 2, 2, 100, 0, cor preta. Effects > 3D Effects > Drop Shadow: -2, -2, 100, 0, cor preta.
32 - Effects > 3D Effects > Drop Shadow: 10, -10, 100, 10, cor preta. Effects > 3D Effects > Drop Shadow: -10, 10, 100, 10, cor preta. Selections > Select None.
33 - Se você desejar, redimensione seu trabalho. Aplicar sua marca d'água ou assinatura. File > Export > JPEG Optimizer.
CREDITOS Tube by C-Josy - Misted by Maryse - Mask by Narah
Tutorial by Soxikibem'19
Sinta-se à vontade para enviar suas versões. Terei todo o prazer em publicá-las em nosso site.
|