|
TRADUÇÕES:
Obrigada aos nossos tradutores!
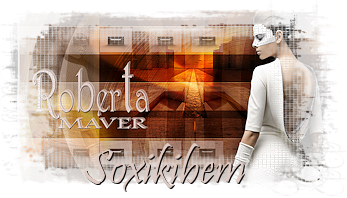
MATERIAL 1 Tube a sua escolha 1 Misted Paisagem a sua escolha DecorBySoxikibem Decor2BySoxikibem tituloRobertaBySoxikibem NarahsMasks_1599
Pluguins Flaming Pear FM Tile Tools VM Extravaganza
Execução
1 - Abrir o material no PSP, duplique e feche os originais. Escolher duas cores para trabalhar, aqui usei as cores:
Foreground: #563320 Background: #d5d1cc
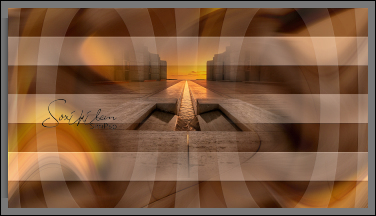
2 - Abra uma transparência de 900x500px. Pinte com a cor do foreground. Selections > Select All. Edit > Copy no Misted Paisagem. Edit > Paste Into Selection. Selections > Select None. Effects > Image Effects > Seamless Tiling: Default.
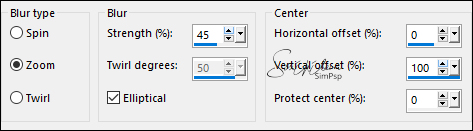
3 - Adjust > Blur > Radial Blur.
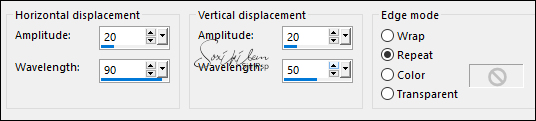
4 - Effects > Distortion Effects > Wave.
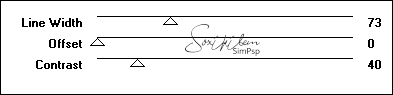
5 - Plugins VM Extravaganza > Transmission.
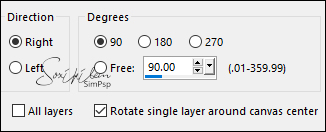
6 - Plugins FM Tile Tools > Blend Emboss: Default. Layers > Duplicate. Image > Free Rotate.
7 - Plugin Flaming Pear > Ornament. Com a Magic Wand configurada em feather:20,
selecione como no print abaixo.
Aperte a tecla Delete 6 vezes no teclado. Selections > Select None.
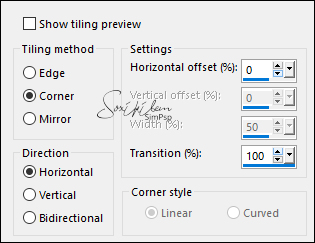
8 - Effects > Image Effects > Seamless Tiling.
Layers > Properties > General > Blend Mode: Screen, Opacity 50.
9 - Edit > Copy no Misted Paisagem. Edit > Paste a New Layer.
Layers > Properties > General > Blend Mode: Overlay.
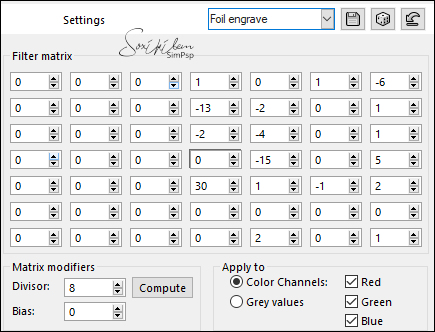
10 - Layers > New Raster Layer. Pinte com a cor do background. Layers > New Mask Layer > From Image: NarahsMasks_1599. Layers > Merge > Merge Group. Layers > Properties > General > Blend Mode: Overlay, Opacity 70.
11 - Ativar a Layer Raster 1. Layers > Duplicate. Layers > Arrange > Bring To Top. Image > Resize: 70%, all layers desmarcado. Plugin Mura's Meister > Pole Transform.
12 - Layers > Duplicate. Image > Mirror > Mirror Horizontal. Layers > Merge > Merge Down.
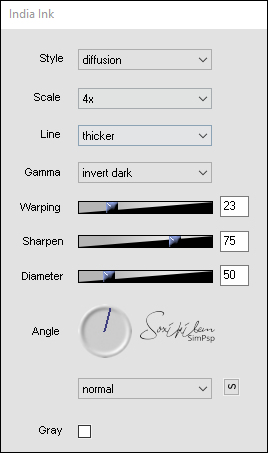
13 - Plugin Flaming Pear > India Ink.
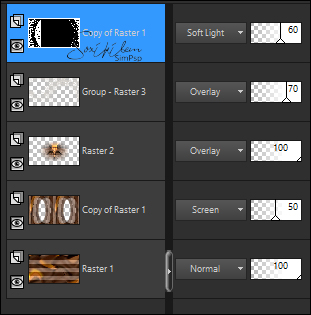
Layers > Properties > General > Blend Mode: Soft Light, Opacity 60. Confira os Blends das Layers. Se desejar mude o blends de acordo com a tonalidade de cor que esta usando.
14 - Edit > Copy no Tube Principal. Edit Paste a New Layer. Posicione à direita. Effects > 3D Effects > Drop Shadow como preferir. Layers > Duplicate. Image > Mirror > Mirror Horizontal. Layers > Properties > General > Opacity 20%.
15 - Edit > Copy no DecorBySoxikibem. Edit > Paste a New Layer. Pick Tool: Position X 111, Position Y 78.
16 - Edit > Copy no tituloRobertaBySoxikibem. Edit > Paste a New Layer. Pick Tool: Position X 33, Position Y 161.
17 - Ative a layer Raster 1. Edit > Copy.
18 - Image > Add Borders: 1px cor foreground 3px cor background 1px cor foreground Selections > Select All.
19 - Image > Add Borders: 40px com qualquer cor. Selections > Invert. Edit > Paste Into Selection.
20 - Effects > User Defined Filter: Foil engrave.
21 - Selections > Select None. Image > Add Borders: 1px cor foreground 3px cor background 1px cor foreground
22 - Edit > Copy no Decor2BySoxikibem. Edit > Paste a New Layer. Layers > Properties > General > Blend Mode: Hard Light.
23 - Aplicar sua marca d'água ou assinatura. File > Export > JPEG Optimizer.
CREDITOS Tube & Misted by Verlaine - Mask by Narah Tutorial by Soxikibem'20
Sinta-se à vontade para enviar suas versões. Terei todo o prazer em publicá-las em nosso site.
|