|
TRADUÇÕES:
Obrigada aos nossos tradutores!
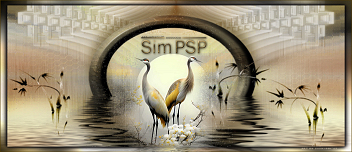
MATERIAL 1 Tube Principal à sua escolha 1 Misted Paisagem à sua escolha DecorNavyBySoxikibem tituloNavyBySoxikibem Selections: navy1BySoxikibem* *Salve as seleções na pasta Selections do seu PSP
Plugins Alien Skin Eye Candy 5 - Impact Filters Unlimited 20 FM Tile Tools
Tutorial elaborado no PSP 2020 Ultimate
Execução
1 - Abrir o material no PSP, duplique e feche os originais. Escolha tres cores para trabalhar: Foreground: #000080 Background: #f5fffa
2 - Abra uma transparência de 900x500px. Pintar a transparência com o Gradiente: Sunburst, formado pelas cores escolhidas.
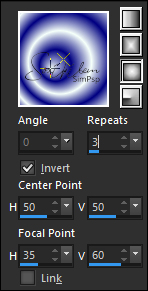
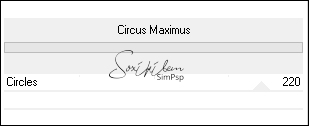
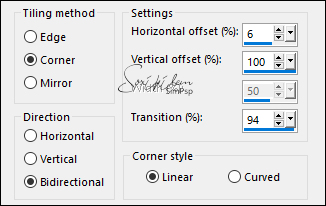
3 - Effects > Plugins > Filters Unlimited 20 > Bkg Designer sf10 I > Circus Maximus:
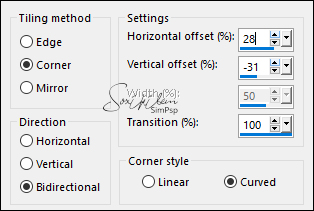
4 - Effects > Image Effects > Seamless Tiling: Side by Side.
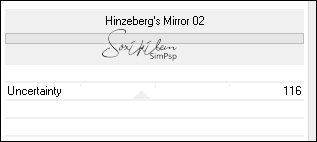
5 - Layers > Duplicate. Effects > Plugins > Filters Unlimited 2.0 > Bkg Designer sf10 II > Hinzeberg's Mirror 02.
6 - Layers > Properties > General > Blend Mode: Soft Light. Layers > Merge > Merge Down. Adjust > Sharpness > Sharpen.
7 - Selections > Load/Save Selection > Load Selection From Disk: navy1BySoxikibem. Selections > Promote Selection to Layer. Selections > Modify > Contract: 5. Pressione a tecla Delete do teclado.
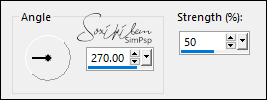
8 - Mudar o Gradiente para Linear, Angle 0, Repeat 0.
Layers > New Raster Layer. Pintar as seleções com o gradiente.
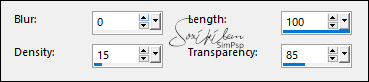
9 - Effects > Texture Effects > Fur:
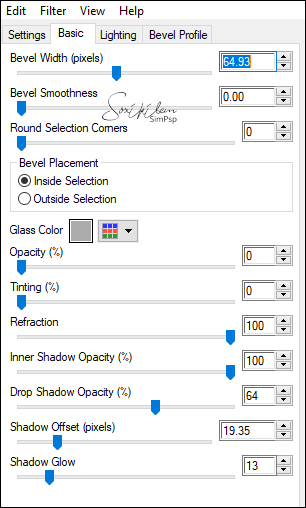
10 - Effects > Plugins > Alien Skin Eye Candy 5 - Impact > Glass. Setting: Clear.
Selections > Select None. Layers > Arrange > Move Down.
11 - Ativar a Layer Promoted Selection. Effects > 3D Effects > Drop Shadow: 5, 5, 100, 5, color: Foreground.
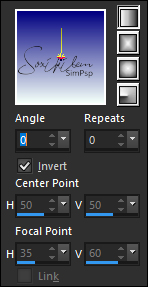
12 - Layers > Duplicate. Image > Mirror > Mirror Horizontal. Effects > Image Effects > Seamless Tiling.
Layers > Properties > General > Opacity: 70%.
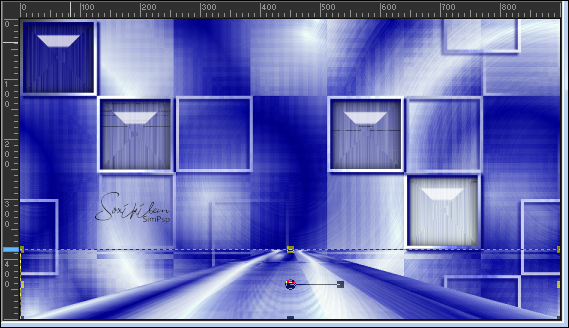
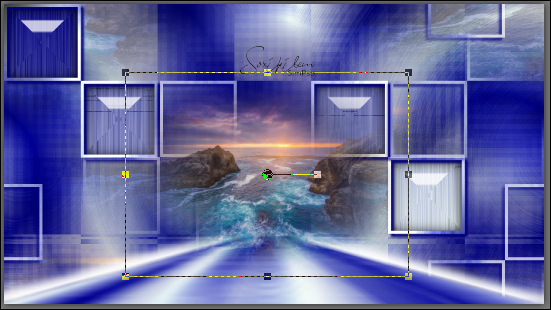
13 - Ativar a layer Raster 1. Layers > Duplicate. Layers > Arrange > Bring to Top. Effects > Geometric Effects > Perspective - Vertical.
14 - Com a ferramenta Pick Tool: Mode Scale... arraste para baixo até a medida 384.
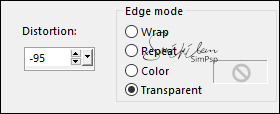
15 - Adjust > Blur > Motion Blur.
Effects > 3D Effects > Drop Shadow: 0, 60, 100, 20, color: #FFFFFF ou a cor do background (cor clara). Effects > 3D Effects > Drop Shadow: 0, -60, 100, 20, color: #FFFFFF ou a cor do background (cor clara).
16 - Ativar a Layer Raster 1. Layers > New Raster Layer. Selections > Select All. Edit > Copy no Misted Paisagem. Edit > Paste Into Selection. Selections > Select None. Effects > Image Effects > Seamless Tiling: Default. Layers > Properties > General > Blend Mode: Multiply - Opacity: 50%. Adjust > Sharpness > Sharpen.
17 - Ativar a Layer do Topo. Edit > Copy no Misted Paisagem. Edit > Paste a New Layer. Image > Resize se necessário. Posicionar como indicado:
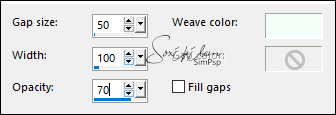
18 - Effects > Texture Effects > Weave: Weave color: cor do background.
Effects > Plugins > FM Tile Tools > Blend Emboss: Default.
19 - Edit > Copy Merged. Image > Add Borders > Symmetric: 1px - color: do foreground 5px - color: do background 1px- color: do foreground. Selections > Select All. Image > Add Borders > Symmetric: 30px com qualquer cor Selections > Invert. Edit > Paste Into Selection.
20 - Adjust > Blur > Gaussian Blur: 20. Effects > Texture Effects > Weave. Weave color: cor do background.
21 - Effects > Edge Effects > Enhance. Selections > Invert. Effects > 3D Effects > Drop Shadow: 15, 15, 75, 50, Color: #000000 Selections > Select None.
22 - Edit > Copy no DecorNavyBySoxikibem. Edit > Paste a New Layer. Com a ferramenta Pick Tool, posicionar: Position X 54 , Position Y 151.
23 - Edit > Copy no tituloNavyBySoxikibem. Edit > Paste a New Layer. Com a ferramenta Pick Tool, posicionar: Pick Tool: Position X 437 , Position Y 27.
24 - Edit > Copy no Tube principal. Edit > Paste a New Layer. Posicionar à esquerda. Effects > 3D Effects > Drop Shadow: à sua escolha.
25 - Image > Add Borders > Symmetric: 1px - color: do foreground 5px - color: do background 1px - color: do foreground.
26 - Se desejar, redimensione o seu trabalho. Aplicar sua marca d'água ou assinatura. File > Export > JPEG Optimizer.
CREDITOS Versao 1 & 2: Tube by L&B Tubes - Misted Paisagem by Grisi - Font: 2Peas 80's.ttf
Sinta-se à vontade para enviar suas versões. Terei todo o prazer em publicá-las em nosso site.
|