|
TRADUÇÕES:
Obrigada aos nossos tradutores!
MATERIAL 1 Tube Principal à sua escolha 1 Misted Paisagem à sua escolha decorChatreuse1BySoxikibem decorChatreuse2BySoxikibem TituloChartreuseSoxikibem
PLUGINS Sketch > Water Paper Tramages > Waffle Mehdi > Sorting Tiles Mura's Seamless > Stripe Carolaine and Sensibility > CS-DLines AAA Frames > Foto Frame
Nota: Fique a vontade para alterar os Blends de acordo com o material e cores escolhidas para o seu trabalho.
Tutorial elaborado no PSP 2020 Ultimate Execução
1 - Abrir o material no PSP, duplique e feche os originais. Escolha 2 cores para trabalhar: Foreground: #b7cd10 Background: #444d38
2 - Abra uma transparência de 850x500px. Pintar com a cor do foregorund (cor clara). Selections > Select All.
3 - Edit > Copy no Misted Paisagem. Edit > Paste Into Selection. Selections > Select None.
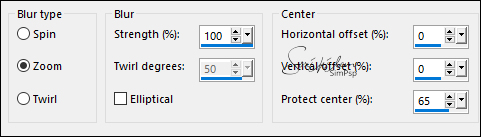
4 - Adjust > Blur > Radial Blur:
Edit > Repeat Radial Blur.
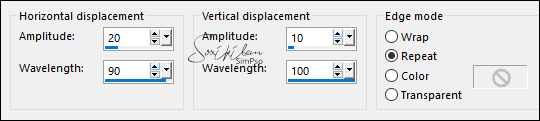
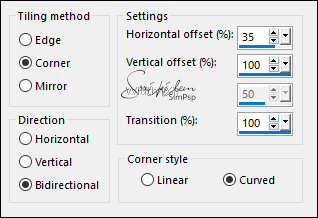
5 - Effects > Distortion Effects > Punch: 100. Effects > Distortion Effects > Wave:
6 - Effects > Plugins > Sketch > Water Paper:
Effects > Edge Effects > Enhance.
7 - Layers > Duplicate. Effects > Plugins > Tramages > Waffle:
Layers > Properties > General > Blend Mode: Screen.
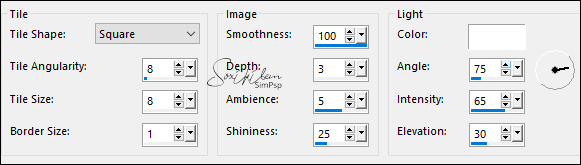
8 - Effects > Texture Effects > Tiles: Color: #ffffff (branco)
Effects > Edge Effects > Enhance.
9 - Edit > Copy no Misted Paisagem. Edit > Paste as New Layer. Layers > Properties > General > Blend Mode: Soft Light.
10 - Layers > New Raster Layer. Selections > Select All. Selections > Modify > Contract: 60. Pintar esta seleção com a cor do foreground (cor clara). Selections > Modify > Contract: 60. Pressione a Tecla Delete do teclado.
11 - Layers > New Raster Layer. Edit > Copy Merged. Edit > Paste Into Selection.
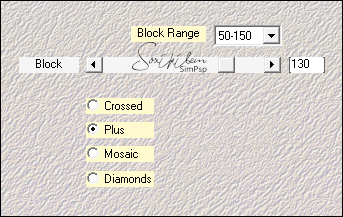
12 - Effects > Plugins > Mehdi > Sorting Tiles:
Layers > Properties > General > Blend Mode: Screen, Opacity: 80%. Effects > Edge Effects > Enhance.
13 - Layers > New Raster Layer. Edit > Copy no Misted Paisagem. Edit > Paste Into Selection. Layers > Properties > General > Blend Mode: Hard Light, Opacity: 50%. Adjust > Sharpness > Sharpen.
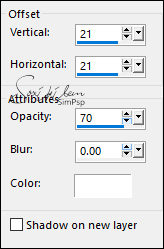
14 - Effects > 3D Effects > Drop Shadow: 21, 21, 100, 0, Color: #ffffff (branco) Shadow on new layer marcado.
Selections > Select None.
15 - Com a layer Raster 5 Shadow1 ativa... Effects > Image Effects > Seamless Tiling: Mirror Ghost.
Layers > Properties > General > Opacity: 60%.
16 - Layers > Duplicate. Image > Mirror > Mirror Vertical.
17 - Ativar a Layer Raster 3. Layers > Duplicate. Effects > Plugins > Mura's Seamless > Stripe:
18 - Com a ferramenta Magic Wand: Tolerance e Feather 0, selecionar a parte preta:
Image > Negative Image. Selections > Select None. Layers > Properties > General > Opacity 50%.
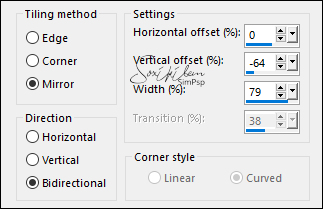
19 - Effects > Image Effects > Seamless Tiling:
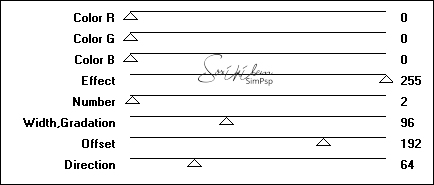
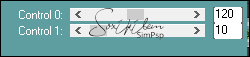
20 - Ativar a Layer Raster 3. Effects > Plugins > Carolaine and Sensibility > CS-DLines:
21 - Effects > 3D Effects > Drop Shadow: Color: #ffffff - Shadow on new layer desmarcado.
22 - Ativar a layer do Topo (Raster 5). Edit > Copy no decorChatreuse1BySoxikibem. Edit > Paste as New Layer. Layers > Properties > General > Blend Mode: Dissolve, Opacity: 50%.
23 - Edit > Copy no decorChatreuse2BySoxikibem. Edit > Paste as New Layer. Pick Tool: Position X 171, Position Y 105.
24 - O efeito deste item é opcional. Layers > New Adjustment Layer > Fill Light/Clarity. Mudar apenas na Aba General em Blend Mode para Multiply.
26 - Edit > Copy no Tube Principal. Edit > Paste as New Layer. Posicionar à esquerda. Effects > 3D Effects > Drop Shadow à sua escolha.
27 - Edit > Copy Special > Copy Merged.
28 - Image > Add Borders > Symmetric: 1px cor background 2px cor foreground 1px cor background Selections > Select All. 10 px com qualquer cor. Selections > Invert. Edit > Paste Into Selection.
29 - Adjust > Blur > Gaussian Blur: 20. Effects > Plugins > Graphics Plus > Cross Shadow: Default.
Selections > Select None.
30 - Image > Add Borders > Symmetric: 1px cor background 2px cor foreground 1px cor background Selections > Select All 40px cor foreground. Selections > Invert.
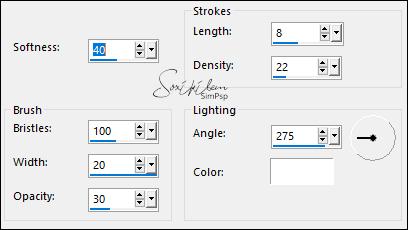
31 - Effects Art Media Effects > Brush Strokes: Color: #ffffff (branco)
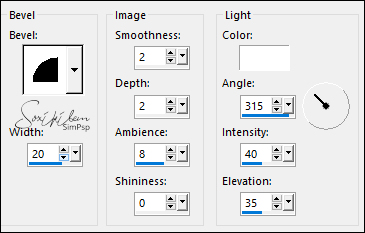
32 - Effects > 3D Effects > Inner Bevel:
Selections > Select None.
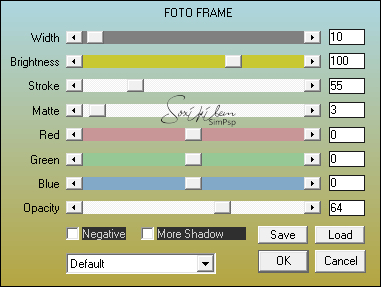
33 - Effects > Plugins > AAA Frames > Foto Frame:
34 - Edit > Copy no TituloChartreuseSoxikibem. Edit > Paste as New Layer. Pick Tool: Position X 415, Position Y 422. Layers > Properties > General > Blend Mode: Luminence (L), Opacity 80%.
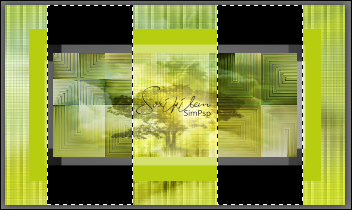
35 - Aplicar sua marca d'água ou assinatura. File > Export > JPEG Optimizer.
CRÈDITOS: Tutorial, Formatação e Art Final: By Soxikibem Tube Principal: Tubed by Ana Ridzi - Misted Paisagem: Tubed by Grisi
Sinta-se à vontade para enviar suas versões. Terei todo o prazer em publicá-las em nosso site.
|