|
TRADUÇÕES:
Obrigada aos nossos tradutores!
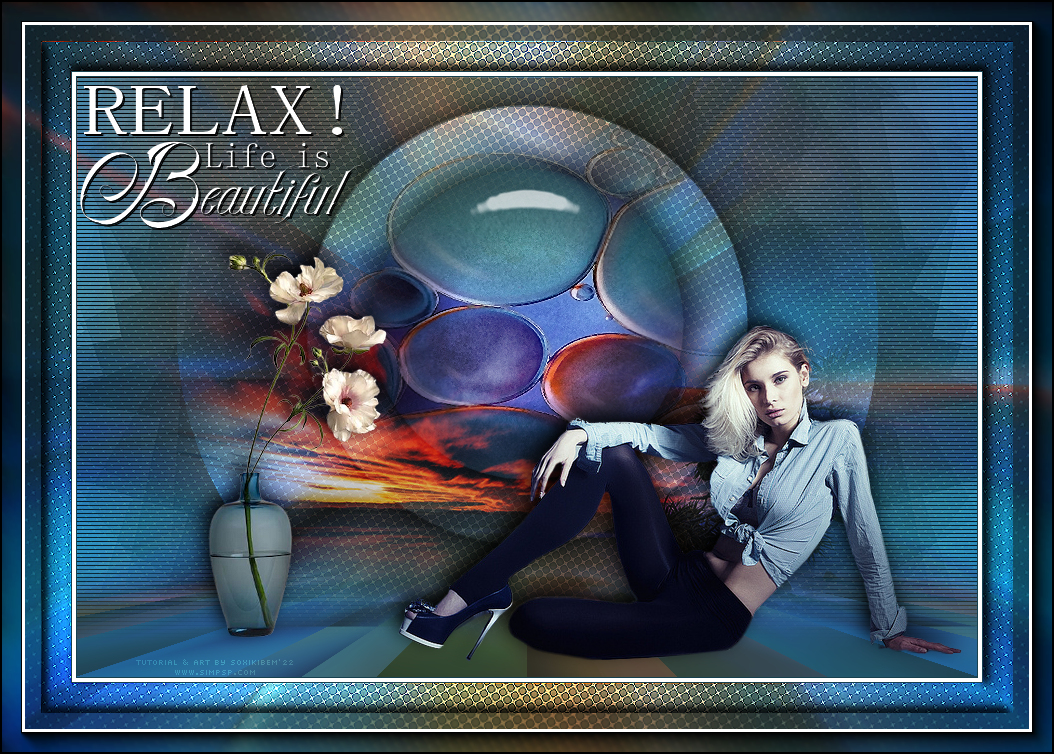
MATERIAL 1 Tube Principal à sua escolha 1 Tube Decorativo à sua escolha SuizaBella_Ref_AG-001334 decor1Xiki Selections: CircleSelecXiki* *(Salvar a seleção na pasta Selections do PSP)
PLUGINS
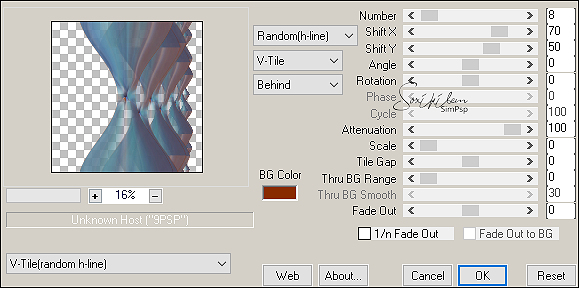
Mehdi > Sorting Tiles
Execução
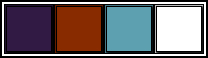
1 - Abrir o material no PSP, duplique e feche os originais. Escolha quatro cores para trabalhar. Foreground: #311a44 Background: #882b00 Cor 3: #5da0b0 Cor 4: #ffffff
2 - Abra uma Transparência de 900x600. Pintar com um gradiente Linear formado pelas cores do Foreground e Background:
3 - Layers > New Raster Layer. Selections > Select All. Edit > Copy no SuizaBella_Ref_AG-001334. Edit > Paste Into Selections. Selections > Select None. Effects > Image Effects > Seamless Tiling: Default.
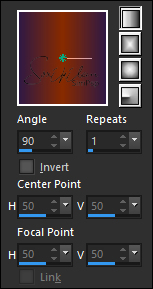
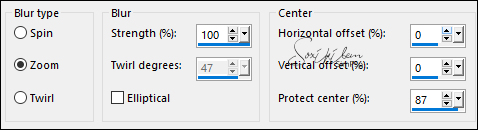
4 - Adjust > Blur > Radial Blur:
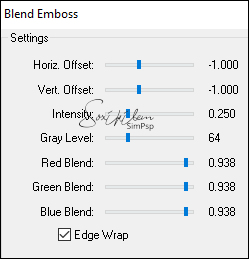
5 - Effects > Plugins > FM Tile Tools > Blend Emboss: Default.
Layers > Properties > General > Blend Mode: Hard Light.
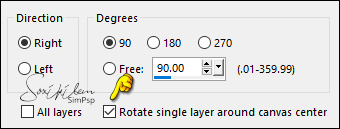
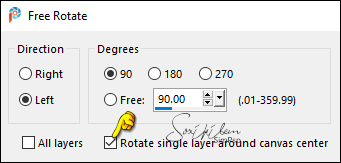
6 - Layers > Duplicate. Image > Free Rotate:
7 - Effects > Distortion Effects > Warp:
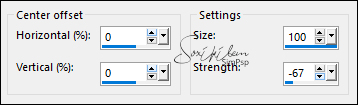
8 - Effects > Plugins > Mura's Meister > Copies:
Layers > Properties > General > Blend Mode: Dodge.
9 - Image > Free Rotate:
10 - Com a Magic Wand: Tolerance: 0 e Feather: 40, selecionar a parte debaixo deste efeito.
Pressionar a tecla Delete 3 vezes.
11 - Layers > New Raster Layer. Selections > Invert. Effects > 3D Effects > Drop Shadow: 0, 0, 100, 50, Color: #000000 Edit > Repeat Drop Shadow. Selections > Select None.
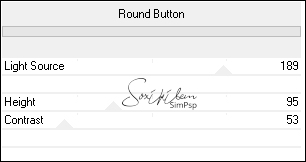
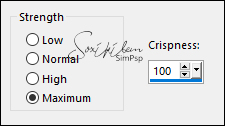
12 - Ativar a Layer Copy of Raster 2. Effects > Plugins > Filters Unlimited 2.0 > Buttons & Frames > Round Button:
13 - Ativar a Layer Raster 3. Layers > New Raster Layer. Selections > Load/Save Selections > Load Selection from Disk: CircleSelecXiki. Edit > Copy no SuizaBella_Ref_AG-001334. Edit > Paste Into Selections. Adjust > Sharpenss > Sharpen.
14 - Effects > 3D Effects > Drop Shadow: 0, 0, 100, 50, Color: #000000 Adjust > Add/Remove Noise > JPEG Artifact Removal:
Edit > Repeat JPEG Artifact Removal.
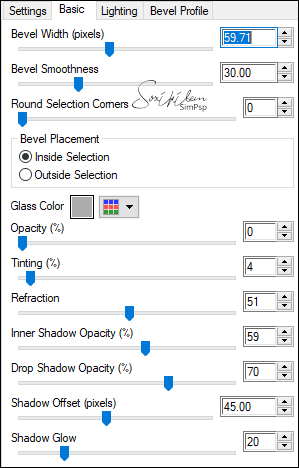
15 - Layers > Duplicate. Effects > Plugins > Alien Skin Eye Candy 5 Impact > Glass. Settings: Clear.
Effects > 3D Effects > Drop Shadow: 0, 0, 100, 50, Color: #0000000 Edit > Repeat Drop Shadow.
16 - Edit > Copy no decor1Xiki. Edit > Paste As New Layer. Layers > Properties > General > Blend Mode: Luminance
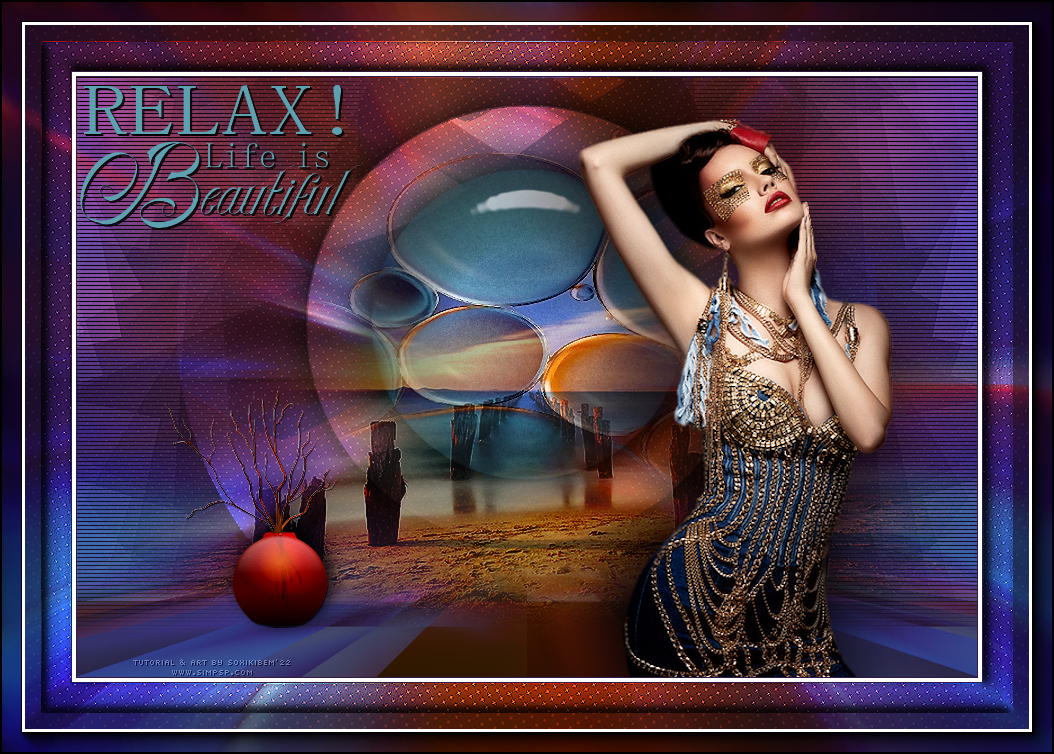
17 - Effects > Plugins > Carolaine and Sensibility > cs_texture:
Adjust > Sharpness > Sharpen More.
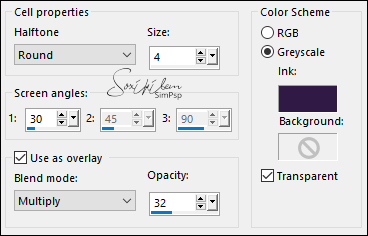
18 - Ativar a Layer Raster 1. Effects > Artistic Effects > Halftone: Color Scheme > Ink: cor do Foreground.
Effects > Edge Effects > Enhance.
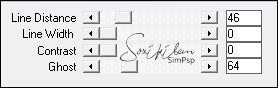
19 - Ativar a layer Raster 5. Edit > Copy Special > Copy Merged. Edit > Paste As New Layer. Adjust > Blur > Gaussian Blur: 20. Effects > Plugins > Mehdi > Sorting Tiles:
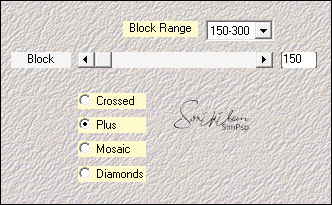
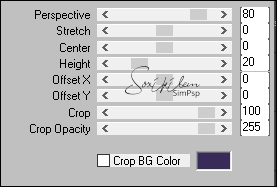
20 - Effects > Plugins > Mura's Meister > Perspective Tiling:
Com a ferramenta Magic Wand: Tolerance: 0 - Feather: 80, clique na parte transparente deste efeito. Pressionar a tecla Delete do teclado 5 vezes. Selections > Select None.
21 - Edit > Copy no Misted Paisagem Edit > Paste As New Layer. Layers > Arrange > Move Down. Se for usar a que esta em material, Pick tool: Position X 0, Position Y 52. Layers > Properties > Blend Mode: Hard Light, Opacity: 60%. * Posicione, mude o Blend e opacidade conforme a imagem e cores que estiver usando.
22 - Ativar a layer do topo. Edit > Copy no tube decorativo. Edit > paste As New Layer. Posicionar e aplicar Drop Shadow à sua escolha.
23 - Edit > Copy no Tube Principal. Edit > paste As New Layer. Posicionar e aplicar Drop Shadow à sua escolha.
24 - Ativar a Layer Raster 2. Layers > Merge > Merge Down. Edit > Copy. Image > Add Borders > Symmetric: 1px - Color: cor do Foreground 4px - Color: cor 4 (branco) 1px - Color: cor do Foreground Selections > Select All.
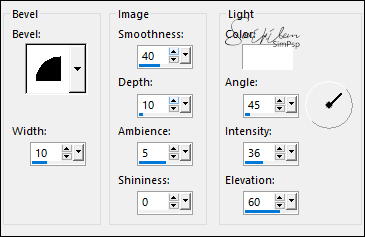
25 - Image > Add Borders > Symmetric: 30px com qualquer cor. Selections > Invert. Edit > Paste Into Selections. Effects > Edge Effects > Enhance. Effects > 3D Effects > Inner Bevel:
Edit > Repeat Inner Bevel. Selections > Select None.
26 - Selections > Select All. Image > Add Borders > Symmetric: 40px com qualquer cor. Selections > Invert. Edit > Paste Into Selections.
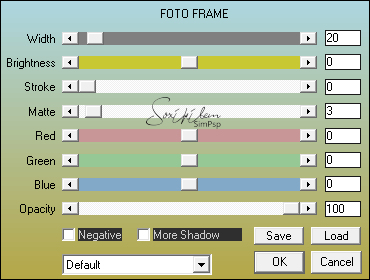
27 - Effects > Plugin > AAA Frames > Foto Frame:
Selections > Select None.
28 - Edit > Copy no titulo_relax_bysoxikibem. Edit > Paste As New Layer. Colorize se desejar. Pick Tool: Position X: 79, Position Y: 84. Effects > 3D Effects > Drop Shadow: 1, 1, 100, 0, Color: #000000 Edit > Repeat Drop Shadow.
29 - Image > Add Borders > Symmetric: 1px - Color: #000000
30 - Aplicar sua marca d'água ou assinatura. File > Export > JPEG Optimizer.
CRÉDITOS Versão 1 Tube Principal: Tubed by Angel Star Misted: by SuizBella Misted Paisagem & Tube decorativo: Tubed by Nicole
CRÉDITOS Versão 2 Tube Principal: Tubed by Ana Ridzi Misted: by SuizaBella Tube decorativo: Tubed by CalliTubes Misted Paisagem by Colybrix
Sinta-se à vontade para enviar suas versões. Terei todo o prazer em publicá-las em nosso site.
|