TRADUÇÕES:
Obrigada aos nossos tradutores!
MATERIAL 1 Tube Principal à sua escolha 1 Misted Paisagem à sua escolha AlphaChannel_LC_bySoxikibem textoBySoxikibem DecoBySoxikibem TituloLCbySoxikibem
PLUGINS AAA Frames > Foto Frame Alien Skin | Eye Candy 5 Impact: Motion Trail, Perspective Shadow Flaming Pear: Flexify 2 Unlimited 2.0: Background Designers IV
Este Tutorial foi escrito por
Soxikibem, qualquer semelhança é mera coincidência. Tutorial elaborado no PSP 2022
O meu agradecimento as Tubeiras pelos Tubes e Masks
Fique a vontade para mudar os Blends das layers, pois, dependendo das cores e imagens o resultado pode mudar.
TUTORIAL
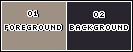
1 - Abrir o material no PSP, duplique e feche os originais. Escolha duas cores para trabalhar. Foreground: #9f9084 Background: #29252e
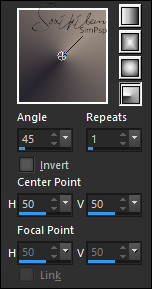
2 - Abra o AlphaChannel_LC_bySoxikibem. Pintar com um gradiente Radial formado pelas cores escolhidas:
Adjust > Blur > Gaussian Blur: 20.
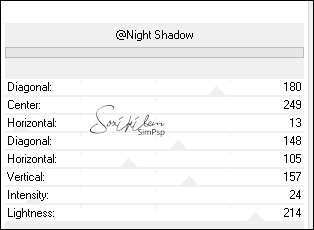
3 - Effects > Plugins > Filters Unlimited 2.0 > &<Background Designers IV > Night Shadow:
4 - Effects > Texture Effects > Sandstone:
5 - Selections > Load/Save Selections > Load Selection from Alpha Channel: Selection #1. Selections > Promote Selection to Layer. Selections > Select None.
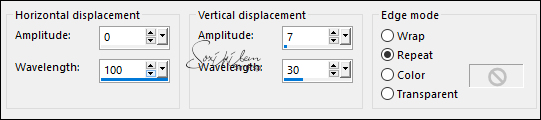
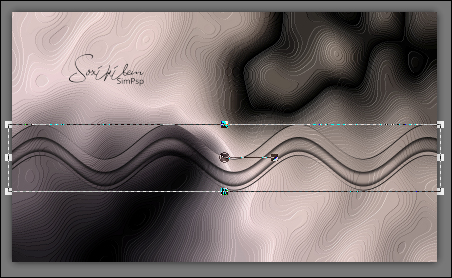
6 - Effects > Distortion Effects > Wave:
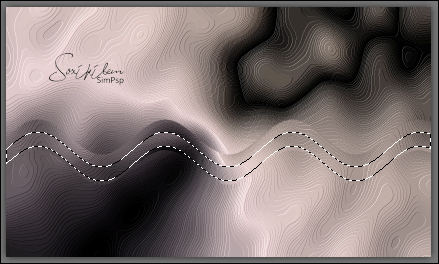
7 - Com a ferramenta Magic Wand: Feather e Tolerance: 0, selecionar no meio das linhas curvas:
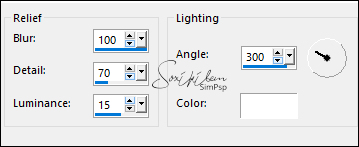
Effects > 3D Effects > Cutout:
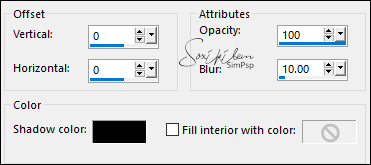
8 - Selections > Select None. Effects > 3D Effects > Drop Shadow: 1, 1, 100, 0, Color: #000000 (preto) Effects > 3D Effects > Drop Shadow: -1, -1, 100, 0, Color: #000000 (preto) Com a ferramenta Pick Tool puxar nas laterais para retirar a marca na borda:
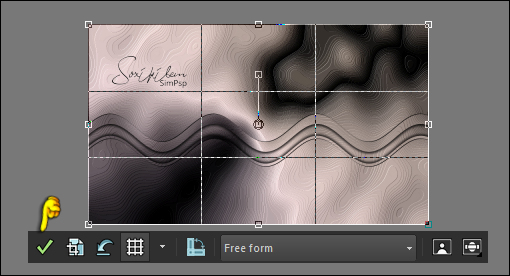
Ferramenta Crop Tool > Merged Opaque:
9 - Layers > Duplicate. Effects > Plugins > Alien Skin | Eye Candy 5 Impact > Motion Trail:
Layers > Properties > General > Blend Mode: Screen.
10 - Layers > Duplicate. Image > Mirror > Mirror Horizontal. Image > Flip > Flip Vertical. Layers > Properties > General > Blend Mode: Dodge.
11 - Layers > New Raster Layer. Selections > Load/Save Selections > Load Selection from Alpha Channel: Selection #2. Pintar esta seleção com a cor #ffffff (Branco). Selections > Select None.
12 - Effects > Plugins > Flaming Pear > Flexify 2:
Layers > Properties > General > Blend Mode: Soft Light.
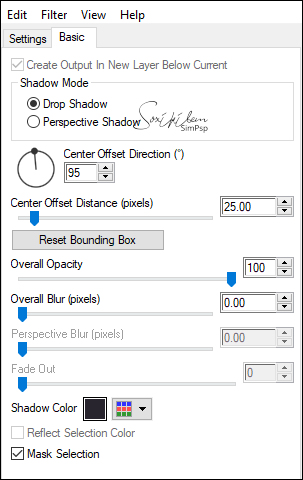
13 - Effects > Plugins > Alien Skin | Eye Candy 5 Impact > Perspective Shadow:
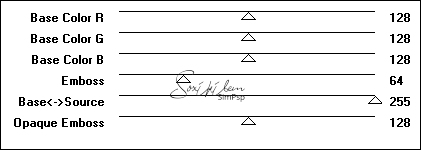
14 - Effects > 3D Effects > Drop Shadow: -10, -10, 100, 20, Color: #ffffff (branco) Effects > Plugins > Mura's Seamless > Emboss at Alpha: Default.
15 - Selections > Load/Save Selections > Load Selection from Alpha Channel: Selection #3. Layers > New Raster Layer. Pintar esta seleção com a cor do Foreground. Layers > Properties > General > Blend Mode: Dodge. Selections > Select None.
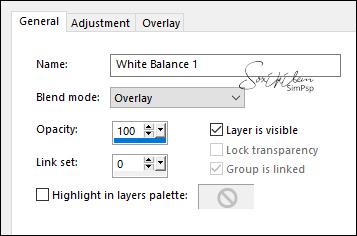
16 - Layers > New Adjustment Layer > White Balance > General > Blend Mode: Overlay.
17 - Edit > Copy no Misted Paisagem. Edit > Paste as New Layer. Posicionar à direita. Mudar o Blend da layer à sua escolha. *Se estiver usando a paisagem do material e as mesmas cores do tutorial: Image > Negative Image. Pick Tool: Position X 391, Position Y 126. Layers > Properties > General > Blend Mode: Hard Light
18 - Effects > Plugins > Mura's Seamless > Emboss at Alpha: Default.
19 - Layers > Duplicate. Layers > Properties > General > Blend Mode: Color.
20 - Ativar a Layer Raster 1. Edit > Copy no textoBySoxikibem. Edit > Paste As New Layer. Pick Tool: Position X 84, Position Y 0. Layers > Properties > General > Blend Mode: Overlay.
21 - Ativar a Layer do Topo. Edit > Copy no DecoBySoxikibem. Edit > Paste As New Layer. Pick Tool: Position X 93, Position Y 206. Layers > Properties > General > Blend Mode: Overlay ou Burn. Layers > Duplicate.
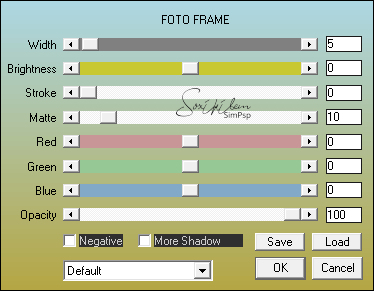
22 - Layers > New Raster Layer. Selections > Load/Save Selections > Load Selection from AlphaChannel.: Selection #3 Edit > Copy Special > Copy Merged. Edit > Paste Into Selection. Effects > Plugins > AAA Frames > Foto Frame:
23 - Selections > Invert. Effects > 3D Effects > Drop Shadow: 10, 10, 80, 30, Color: com a cor do background. Effects > 3D Effects > Drop Shadow: -10, -10, 50, 30, Color: com a cor do background. Selections > Select None. Image > Add Borders > Symmetric: 40px com a cor branca.
24 - Edit > Copy no tube principal. Edit > Paste As New Layer. Resize se for necessário. O tube do tutorial o resize foi de 90%. Posicionar e aplicar Drop Shadow ou efeito à sua escolha.
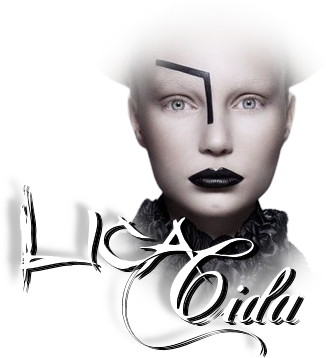
25 - Edit > Copy no TituloLCbySoxikibem. Edit > Paste As New Layer. Posicionar à sua escolha
26 - Image > Add Borders > Symmetric: 1px - Color: com a cor do background.
27 - Aplicar sua marca d'água ou assinatura. File > Export > JPEG Optimizer.
CRÉDITOS: Versão 1 & 2 Criação - Formatação e Art Final by Soxikibem Tubes Principal & Misteds: Tubed by Pqna&Alice
Sinta-se à vontade para enviar suas versões. Terei todo o prazer em publicá-las em nosso site.
|