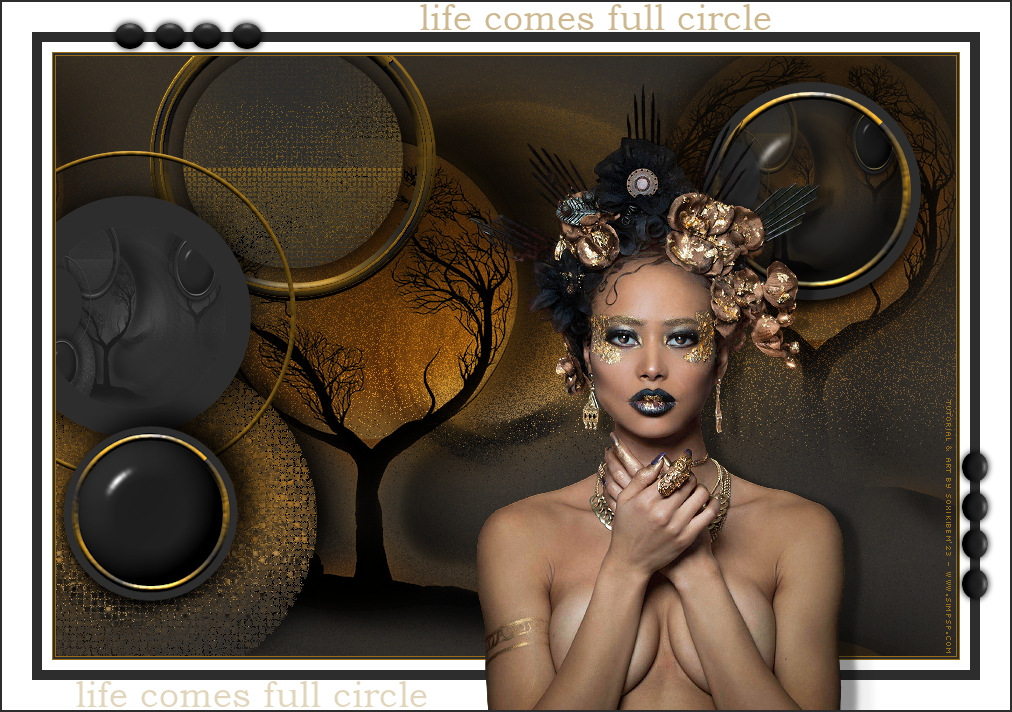
|
TRADUÇÕES:
Obrigada aos nossos tradutores!
MATERIAL 1 Tube Principal a sua escolha 1 Misted Paisagem a sua escolha TituloBySoxikibem DecorBySoxikibem Selections: Salvar as seleções na pasta Selections do seu PSP Preset: De dois cliques no preset para instalar
PLUGINS Alien Skin Eye Candy 5 Impact > Bevel Filters Unlimited 2.0 > Bkg Designer sf 10 II FM Tile Tools > Blend Emboss: Default
Este Tutorial foi escrito por
Soxikibem, qualquer semelhança é mera coincidência. Tutorial elaborado no PSP 2022
O meu agradecimento as Tubeiras pelos Tubes e Masks
Fique a vontade para mudar os Blends das layers, pois dependendo das cores e imagens o resultado poderá mudar.
TUTORIAL
1 - Abrir o material no PSP, duplique e feche os originais. Escolha 3 cores para trabalhar. Foreground: #2d2d2d Background: #986e1a Cor 3: #ffffff
2 - Abra uma Transparência de 900 x 600px. Pintar com a cor do foreground. Selections > Select All.
3 - Edit > Copy no Misted Paisagem. *Edit > Paste Into Selections. Selections Select None. *NOTA: Para que o efeito do item 5 fique igual ao tutorial, eu aconselho usar o misted paisagem que esta no material, colorizado com as cores do seu trabalho.
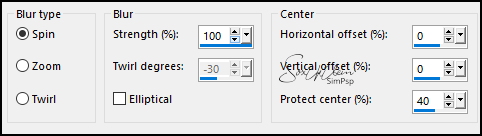
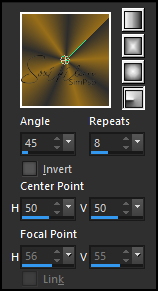
4 - Adjust > Blur > Radial Blur.
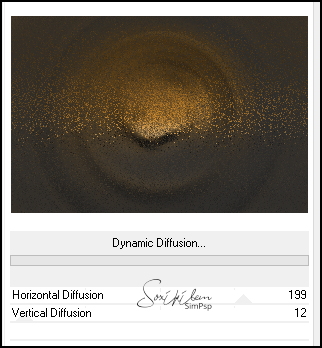
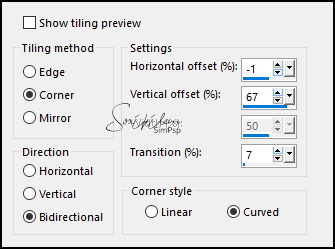
5 - Filters Unlimited 2.0 > Bkg Designer sf 10 II > Dynamic Diffusion.
6 - Layers > New Raster Layer. Selections > Load/Save Selections > Load Selections from Disk: SelectionLIFE_Xiki1. Pintar esta seleção com a cor do foreground.
7 - Selections > Modify > Contract: 10. Layers > New Raster Layer. Pintar com um gradiente Radial formado pelas cores do foreground e background.
Selections > Modify > Contract: 8. Aperte a tecla Delete do teclado.
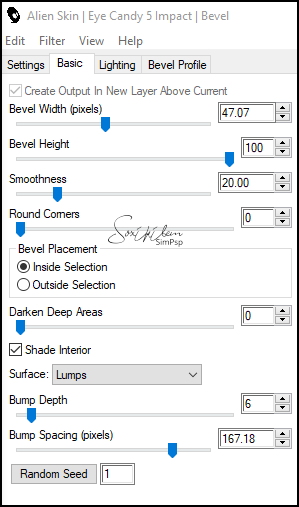
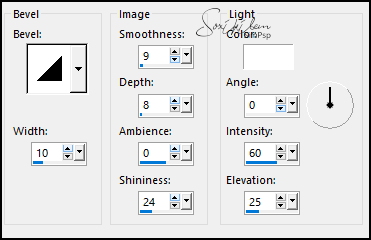
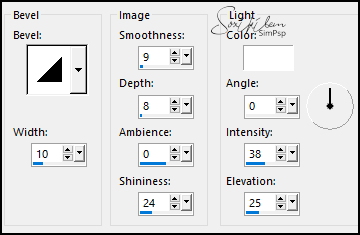
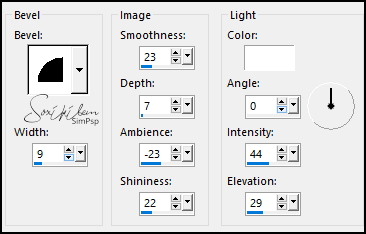
8 - Ainda selecionado ative a layer Raster 2. Plugin Alien Skin Eye Candy 5 Impact > Bevel: Bevel_LCFCbyXiki.f1s ou use as configurações do print abaixo.
Selections > Select None. Effects > 3D Effects > Drop Shadow: 7, -2, 100, 20, cor preta.
9 - Ativar a layer Raster 3. Effects > 3D Effects > Inner Bevel.
Layers > Merge > Merge Down.
10 - Selections > Load/Save Selections > Load Selection from Disk: SelectionLIFE_Xiki2. Ativar a Layer Raster 1. Selections > Promote Selection to Layer. Layers > Arrange > Bring to Top.
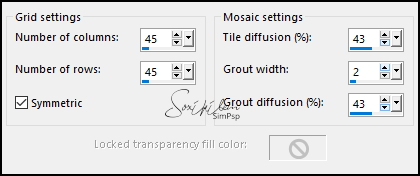
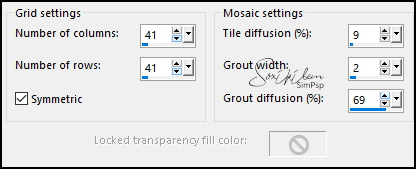
11 - Effects > Texture Effects > Mosaic - Antique.
Selections > Select None. Pick Tool: Position X: -69, Position Y: 299. Effects > 3D Effects > Drop Shadow: -11, 15, 100, 40, cor preta
12 - Ativar a Layer Raster 2. Layers > Duplicate. Image > Resize: 80%, all layers desmarcado. Layers > Arrange > Bring to Top. Pick Tool: Position X: -6, Position Y: 363. Effects > 3D Effects > Drop Shadow: -11, 15, 100, 40, cor preta
13 - Ativar a layer Promoted Selection. Layers > New Raster Layer. Selections > Load/Save Selections > Load Selection from Disk: SelectionLIFE_Xiki3. Pintar com a cor do background. Seletions > Modify > Contract: 5. Aperte a tecla Delete do teclado.
14 - Layers > New Raster Layer. Seletions > Modify > Contract: 40. Pintar com a cor do foreground. Effects > 3D Effects > Drop Shadow: 0, 0, 100, 50, cor preta. Selections > Select None.
15 - Ativar a Layer Raster 3. Effects > 3D Effects > Inner Bevel.
Ativar a Layer Raster 4. Layers > Merge > Merge Down. Pick Tool: Position X: -90, Position Y: 95.
16 - Ativar a layer Promoted Selection. Layers > New Raster Layer. Selections > Load/Save Selections > Load Selection from Disk: SelectionLIFE_Xiki4. Pintar a seleção com a cor do background. Selections > Modify > Contract: 3. Aperte a tecla Delete do teclado.
Pintar a seleção com o gradiente em uso. Selections > Modify > Contract: 6. Aperte a tecla Delete do teclado.
Pintar a seleção com a cor do background. Selections > Modify > Contract: 3. Aperte a tecla Delete do teclado.
Pintar a seleção com o gradiente em uso. Selections > Modify > Contract: 6. Aperte a tecla Delete do teclado.
Selections > Modify > Contract: 15. Layers > New Raster Layer. Pintar com a cor do foreground.
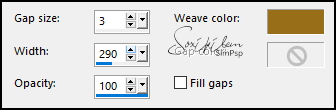
17 - Effects > Texture Effects > Weave, com a cor do background.
18 - Effects > Texture Effects > Mosaic - Antique.
Effects > 3D Effects > Drop Shadow: 0, 0, 100, 30, cor preta. Selections > Select None.
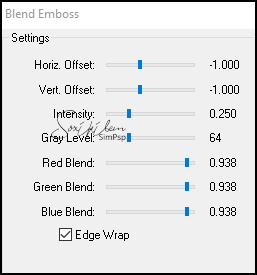
19 - Ativar a layer Raster 4. Plugin FM Tile Tools > Blend Emboss: Default.
20 - Effects > 3D Effects > Inner Bevel.
Ativar a Layer Raster 5. Layers > Merge > Merge Down. Pick Tool: Position X: 94, Position Y: -41
21 - Ativar a Layer Raster 1. Edit > Copy no Misted Paisagem. Edit > Paste as New Layer. Se estiver usando o do material, Resize em 55%. Posicione como desejar. Neste trabalho eu coloquei em Position X: 114, Position Y: 50. Escolha um Blend que combine com as cores que esta usando, aqui eu usei o Blend Darken. Effects > 3D Effects > Drop Shadow: -16, 37, 70, 100, cor preta.
22 - Layers > Duplicate. Effects > Image Effects > Seamless Tiling.
Layers > Arrange > Move Down. Layers > Properties: blend Mode Soft Light.
23 - Ativar a layer do Topo. Edit > Copy Special > Copy Merge. Selections > Load/Save Selections > Load Selections from Disk: SelectionLIFE_Xiki1. Selections > Modify > Contract: 17. Layers > New Raster Layer. Edit > Paste Into Selection. Layers > Properties: Opacity 40%. Adjust > Sharpness > Sharpen. Selections > Select None.
24 - Layers > Duplicate. Pick Tool: Position X: -14, Position Y: 169. Layers > Properties: Blend Mode Luminance (L), Opacity 40%.
25 - Image > Add Borders: 1px cor background 2px cor foreground 1px cor background 10px cor branca 10px cor foreground 30px cor branca
26 - Edit > Copy no Tube Personagem. Edit > Paste as New Layer. Posicione conforme o modelo. Aplique Drop Shadow ou efeito que preferir.
27 - Edit > Copy no DecorBySoxikibem. Edit > Paste as New Layer. Pick Tool: Position X: 105, Position Y: 13.
28 - Edit > Copy no TituloBySoxikibem. Edit > Paste as New Layer. Pick Tool: Position X: 418, Position Y: 2. Layers > Properties: Opacity 50%.
29 - Layers > Duplicate. Pick Tool: Position X: 74, Position Y: 679. Layers > Properties: Opacity 30%.
30 - Image > Add Borders: 2px cor foreground.
31 - Aplicar sua marca d'água ou assinatura. File > Export > JPEG Optimizer.
VERSÃO:
CRÉDITOS: Criação - Formatação e Art Final by Soxikibem Tube Principal & Paisagem: Tubed by Pqna&Alice
Sinta-se à vontade para enviar suas versões. Terei todo o prazer em publicá-las em nosso site.
|