|
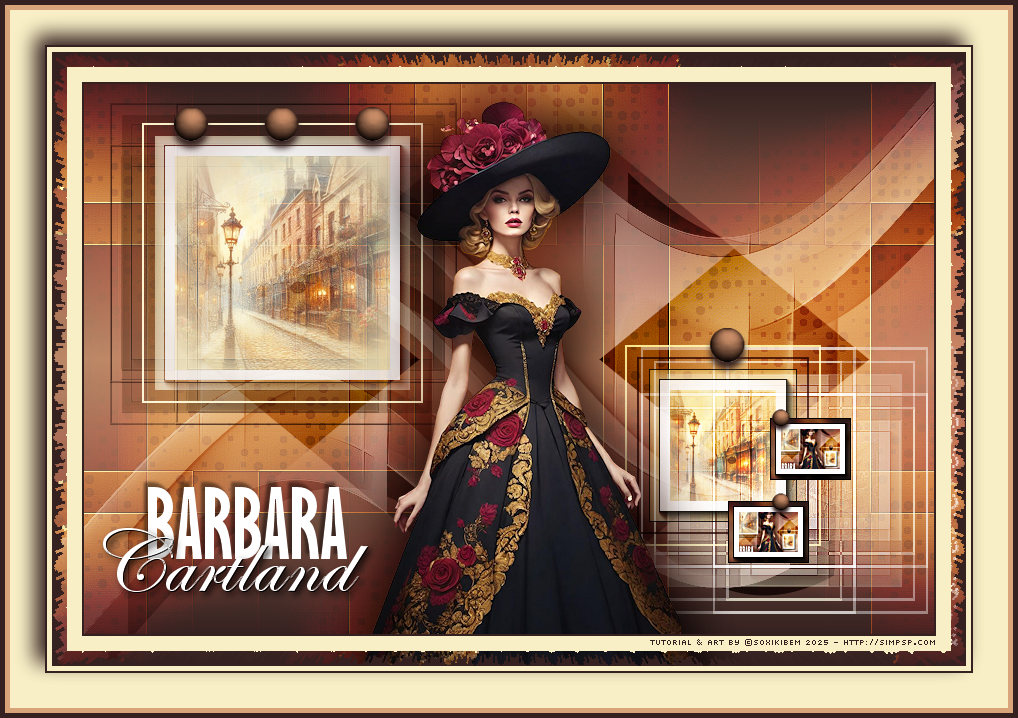
Há romances que não vivem
apenas nas páginas, eles habitam o olhar, a cor, o detalhe. Esta
arte é um tributo à doçura e à intensidade dos livros de Barbara
Cartland, onde o amor floresce em meio a castelos, silêncios
roubados e promessas feitas sob o luar.
TRADUÇÕES:
O Sim
PSP valoriza e reconhece o trabalho das tradutoras que tornam os
tutoriais acessíveis a diferentes idiomas.
MATERIAL: 1 Tube Principal ou Personagem à sua escolha 1 Misted Paisagem à sua escolha Outros Materiais by Soxikibem
PLUGINS: AAA Frames > Foto Frame &<Bkg Designer sf10 III > SpyroZag AAA Frames > Foto Frame VM Natural > Acid Rain Nota Plugin: Se o efeito não aparecer no Bkg Designer III, ele também estará disponível no Funhouse e no AFS Import.
Tutorial elaborado no PSP 2022 Testado e revisado por Márcinha no PSP 2020.
Agradeço às Tubeiras pelos Tubes e Masks, pois sem eles não seria
possível criar este trabalho.
TUTORIAL
*Deletar a Marca D'água de todos os materiais. Cor 3: #d6d2c6
2 - Abra uma imagem
transparente de 850x550px.
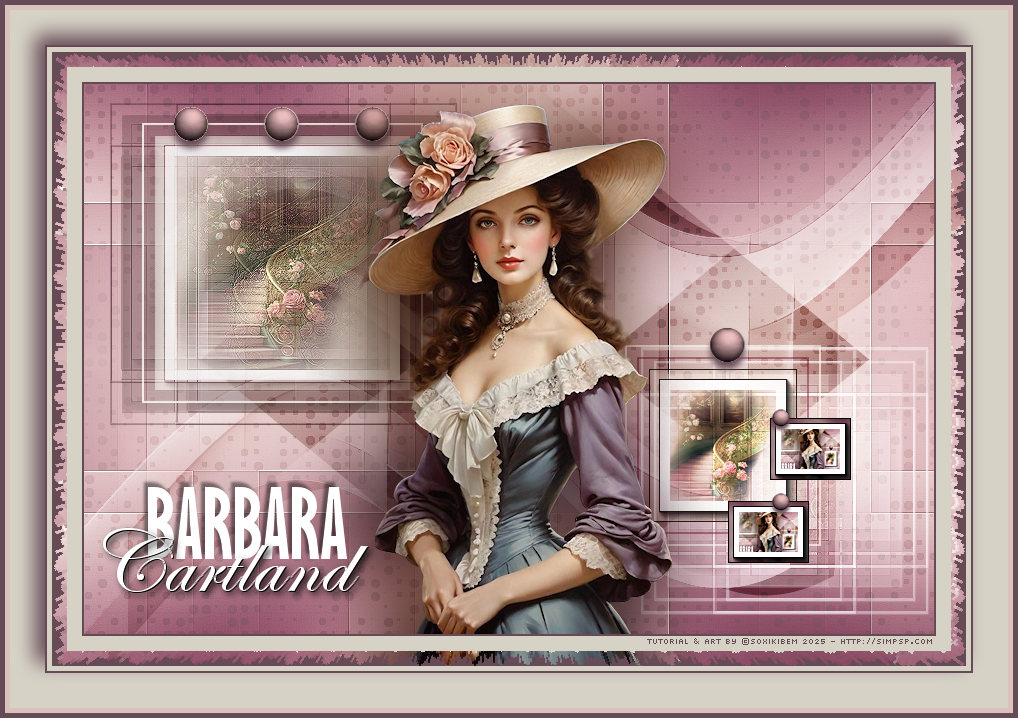
3 - Effects > Reflection Effects > Kaleidoscope.
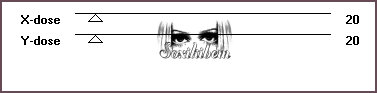
4 - Layers > Duplicate. Plugin VM Natural > Acid Rain.
Layers > Properties > General > Blend Mode: Overlay, Opacity 35%.
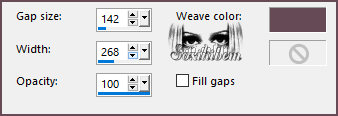
5 - Ativar a Layer Raster 1. Effects > Texture Effects > Weave. Com a cor do Foreground.
6 - Plugin Toadies > What Are You?.
Effects > Edge Effects > Enhance More.
7 - Layers > Duplicate. Image > Mirror > Mirror Horizontal. Layers > Properties > General > Blend Mode: Burn, Opacity 55%.
8 - Ativar a Layer Copy of Raster 1que está no Topo. Layers > New Raster Layer. Selectons > Load/Save Selections > Load Selectoin From Disk: 305_Xiki6. Pintar com um Gradient Linear formado pelas cores do Foreground e Background.
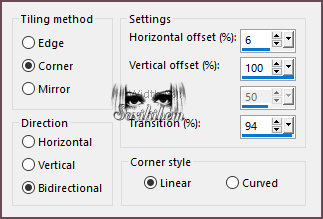
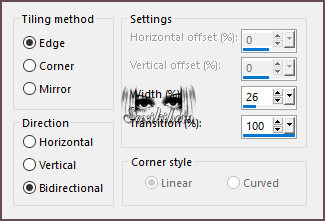
9 - Selections > Select None. Effects > Image Effects > Seamless Tiling.
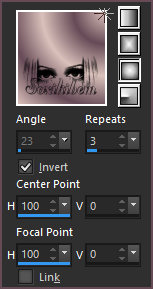
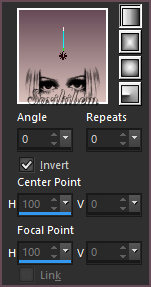
10 - Effects > Reflection Effects > Rotating Mirror.
Layers > Properties > General > Blend Mode: Screen.
11 - Layers > New Raster Layer. Selectons > Load/Save Selections > Load Selectoin From Disk: 305_Xiki1. Pintar com a cor 3. Selections > Modify > Contract: 2. Edit > Cut ou Delete.
12 - Selections > Modify > Contract: 10. Flood Fill > Opacity 60%, pintar com a cor 3. Edit > Copy no Misted Paisagem. Edit > Paste Into Selection. Adjust > Sharpness > Sharpen.
13 - Plugin AAA Frames > Foto Frame.
Selections > Select None.
14 - Layers > Duplicate. Ativar a Layer Raster 3. Plugin Toadies > What Are You?.
Effects > Edge Effects > Enhance.
15 - Effects > 3D Effects > Drop Shadow: 1, 1, 100, 0, cor Foreground. Layers > Properties > General > Blend Mode: Multiply. Ativar a Layer Copy of Raster 3. Layers > Properties > General > Blend Mode: Screen.
16 - Layers > New Raster Layer. Selectons > Load/Save Selections > Load Selectoin From Disk: 305_Xiki4. Flood Fill > Opacity 100%, pintar com a cor do Foreground.
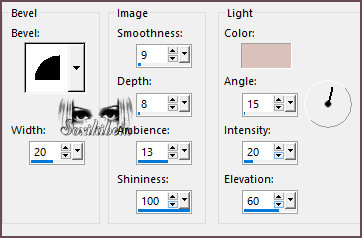
17 - Effects > 3D Effects > Inner Bevel, com a cor do Background.
Selections > Select None. Effects > 3D Effects > Drop Shadow: 7, 0, 100, 10, cor Foreground.
18 - Layers > New Raster Layer. Selectons > Load/Save Selections > Load Selectoin From Disk: 305_Xiki2. Flood Fill > Opacity 100%, pintar com a cor 3. Selections > Modify > Contract: 2. Edit > Cut ou Delete.
19 - Selections > Modify > Contract: 10. Pintar com a cor do Foreground. Selections > Modify > Contract: 2. Edit > Cut ou Delete.
20 - Selections > Modify > Contract: 10. Flood Fill > Opacity 60%, pintar com a cor 3. Edit > Copy no Misted Paisagem. Edit > Paste Into Selection. Adjust > Sharpness > Sharpen.
21 - Plugin AAA Frames > Foto Frame.
Selections > Select None.
22 - Layers > Duplicate. Ativar a Layer Raster 5. Plugin Toadies > What Are You?.
Effects > Edge Effects > Enhance.
23 - Effects > 3D Effects > Drop Shadow: 1, 1, 100, 0, cor Foreground. Effects > Image Effects > Seamless Tiling.
Layers > Properties > General > Blend Mode: Screen.
24 - Ativar a Layer Copy of Raster 5. Layers > Properties > General > Blend Mode: Hard Light.
25 - Layers > New Raster Layer. Selectons > Load/Save Selections > Load Selectoin From Disk: 305_Xiki5. Flood Fill > Opacity 100%, pintar com a cor do Foreground.
26 - Effects > 3D Effects > Inner Bevel, com a cor do Background.
Selections > Select None. Effects > 3D Effects > Drop Shadow: 7, 0, 100, 10, cor Foreground.
27 - Ativar a Layer Raster 2. Edit > Copy no Decor305_Xiki1. Edit > Paste as New Layer. Já esta no lugar certo.
28 - Ativar a Layer Raster 6 > do topo. Edit > Copy no tube Personagem. Edit > Past as New Layer. Posicione como no modelo. Aplique Efeito como preferir.
29 - Edit > Copy no TituloCartland_Xiki. Edit > Paste as New Layer. Pick Tool: Position X: 14, Position Y: 395.
30 - Edit > Copy Special > Copy Merged. Layers > New Raster Layer. Selectons > Load/Save Selections > Load Selectoin From Disk: 305_Xiki3. Edit > Paste Into Selection. Adjust > Sharpness > Sharpen More.
31 - Plugin AAA Frames > Foto Frame.
Selections > Select None.
32 - Pick Tool: Position X: 644, Position Y: 417. Layers > Duplicate. Pick Tool: Position X: 686, Position Y: 334.
33 - Ativar a Layer Raster 6. Layers > Duplicate. Layers > Arrange > Bring to Top. Image > Resize: 50%, all layers desmarcado. Adjust > Sharpness > Sharpen. Pick Tool: Position X: 684, Position Y: 325. Layers > Duplicate. Pick Tool: Position X: 684, Position Y: 409.
34 - Image > Add Borders > Symmetric: 2px com a cor: Foreground Edit > Copy. Image > Add Borders > Symmetric: 15px com a cor 3 Selections > Select All.
35 - Image > Add Borders > Symmetric: 15px com qualquer cor Selections > Invert. Edit > Paste Into Selection. Filters Unlimited 2.0 > &<Bkg Designer sf10 III > SpyroZag: Amplitude:10 Se o efeito não aparecer no Bkg Designer III, ele também estará disponível no Funhouse e no AFS Import. Selections > Select None.
36 - Image > Add Borders > Symmetric: 5px com a cor: 3 2px com a cor: Foreground Selections > Select All Image > Add Borders > Symmetric: 35px com a cor: 3 Effects > 3D Effects > Drop Shadow: -10, -10, 100, 30, cor Foreground. Selections > Select None. Image > Add Borders > Symmetric: 5px com a cor: Background 5px com a cor: Foreground
37 - Se você desejar
redimensione seu trabalho.
Versão:
Créditos: Formatação, Arte Final e Tutorial by Soxikibem Tube Principal: Tubed by Pqna&Alice Outros Materiais: by Soxikibem
Sinta-se à vontade para enviar suas versões. Terei todo o prazer em publicá-las em nosso site.
Envie sua versão para o e-mail: soxikibem.simpsp@gmail.com
Soxikibem Redes Sociais
My notebooks on Amazon
My art collections on Redbubble
SimPSP Redes Sociais
|