|
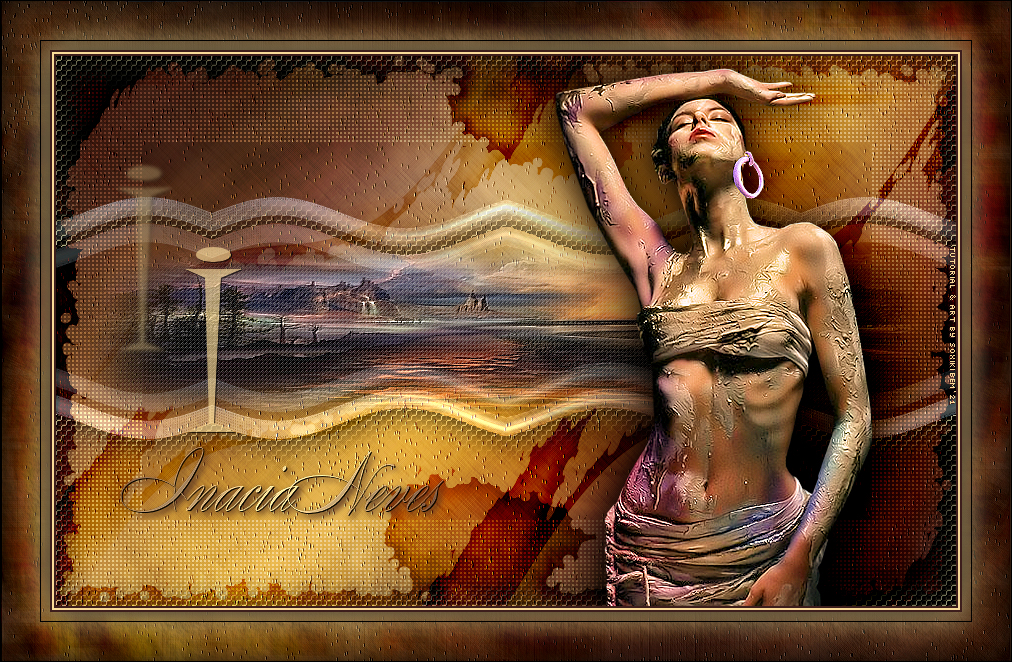
Tutorial S IM criado para simbolizar a segunda letra do SimPsp.O SimPsp é a união de três amigas: Soxikibem, Inácia e Marcinha Inácia tu és uma grande amiga e uma artista incomparável. Tenho um grande respeito e carinho por você... Loviuuuuu Soxikibem.
TRADUÇÕES:
Obrigada aos nossos tradutores!
MATERIAL 1 Tube à sua escolha 1 Misted Paisagem à sua escolha titulo_i_inaciaBySoxikibem BurntEdgesBySoxikibem
Plugins AAA Frames AFS Import FM Tile Tools
Execução
1 - Abrir o material no PSP, duplique e feche os originais. Escolha duas cores para trabalhar: Foreground: #3d1e1d Background: #fadb97
2 - Abra uma transparência de 900x550px. Pintar com um gradiente Linear formado pelas cores escolhidas.
3 - Adjust > Blur > Gaussian Blur: 40. Effects > Texture Effects > Straw Wall: Color: #242424
4 - Edit > Copy no BurntEdgesBySoxikibem. Edit > Paste a New Layer.
5 - Layers > New Raster Layer. Selections > Select All. Edit > Copy no Misted Paisagem. Edit > Paste Into Selection. Selections > Select None.
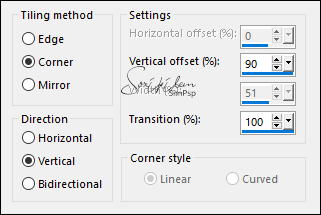
6 - Effects > Image Effects > Seamless Tiling: Default.
7 - Adjust > Blur > Radial Blur.
8 - Layers > Properties > General: Blend Mode: Overlay.
9 - Effects > Pugins > AFS Import > sqborder2.
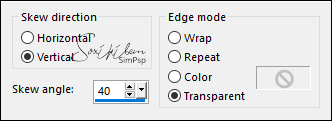
10 - Ativar a layer Raster 2. Layers > Duplicate. Layers > Arrange > Bring To top. Effects > Geometric Effects > Skew.
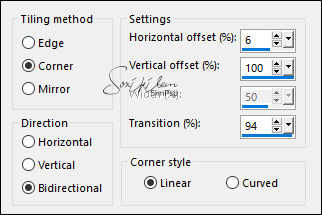
11 - Effects > Image Effects > Seamless Tiling: Side by Side.
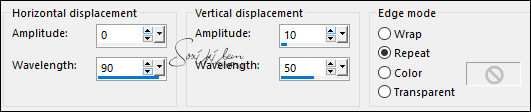
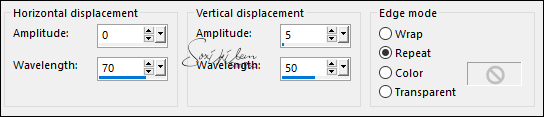
12 - Effects > Distortion Effects > Wave.
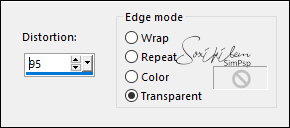
13 - Ativar a layer Raster 3. Layers > Duplicate. Layers > Arrange > Bring to Top. Effects > Geometric Effects > Perspective - Horizontal:
Image > Mirror > Mirror Horizontal. Effects > Geometric Effects > Perspective - Horizontal.
14 - Effects > Distortion Effects > Wave.
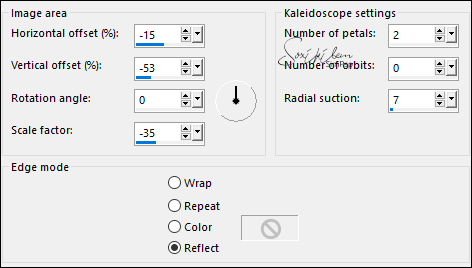
15 - Image > Negative Image. Layers > Properties > General: Blend Mode: Screen - Opacity: 50%. Effects > Reflection Effects > Kaleidoscope.
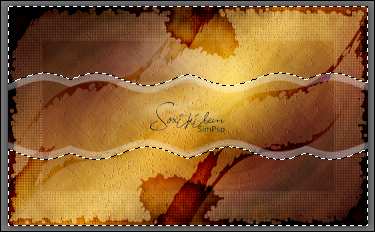
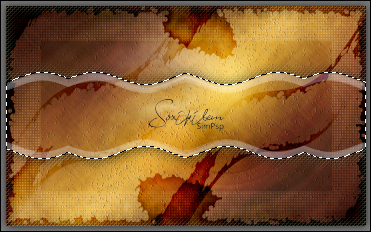
16 - Com a Ferramenta Magic Wand Tool: Mode: Add(Shift) - Tolerance e Feather em 0, selecione a parte de cima e debaixo como no print.
17 - Layers > New Raster layer. Effects > 3D Effects > Cutout: Color: #000000
18 - Effects > Texture Effects > Weave: Weave color: cor do background.
Selections > Select None. Effects > Plugins > FM Tile Tools > Blend Emboss: Default.
19 - Continuar na mesma layer. Com a Ferramenta Magic Wand Tool: Tolerance e Feather em 0, selecionar o centro:
Layers > New Raster Layer. Edit > Copy no Misted Paisagem. Edit > Paste Into Selection. Layers > Arrange > Move Down. Edit > Repeat Layer Move Down.
20 - Adjust > Sharpness > Sharpen. Effects > Texture Effects > Weave: Weave color: #FFFFFF
Effects > Plugins > FM Tile Tools > Blend Emboss: Default. Selections > Select None.
21 - Ativar a layer Copy of Raster 3. Effects > Image Effects > Seamless Tiling.
Layers > Duplicate. Layers > Properties > General > Blend Mode: Dodge - Opacity: 50%.
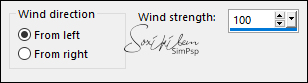
22 - Ativar a layer do topo (Raster 4). Edit > Copy no tube principal. Edit > Paste as New Layer. Posicionar à direita. Nomear esta layer para Tube Layers > Duplicate por duas vezes. Na layer Tube, aplicar: Effects > Distortion Effects: Wind.
Layers > Properties > General > Blend Mode: Burn.
23 - Ativar layer Copy of Tube e aplicar: Adjust > Blur > Gaussian Blur: 40. Layers > Properties > General > Blend Mode: Multiply.
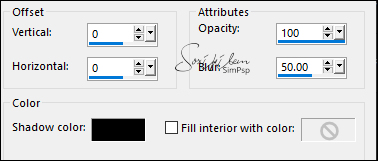
24 - Ativar a layer Copy (2) of Tube. Effects > 3D Effects > Drop Shadow: como preferir.
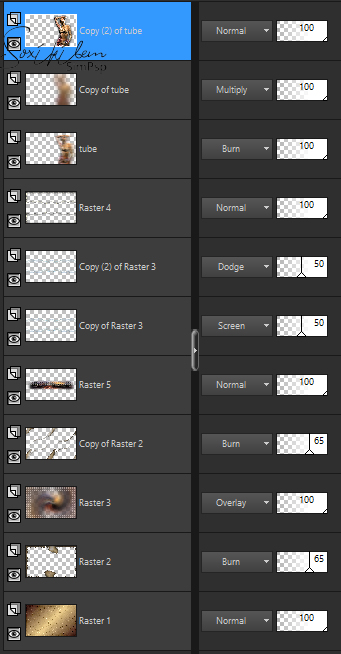
25 - Confira a posição das layers. Altere os Blends se achar necessário para combinar com as cores que esta usando.
26 - Edit > Copy Special > Copy Merged. Image > Add Borders > Symmetric: 2 px - color do foreground 2 px - color do background 2 px - color do foreground
27 - Selections > Select All. Image > Add Borders > Symmetric: 50px com qualquer cor. Selections > Invert. Edit > Paste > Into Selection. Adjust > Blur > Radial Blur.
28 - Effects > Texture Effects > Straw Wall.
Adjust > Sharpness > Sharpen.
29 - Selections > Invert. Effects > 3D Effects > Drop Shadow: 0, 0, 100, 50, cor background. Edit > Repeat Drop Shadow.
30 - Layers > New Raster Layer. Selections > Invert. Effects > 3D Effects > Cutout.
Layers > Merge > Merge Down.
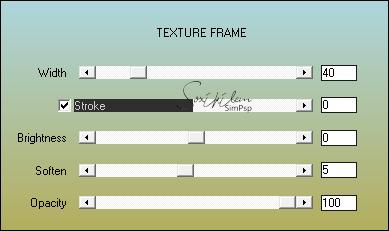
31 - Effects > Plugins > AAA Frames > Texture Frame.
Selections > Select None.
32 - Edit > Copy no titulo_i_inaciaBySoxikibem. Edit > Paste as New Layer. Posicione como preferir.
33 - Aplicar sua marca d'água ou assinatura. File > Export > JPEG Optimizer.
CREDITOS Versão 1: Tube by Silvina - Misted Paisagem by Nicole Versão 2: Tube by Kahlan - Misted by angel Star
Sinta-se à vontade para enviar suas versões. Terei todo o prazer em publicá-las em nosso site.
|