|
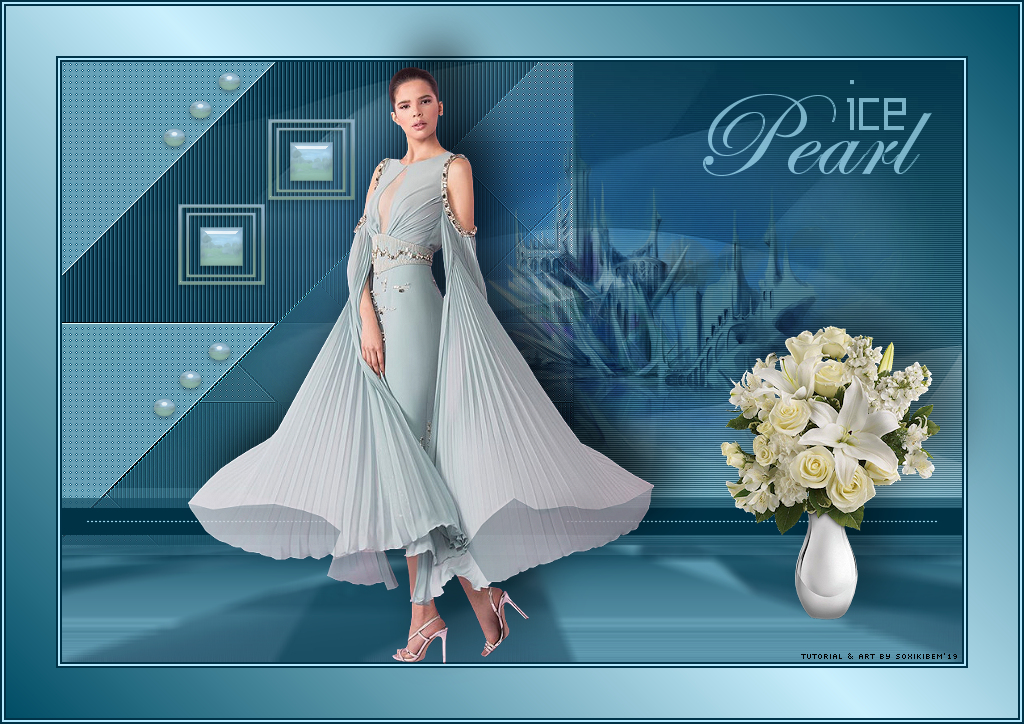
English Translation by Soxikibem Original Tutorial
MATERIAL 1 Tube of your choice. 1 Tube decorative of your choice. 1 Tube misted by Kad grafico75_soxikibem, decor75_xiki, perolas_xiki, titulo_icePearl_xiki Mask: Mask_GB_124
PLUGINS Carolaine and Sensibility, Kiwi's, Mura's, Unlimited 2.0, VanDerlee
TUTORIAL
1 - Open the tube, duplicate and close the original. Choose two colors: Foreground: #004d65 Background: #caf0fe
2 - Open the grafico75_soxikibem.pspimage. Paint with a gradient formed by the colors you choose.
3 - Effects > Plugin Kiwi's > Zig-Zack: 74, 145, 195, 94.
4 - Layers > New Raster Layer.Selections > Load/Save Selection > Load Selection From Alpha Channel: Selection #1.
5 - Paint selection with Gradient > Linear, Angle 0, Repeats 0, invert marked. Effects > Texture Effects > Blinds: Width 2, Opacity 75, foreground color, Horizontal marked. Selections > Select None. Layers > Merge > Merge Down.
6 - With the Magic Wand Tool set in Tolerance and
Feather 0,
7 - Effects > Plugin Carolaine and Sensibility > CS-LDots: 255, 3, 2.Effects > Edge Effects > Enhance. Selections > Select None.
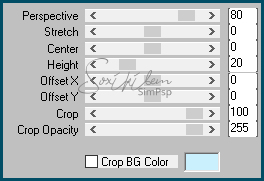
8 - With the Magic Wand Tool select as shown in the image:
9 - Effects > Texture Effects > Blinds: Width 4, Opacity 100, foreground color, light from left/top checked. Effects > Edge Effects > Enhance. Selections > Select None.
10 - Selections > Load/Save Selection > Load Selection From Alpha Channel: Selection #2.
11 - Effects > Plugin Unlimited 2.0 > BKg Designer sf10 II > FFU Edge Average: 163.
12 - Effects > Edge Effects > Enhance. Selections > Select None.
13 - Layers > Duplicate. Effects > Plugin Mura's > Perspective Tiling. Adjust Blur > Average: 11.
14 - Layers > New Raster Layer.Selections > Load/Save Selection > Load Selection From Alpha Channel: Selection #3. Paint selection with foreground color. Selections > Select None.
15 - Effects > Plugin VanDerlee > UnPlugged-X: Filters Defocus, Defocus 2, Transparency 0, Luminosity.
16 - Layers > New Raster Layer. Paint with color #FFFFFF (white).Apply Mask: Layers > New Mask Layer > Form Image > Mask_BG_124. Layers > Merge > Merge Group.
17 - Layers > Arrange > Move Down. Repeat: Layers > Arrange > Move Down. Layers > Properties > General > Blend Mode: Lighten.
18 - Edit > Copy on misted KaD_WinterScenery18.png Edit > paste as new layer above the mask layer. Image > Resize in 70%, all layers unchecked. Adjust > Sharpness > Sharpen.
19 - Effects > Image Effects > Offset: Horizontal 81, Vertical 90, Custom, Transparent. Layers > Properties > General > Blend Mode: Multiply.
20 - Edit > Copy on decor75_xiki png. Edit > paste as new layer. (Colorize if you prefer, with shade of the chosen colors) Effects > Image Effects > Offset: Horizontal -200, Vertical 200, Custom, Transparent.
21 - Layers > Duplicate. Effects > Image Effects > Offset: Horizontal -90, Vertical -85, Custom, Transparent.
22 - Edit > Copy on perolas_xiki png. Edit > paste as new layer. (Colorize if you prefer, with shade of the chosen colors) Effects > Image Effects > Offset: Horizontal -310, Vertical 250, Custom, Transparent.
23 - Layers > Duplicate. Effects > Image Effects > Offset: Horizontal -10, Vertical -270, Custom, Transparent.
24 - Edit > Copy on pontilhados_xiki png. Edit > paste as new layer on top of all layers.. Effects > Image Effects > Offset: Horizontal 240, Vertical -160, Custom, Transparent.
25 - Layers > Duplicate. Image > Mirror > Mirror Horizontal.
26 - Open file titulo_icePearl_xiki. Export as Custom Brush. Layers > New Raster Layer. With Brush Tool apply with background color.
28 - Borders: Image > Add Bordes > symmetric:2px foreground color 2px background color 2px foreground color 50px background color 2px foreground color 2px background color 2px foreground color
29 - Layers > New Adjustment Layer > White Balance: Change in General > Blend mode: Multiply and Opacity 50%.
30 - Layers > Merge > Merge visible. With the Magic Wand tool select the 50px border. Paint with Gradient > Linear with the chosen colors: Angle 45, Repeats 1, Invert unchecked. Selections > Select None.
31 - Edit > Copy in main tube. Edit > paste as new layer, position. Effects > 3D Effects > Drop Shadow: as you wish.
32 - Edit > Copy in decorative tube. Edit > paste as new layer, position. Effects > 3D Effects > Drop Shadow: as you wish.
33 - If you want to resize your work now. Apply your watermark or signature. File > Export > JPEG Optimizer...
CREDITS: Version 1: Tube by Mirosslava - Mask by Narah - Tube misted & Deco by Kad Version 2: Tube by Mirosslava - Mask by Narah - Tube misted by Kad - Tube Deco by CibiBijoux
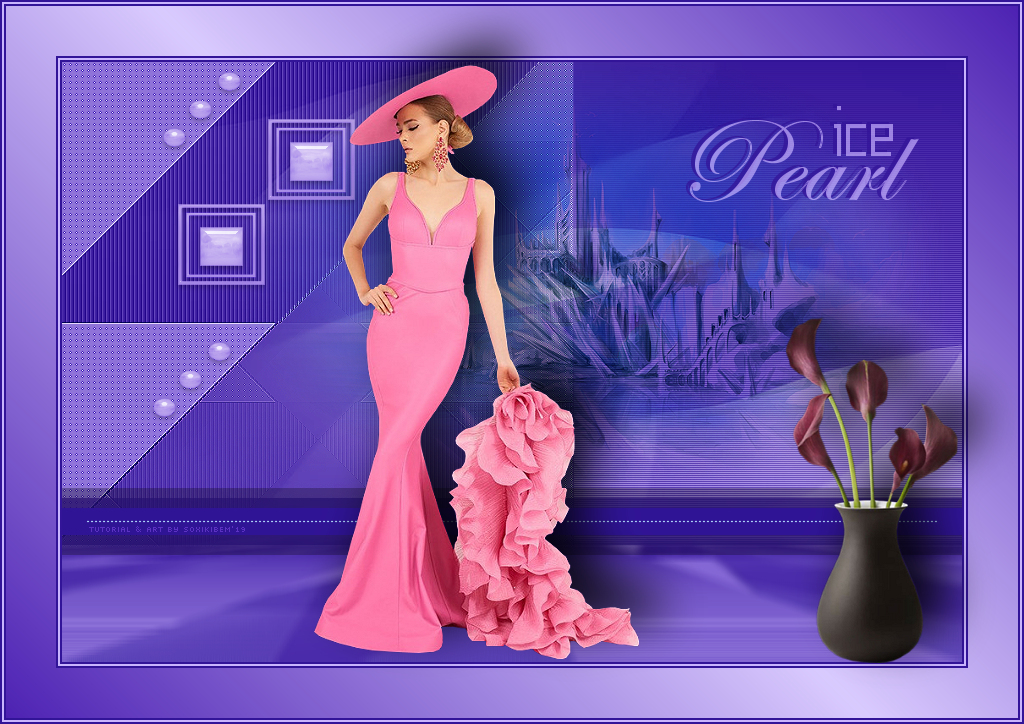
Tutorial by Soxikibem'19
Feel free to submit your versions. I'll be happy to post them on our site.
Envie sua versão para o e-mail: soxikibem.simpsp@gmail.com
|